If you’re like me, packing a tasty lunch for work can feel like a daily struggle. You want something that satisfies your cravings but also fits within your SmartPoints. It’s not always easy to strike that balance, right? That’s why I put together this list of 27 WW lunch ideas that are both delicious and smart.
This post is for those of you who care about your health and want to enjoy tasty meals without feeling guilty. Whether you’re following Weight Watchers, trying to eat healthier, or just looking for something different from the same old sandwiches, you’re in the right place. I know how hard it can be to find meals that are both nutritious and satisfying, especially when you’re busy and pressed for time.
Here’s what you can expect: a collection of lunch ideas that are simple, flavorful, and loaded with variety. From hearty salads to savory wraps, each recipe fits into your SmartPoints plan while still delivering on taste. You’ll discover meals that are easy to prepare, making your weekdays a little less hectic and a lot more enjoyable.
So, grab your lunchbox and get ready to spice up your work lunches. Let’s dive into these ideas that will keep your taste buds happy and your SmartPoints in check!
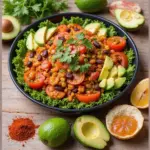
1. Quinoa & Black Bean Salad

Elevate your lunch routine with a delicious Quinoa & Black Bean Salad! This dish is packed with protein and flavor, making it a perfect midday meal. The fresh cilantro and zesty lime juice bring brightness, while a hint of cumin adds warmth. Toss in colorful bell peppers and crunchy red onions for a delightful texture. You’ll feel satisfied and energized, perfect for powering through your afternoon!
Recipe Overview:
Servings: 4
Prep Time: 15 minutes
Cook Time: 20 minutes
Total Time: 35 minutes
Calories: 230 per serving
Nutrition Information:
Calories: 230, Protein: 8g, Carbs: 40g, Fat: 5g
Ingredients:
– 1 cup quinoa, rinsed
– 1 can (15 oz) black beans, drained and rinsed
– 1 bell pepper, diced
– 1 small red onion, chopped
– 1/4 cup fresh cilantro, chopped
– Juice of 1 lime
– 1 tsp cumin
– Salt and pepper to taste
Step-by-Step Instructions:
1. Cook the quinoa according to package instructions. Allow it to cool.
2. In a large bowl, combine the cooled quinoa, black beans, diced bell pepper, chopped onion, and cilantro.
3. Drizzle lime juice over the mixture, then sprinkle in the cumin, salt, and pepper. Stir everything together until well mixed.
4. Serve the salad chilled or at room temperature for a refreshing lunch option.
Storage Tips: Store leftovers in airtight containers for up to 3 days in the fridge. This makes it easy to grab a healthy lunch on busy days!
Flavor Boosters: Want to add even more flavor? Try adding diced avocado or sweet corn for extra creaminess and sweetness. Enjoy your vibrant and filling salad!
Quinoa & Black Bean Salad
Editor’s Choice

HOMBERKING 10 Pack Borosilicate Glass Meal Prep Containers with Locking …

BetterBody Foods Organic Quinoa, Vegan, Gluten Free, Low Glycemic Rice R…
2. Turkey & Hummus Wraps

Lunchtime doesn’t have to be dull. Spice it up with delicious Turkey & Hummus Wraps that are simple to make and perfect for your busy day! Imagine biting into a soft whole wheat tortilla packed with savory turkey, creamy hummus, and a colorful crunch of fresh veggies. It’s a meal that’s not only filling but also light on calories, making it a fantastic option for anyone watching their SmartPoints.
Recipe Overview:
Servings: 2
Prep Time: 10 minutes
Cook Time: 0 minutes
Total Time: 10 minutes
Calories: 180 per serving
Nutrition Information:
Calories: 180, Protein: 15g, Carbs: 22g, Fat: 5g
Ingredients:
– 2 whole wheat tortillas
– 4 oz sliced turkey breast
– 1/4 cup hummus
– 1 cup mixed greens
– 1/2 cup sliced cucumber
– 1/2 cup shredded carrots
Step-by-Step Instructions:
1. Start by spreading 2 tablespoons of hummus on each tortilla. This adds flavor and moisture.
2. Next, layer the turkey, mixed greens, cucumber, and shredded carrots. Feel free to get creative!
3. Roll the tortillas tightly, slice them in half, and you’re ready to munch!
Tips:
Want to kick it up a notch? Add your favorite spices to the hummus for an extra kick! You can also experiment by swapping turkey for grilled chicken or roasted veggies for a vegetarian option.
Frequently Asked Questions:
Can I use different proteins? Absolutely! Chicken or roasted vegetables work great too! Mix it up to keep your lunches exciting and fresh.
Enjoy these wraps for a quick, satisfying meal that keeps you energized and ready to tackle your day!
Turkey & Hummus Wraps
Editor’s Choice

365 Everyday Value Organic Whole Wheat Tortillas, 10.5 oz (Frozen)

Mezete Hummus Variety Pack | Authentic Middle Eastern | Free from Preser…

50 Pack (100-Piece) 32 oz Meal Prep Containers Reusable with Lids 3-Comp…
3. Greek Yogurt & Berry Parfait

Kick off your lunch with a delicious Greek Yogurt & Berry Parfait! This delightful treat is not just tasty; it’s also a powerhouse of protein and antioxidants. Imagine creamy Greek yogurt layered with fresh, juicy berries and a satisfying crunch from granola. Plus, the colorful layers make it a feast for the eyes too!
Recipe Overview:
Servings: 1
Prep Time: 5 minutes
Cook Time: 0 minutes
Total Time: 5 minutes
Calories: 150 per serving
Nutrition Information:
Calories: 150, Protein: 10g, Carbs: 24g, Fat: 3g
Ingredients:
– 1 cup plain Greek yogurt
– 1/2 cup mixed berries (strawberries, blueberries, raspberries)
– 1/4 cup granola
– Drizzle of honey (optional)
Step-by-Step Instructions:
1. Start by placing half of the Greek yogurt in a tall glass or bowl.
2. Layer half of the mixed berries on top of the yogurt.
3. Sprinkle half of the granola over the berries.
4. Repeat the layers with the remaining yogurt, berries, and granola.
5. If you like, add a drizzle of honey for extra sweetness.
6. Dig in and enjoy immediately!
Tips:
– Use seasonal fruits for a fresh twist!
– Prepare it the night before, just keep the granola separate to maintain its crunch.
This parfait is perfect for a quick lunch or snack at work. Feel free to switch up the fruits based on your favorites or what’s in season. A quick, easy, and healthy choice for your busy day!
Greek Yogurt & Berry Parfait
Editor’s Choice


Purely Elizabeth, Coconut Cashew, Keto Granola, Grain-Free, Non-GMO, Pal…
HOMBERKING 10 Pack Borosilicate Glass Meal Prep Containers with Locking …
4. Chickpea Salad Sandwich

Craving a delicious sandwich that skips the meat? Try the Chickpea Salad Sandwich! This hearty option blends creamy mashed chickpeas with crunchy celery and zesty red onion, all held together with a touch of mayo. Serve it on whole-grain bread for a filling lunch that’s both satisfying and packed with flavor. It’s a tasty way to enjoy a guilt-free meal at work!
Recipe Overview:
Servings: 2
Prep Time: 10 minutes
Cook Time: 0 minutes
Total Time: 10 minutes
Calories: 220 per serving
Nutrition Information:
Calories: 220
Protein: 10g
Carbs: 30g
Fat: 8g
Ingredients:
– 1 can (15 oz) chickpeas, drained and rinsed
– 2 tbsp mayonnaise (or Greek yogurt)
– 1/4 cup diced celery
– 1/4 cup diced red onion
– Salt and pepper to taste
– 4 slices whole-grain bread
Step-by-Step Instructions:
1. Use a fork to mash the chickpeas in a bowl, leaving some chunks for texture.
2. Mix in the mayonnaise, diced celery, red onion, salt, and pepper until well combined.
3. Spread the mixture generously on whole-grain bread and assemble your sandwich.
4. Cut it in half and enjoy your delicious creation!
Tips:
Add sliced avocado for an extra creamy touch! This will not only enhance the flavor but also give you more healthy fats.
Frequently Asked Questions:
Can I use other beans? Yes, while chickpeas are best for texture, you can experiment with other beans too. Just keep in mind that the flavor and texture will change!
This Chickpea Salad Sandwich is perfect for busy workdays. It’s easy to make ahead and pack for lunch. Plus, it fits well into any smart eating plan. Enjoy a healthy, flavorful meal that keeps you energized throughout your day!
Fun fact: Chickpeas pack fiber and protein, fueling ww lunch ideas for work with under 6 SmartPoints. Pair with whole-grain bread for a satisfying, budget-friendly sandwich that keeps you on track at the office.
Chickpea Salad Sandwich
Editor’s Choice

Amazon Grocery, Canned Garbanzo Beans, 15.5 Oz (Previously Amazon Fresh,…

Oroweat Whole Grains 100% Whole Wheat Bread, Wheat Bread Free From Artif…

Hellmann’s Light Mayonnaise For A Creamy Condiment for Sandwiches and Si…
5. Sweet Potato & Black Bean Bowl

Craving a meal that’s both filling and nutritious? The Sweet Potato & Black Bean Bowl offers a delightful blend of flavors that will brighten your workday. Imagine tender, oven-roasted sweet potatoes paired with hearty black beans, all drizzled with a zesty lime-cilantro dressing. This dish not only satisfies your hunger but also fuels your body with essential nutrients.
Recipe Overview:
Servings: 2
Prep Time: 10 minutes
Cook Time: 25 minutes
Total Time: 35 minutes
Calories: 300 per serving
Nutrition Information:
Calories: 300
Protein: 12g
Carbs: 54g
Fat: 6g
Ingredients:
– 2 medium sweet potatoes, cubed
– 1 can (15 oz) black beans, drained and rinsed
– 1/2 cup corn (frozen or canned)
– Fresh cilantro, chopped
– Juice of 1 lime
– Olive oil, salt, and pepper to taste
Step-by-Step Instructions:
1. Preheat your oven to 400°F (200°C).
2. Toss the sweet potato cubes in olive oil, salt, and pepper, then spread them evenly on a baking sheet.
3. Roast the sweet potatoes for about 25 minutes, or until they are tender and slightly caramelized.
4. In a large bowl, mix the roasted sweet potatoes with black beans, corn, chopped cilantro, and lime juice.
5. Stir everything together until well combined. Serve warm and enjoy!
Tips:
– Consider making a big batch on the weekend for easy lunches throughout the week.
– Want to switch it up? Add in bell peppers or zucchini for extra veggies!
This bowl is not just a meal; it’s a celebration of flavors. The sweet potatoes provide natural sweetness, while black beans add a satisfying protein punch. Perfect for meal prep or a quick office lunch, this dish keeps you energized and ready to tackle your tasks!
Sweet Potato & Black Bean Bowl
Editor’s Choice

Bento Box Adult Lunch Box, Containers for Adults Men Women with 4 Compar…

YARRAMATE 16oz/470ml Glass Olive Oil Sprayer for Cooking with Stickers, …

Zulay Kitchen Metal Lemon Squeezer – Sturdy & Easy-to-Use Handheld Citru…
6. Spinach & Feta Stuffed Chicken

Get ready to elevate your lunch game with a delicious Spinach & Feta Stuffed Chicken. This mouthwatering dish combines juicy chicken breasts with a zesty filling of spinach, creamy feta cheese, and aromatic herbs. You’ll feel like a gourmet chef without the fuss! Plus, it’s loaded with protein, making it a perfect choice for a satisfying workday meal.
Recipe Overview:
– Servings: 4
– Prep Time: 15 minutes
– Cook Time: 30 minutes
– Total Time: 45 minutes
– Calories: 250 per serving
Nutrition Information:
Calories: 250, Protein: 30g, Carbs: 3g, Fat: 12g
Ingredients:
– 4 chicken breasts
– 1 cup spinach, chopped
– 1/2 cup feta cheese, crumbled
– 1 tsp garlic powder
– Salt and pepper to taste
– Olive oil for cooking
Step-by-Step Instructions:
1. Preheat your oven to 375°F (190°C). This ensures even cooking.
2. In a mixing bowl, combine the chopped spinach, crumbled feta, garlic powder, salt, and pepper. Stir until well mixed.
3. Carefully cut a pocket into each chicken breast. Stuff each pocket with the spinach and feta mixture.
4. Heat a bit of olive oil in a skillet over medium heat. Sear the stuffed chicken for 3-4 minutes on each side until browned.
5. Transfer the chicken to your preheated oven and bake for 20-25 minutes, or until fully cooked.
Tips:
Serve with a side of roasted vegetables for a complete meal. You can also pair it with a light salad for extra freshness!
Frequently Asked Questions:
– Can I use different cheeses? Yes! Mozzarella or goat cheese are excellent alternatives that add unique flavors.
– How can I make it ahead of time? Prepare the stuffed chicken and refrigerate it. Just bake it when you’re ready to eat!
Spinach & Feta Stuffed Chicken
Editor’s Choice

OmieBox Bento Box for Kids – Insulated Bento Lunch Box with Leak Proof V…

TrendPlain 16oz/470ml Glass Olive Oil Sprayer for Cooking – 2 in 1 Olive…

KitchenAid All Purpose Kitchen Shears with Protective Sheath Durable Sta…
7. Cauliflower Rice Stir-Fry

Craving a tasty yet healthy meal? Try this Cauliflower Rice Stir-Fry! It’s a fantastic low-carb option that bursts with flavor. Imagine vibrant bell peppers and sweet peas mingling with fluffy cauliflower rice. You can even toss in your favorite protein to make it more filling. This dish is not only quick to prepare but also a sneaky way to add more veggies to your day.
Recipe Overview:
Servings: 4
Prep Time: 10 minutes
Cook Time: 10 minutes
Total Time: 20 minutes
Calories: 150 per serving
Nutrition Information:
Calories: 150, Protein: 10g, Carbs: 18g, Fat: 5g
Ingredients:
– 1 head of cauliflower, grated into rice
– 1 cup bell peppers, diced
– 1 cup peas and carrots mix
– 2 eggs, beaten (optional)
– Soy sauce to taste
– Olive oil for cooking
Step-by-Step Instructions:
1. Heat olive oil in a large skillet over medium heat.
2. Add the cauliflower rice and sauté for about 5 minutes until tender.
3. Stir in the diced bell peppers and the peas and carrots mix. Cook for another 2-3 minutes until the veggies are bright and slightly soft.
4. If you’re adding eggs, push the veggies to one side and scramble them in the skillet.
5. Mix everything together, add soy sauce to taste, and enjoy your delicious stir-fry!
Tips:
Feel free to swap in your favorite veggies like broccoli, zucchini, or snap peas for a personal touch.
Frequently Asked Questions:
Can I make this without eggs? Absolutely! Just skip them for a vegan-friendly version.
This Cauliflower Rice Stir-Fry is perfect for lunch at work or a quick dinner at home. You can prepare it in no time, and it’s sure to satisfy your cravings while keeping you on track with your healthy eating goals. So grab your ingredients and give it a try today!
Cauliflower Rice Stir-Fry
Editor’s Choice

365 by Whole Foods Market, Organic Riced Cauliflower, 12 oz, (Frozen)


Pompeian Robust Extra Virgin Olive Oil, Contains Polyphenols, First Cold…
8. Caprese Salad Skewers

Ready to impress your coworkers with a fresh and tasty lunch? Try making Caprese Salad Skewers! These colorful bites are not just pretty; they burst with flavor. With juicy cherry tomatoes, creamy mozzarella, and fragrant basil, each skewer is a delightful treat. A drizzle of balsamic reduction adds a touch of sweetness, making these skewers a perfect snack or light meal.
Recipe Overview:
Servings: 4
Prep Time: 10 minutes
Total Time: 10 minutes
Calories: 120 per serving
Nutrition Information:
Calories: 120, Protein: 8g, Carbs: 6g, Fat: 7g
Ingredients:
– 1 pint cherry tomatoes
– 8 oz fresh mozzarella balls
– Fresh basil leaves
– Balsamic reduction for drizzling
– Skewers or toothpicks
Step-by-Step Instructions:
1. Take a skewer and thread on a cherry tomato.
2. Next, add a fresh basil leaf, followed by a mozzarella ball.
3. Repeat this pattern until the skewer is filled, leaving some space at both ends.
4. Drizzle balsamic reduction over the skewers just before serving.
Tips:
– These skewers are fantastic for meal prep. Make them ahead of time and grab them on the go!
– If you’re short on time, consider using pre-packaged mozzarella balls.
– These colorful skewers not only taste great; they also look stunning on your lunch table.
Frequently Asked Questions:
Can I use regular mozzarella? Yes! Just cut it into bite-sized cubes for easy assembly.
With this simple recipe, your work lunches will never be boring again. Enjoy the fresh flavors while keeping your SmartPoints in check!
Caprese Salad Skewers
Editor’s Choice

300PCS Cocktail Picks Bamboo Skewers for Appetizers, FATLODA Paddle Wood…

365 by Whole Foods Market, Balsamic Vinegar Of Modena, 16.9 Fl Oz
Bento Box Adult Lunch Box, Containers for Adults Men Women with 4 Compar…
9. Zucchini Noodles with Marinara Sauce

Craving a delicious yet healthy meal? Try Zucchini Noodles with Marinara Sauce! This dish satisfies your pasta cravings while keeping carbs in check. Fresh zucchini spirals soak up rich marinara, topped with fragrant basil for a burst of flavor. It’s a perfect choice for a quick lunch that feels indulgent yet light.
Recipe Overview:
– Servings: 2
– Prep Time: 10 minutes
– Cook Time: 10 minutes
– Total Time: 20 minutes
– Calories: 180 per serving
Nutrition Information:
– Calories: 180
– Protein: 6g
– Carbs: 12g
– Fat: 7g
Ingredients:
– 2 medium zucchinis, spiralized
– 1 cup marinara sauce
– 1 tsp olive oil
– Fresh basil for garnish
– Salt and pepper to taste
Step-by-Step Instructions:
1. Heat the olive oil in a skillet over medium heat.
2. Add the spiralized zucchini noodles. Sauté for about 3-4 minutes until they start to soften.
3. Pour the marinara sauce over the noodles and stir well to combine.
4. Season with salt and pepper to taste. Serve garnished with fresh basil.
Tips for Enjoyment: Want to boost the protein? Add grilled chicken or turkey for a heartier meal!
Frequently Asked Questions:
– *Can I make this ahead of time?* It’s best enjoyed fresh, but you can prepare the zucchini noodles in advance to save time at lunchtime.
This recipe is not only simple but also perfect for meal prepping. Just spiralize the zucchini and store it in the fridge. When you’re ready to eat, sauté it quickly and add sauce. Enjoy your flavorful, healthy lunch without the hassle!
Zucchini Noodles with Marinara Sauce
Editor’s Choice

Brieftons 5-Blade Vegetable Spiralizer: Strongest-Heaviest Spiral Slicer…
50 Pack (100-Piece) 32 oz Meal Prep Containers Reusable with Lids 3-Comp…
YARRAMATE 16oz/470ml Glass Olive Oil Sprayer for Cooking with Stickers, …
10. Savory Egg Muffins

Start your lunch with a burst of flavor and nutrition with Savory Egg Muffins! These delightful treats are not only easy to make but also packed with veggies and protein, making them a perfect choice for a grab-and-go meal. You can whip them up in advance and customize them with your favorite ingredients, ensuring a fresh twist every time you enjoy them.
Imagine biting into a warm muffin filled with spinach and peppers. The cheese melts in your mouth, making each bite satisfying. These muffins are trending on meal prep blogs, and it’s easy to see why—they are simple, delicious, and healthy!
Recipe Overview:
Servings: 12
Prep Time: 15 minutes
Cook Time: 20 minutes
Total Time: 35 minutes
Calories: 100 per muffin
Nutrition Information:
Calories: 100, Protein: 7g, Carbs: 2g, Fat: 6g
Ingredients:
– 8 large eggs
– 1 cup fresh spinach, chopped
– 1/2 cup bell peppers, diced
– 1/2 cup shredded cheese (your choice)
– Salt and pepper to taste
Step-by-Step Instructions:
1. Preheat your oven to 350°F (175°C) and grease a muffin tin.
2. In a large bowl, whisk the eggs with a pinch of salt and pepper.
3. Fold in the chopped spinach, diced bell peppers, and cheese until well combined.
4. Pour the mixture into the muffin tin, filling each cup about two-thirds full.
5. Bake for 20 minutes or until the muffins are set and lightly golden.
6. Let them cool for a few minutes before gently removing them from the tin. Enjoy warm or store for later!
Tips:
– Store your muffins in the fridge for up to 5 days.
– Reheat them in the microwave for a quick meal.
– You can freeze these muffins for up to 3 months. Just wrap them individually to keep them fresh!
These Savory Egg Muffins make lunchtime easy and enjoyable, allowing you to focus on your day without sacrificing flavor or nutrition. Perfect for busy mornings or a nutritious lunch, they’re sure to become a staple in your meal prep routine!
Savory Egg Muffins
Editor’s Choice

2Pack Silicone Muffin Pan for Baking with Metal Reinforced Frame, 12 Cup…

50 Pack (100-Piece) 24 oz Meal Prep Containers Reusable with Lids, Sturd…

NileHome Stainless Steel Whisk Set 8″ 10″ 12″ Kitchen Whisk Balloon Whis…
11. Lentil Soup

Warm up your lunch break with a delicious bowl of Lentil Soup! This hearty dish not only fills you up but also packs a punch of nutrition. Lentils are loaded with protein and fiber, while colorful veggies and aromatic spices make each spoonful a delight. Pair it with some whole grain bread for a complete meal that’s both satisfying and healthy.
Recipe Overview:
Servings: 6
Prep Time: 10 minutes
Cook Time: 30 minutes
Total Time: 40 minutes
Calories: 180 per serving
Nutrition Information:
Calories: 180
Protein: 12g
Carbs: 32g
Fat: 2g
Ingredients:
– 1 cup lentils, rinsed
– 1 onion, diced
– 2 carrots, diced
– 2 celery stalks, diced
– 4 cups vegetable broth
– 1 tsp cumin
– Salt and pepper to taste
Step-by-Step Instructions:
1. In a large pot, heat a splash of olive oil over medium heat. Add the diced onion, carrots, and celery. Sauté until they soften, about 5-7 minutes.
2. Stir in the rinsed lentils, vegetable broth, cumin, salt, and pepper. Bring the mixture to a boil.
3. Once boiling, reduce the heat and let it simmer for about 30 minutes, or until the lentils are tender.
4. Taste and adjust the seasoning if needed. Serve warm and enjoy!
Tips:
– Blend the soup for a creamy texture if you prefer. Just use an immersion blender right in the pot!
– Want to mix it up? Add spinach or diced tomatoes for extra flavor and nutrients.
This Lentil Soup is perfect for meal prepping or cozying up on a chilly day. It’s budget-friendly and easy to make, ensuring you always have a warm, nutritious meal at your fingertips. Enjoy the rich flavors and comforting aroma that will surely brighten your workday!
Lentil Soup
Editor’s Choice

Immersion Blender Handheld Corded Hand Blenders Set 1100W, Trigger Varia…

Airtight Food Storage Containers with Lids, 24 PCS Kitchen and Pantry Or…

Pacific Foods Organic Low Sodium Vegetable Broth, 32 oz (Pack of 5)
12. Thai Chicken Salad

Imagine taking a break from your busy workday to enjoy a refreshing Thai Chicken Salad. This dish is not just a meal; it’s a mini-vacation for your taste buds! With crunchy veggies, tender chicken, and a creamy peanut dressing, this salad brings a burst of flavors that will brighten your day. Ideal for warm afternoons, it’s both healthy and satisfying.
Recipe Overview:
Servings: 4
Prep Time: 15 minutes
Cook Time: 10 minutes
Total Time: 25 minutes
Calories: 250 per serving
Nutrition Information:
Calories: 250, Protein: 20g, Carbs: 22g, Fat: 12g
Ingredients:
– 2 cups shredded rotisserie chicken
– 1 cup cabbage, shredded
– 1 cup carrots, grated
– 1/2 cup cilantro, chopped
– 1/4 cup peanut butter
– 2 tbsp soy sauce
– Juice of 1 lime
Step-by-Step Instructions:
1. In a large bowl, mix the shredded chicken, cabbage, carrots, and cilantro.
2. In another bowl, whisk together the peanut butter, soy sauce, and lime juice until smooth.
3. Pour the dressing over the salad mixture. Toss it all together until everything is well coated. Serve immediately or store the dressing separately for later!
Tips:
– Add crushed peanuts on top for an extra crunch!
– This salad stays fresh in the fridge for a couple of days if you keep the dressing separate.
Frequently Asked Questions:
Can I make this salad ahead of time? Yes, just store the salad and dressing in separate containers until you’re ready to eat. This way, it stays fresh and tasty!
Enjoy this delightful salad for lunch and feel energized for the rest of your day!
Thai Chicken Salad
Editor’s Choice
50 Pack (100-Piece) 32 oz Meal Prep Containers Reusable with Lids 3-Comp…

PBfit 30 Ounce Classic Peanut Butter Powder, Powdered Peanut Butter Spre…

OXO Good Grips Salad Spinner | Lettuce Spinner | Fruit Washer | Fruit Wa…
13. Roasted Veggie & Quinoa Bowl

Brighten your lunch break with a Roasted Veggie & Quinoa Bowl! This dish bursts with colors, flavors, and essential nutrients. Picture roasted seasonal vegetables mingling with light and fluffy quinoa. And for an extra kick, add a sprinkle of tangy feta cheese. It’s not just healthy; it’s a satisfying meal that keeps you energized throughout the day.
Let’s dive into how easy it is to make this bowl. In about 40 minutes, you can whip up two servings. This recipe fits nicely into your meal prep routine. Store it in jars for grab-and-go lunches. Plus, it’s budget-friendly, making it perfect for any workweek.
Recipe Overview:
Servings: 2
Prep Time: 15 minutes
Cook Time: 25 minutes
Total Time: 40 minutes
Calories: 290 per serving
Nutrition Information:
Calories: 290, Protein: 10g, Carbs: 48g, Fat: 8g
Ingredients:
– 1 cup quinoa, rinsed
– 2 cups mixed seasonal vegetables (like zucchini, bell peppers, and carrots)
– 1/2 cup feta cheese, crumbled
– Olive oil, salt, and pepper to taste
Step-by-Step Instructions:
1. Preheat your oven to 400°F (200°C).
2. Toss the mixed vegetables in olive oil, salt, and pepper. Spread them on a baking sheet and roast for 25 minutes until tender.
3. While the veggies are roasting, cook the quinoa following package instructions.
4. Once everything is cooked, combine the quinoa and roasted veggies in a bowl. Top with crumbled feta cheese.
Tips:
– Use leftover roasted vegetables for even quicker prep.
– This bowl is perfect for meal prep. Just store in jars for easy access during the week!
– Feel free to mix in your favorite proteins, like grilled chicken or chickpeas, for added nutrition.
– Can’t find fresh veggies? Frozen ones work too; just adjust roasting time if needed.
With this Roasted Veggie & Quinoa Bowl, you’ll enjoy a delicious and healthy lunch that keeps you satisfied. Give it a try and enjoy brightening your workday meals!
Roasted Veggie & Quinoa Bowl
Editor’s Choice
HOMBERKING 10 Pack Borosilicate Glass Meal Prep Containers with Locking …

IMUSA 0.5Qt Mini Cast Aluminum Traditional Caldero Set with Lid,Silver

Fullstar The Original Pro Chopper – Vegetable Chopper and Spiralizer, Fo…
14. Cabbage & Beef Stir-Fry

Craving a quick, healthy meal? Try this delightful Cabbage & Beef Stir-Fry! It’s packed with tender beef strips, crunchy cabbage, and vibrant carrots. This dish is not just fast to prepare; it’s also a satisfying way to fuel your day. Add your favorite sauce to elevate the flavors and enjoy a meal that’s as delicious as it is nutritious.
Recipe Overview:
Servings: 4
Prep Time: 10 minutes
Cook Time: 15 minutes
Total Time: 25 minutes
Calories: 280 per serving
Nutrition Information:
Calories: 280
Protein: 25g
Carbs: 9g
Fat: 15g
Ingredients:
– 1 lb lean beef strips
– 4 cups shredded cabbage
– 2 carrots, sliced
– Soy sauce or teriyaki sauce to taste
– Olive oil for cooking
Step-by-Step Instructions:
1. Heat a tablespoon of olive oil in a large skillet over medium-high heat.
2. Add the beef strips and stir-fry until they are nicely browned. Once cooked, remove the beef from the skillet and set it aside.
3. In the same skillet, toss in the shredded cabbage and sliced carrots. Stir-fry until they become tender, about 5-7 minutes.
4. Return the cooked beef to the skillet. Pour in your chosen sauce and mix everything well to combine.
5. Serve the stir-fry hot and enjoy your meal!
Tips:
Pair this dish with brown rice for an even heartier option! Got ground beef instead? That works too—just adjust your cooking time for a quick, versatile meal.
This stir-fry is perfect for busy workdays or when you want something healthy without much fuss. It’s quick, easy, and oh-so-satisfying!
Cabbage & Beef Stir-Fry
Editor’s Choice

CAROTE Nonstick Frying Pan Skillet,Non Stick Granite Fry Pan Egg Pan Ome…

Kikkoman Less Sodium Soy Sauce Dispenser – 5 oz.
TrendPlain 16oz/470ml Glass Olive Oil Sprayer for Cooking – 2 in 1 Olive…
15. Balsamic Chicken with Veggies

Experience a burst of flavor with Balsamic Chicken and Veggies! This dish combines juicy chicken breasts marinated in zesty balsamic vinegar and olive oil, roasted to perfection alongside a colorful array of seasonal vegetables. It’s a simple yet impressive meal that will make your lunch feel special.
Whether you’re looking for a nutritious work lunch or a wholesome dinner, this recipe fits the bill. It’s easy to prepare and takes just 45 minutes from start to finish. Plus, at only 300 calories per serving, it’s a guilt-free option that doesn’t skimp on taste.
Recipe Overview:
Servings: 4
Prep Time: 15 minutes
Cook Time: 30 minutes
Total Time: 45 minutes
Calories: 300 per serving
Nutrition Information:
Calories: 300, Protein: 36g, Carbs: 10g, Fat: 12g
Ingredients:
– 4 chicken breasts
– 2 cups assorted vegetables (zucchini, bell peppers, cherry tomatoes)
– 1/4 cup balsamic vinegar
– 2 tbsp olive oil
– Salt and pepper to taste
Step-by-Step Instructions:
1. Preheat your oven to 375°F (190°C).
2. In a bowl, whisk together balsamic vinegar, olive oil, salt, and pepper to create a marinade.
3. Coat the chicken breasts in the marinade and let them soak for at least 30 minutes for maximum flavor.
4. Toss your vegetables in the leftover marinade, spreading them evenly on a baking sheet.
5. Place the marinated chicken on the same baking sheet and roast for 30 minutes, or until the chicken is cooked through.
Tips: Serve with a side of quinoa or brown rice for a complete and filling meal.
Frequently Asked Questions:
Can I use other proteins? Absolutely! Pork or fish can also shine in this dish, giving you plenty of options to keep your meals exciting.
Balsamic Chicken with Veggies
Editor’s Choice

Colavita Balsamic Vinegar of Modena, 17 Ounce Bottle

Pompeian Extra Virgin Olive Oil Variety Pack – Smooth, Robust, Naturally…
50 Pack (100-Piece) 32 oz Meal Prep Containers Reusable with Lids 3-Comp…
16. Whole Wheat Pasta Salad

Looking for a quick, healthy lunch option for your busy workweek? The Whole Wheat Pasta Salad is your go-to dish! This salad bursts with fresh flavors from cherry tomatoes and crunchy cucumbers, all dressed in a zesty lemon-olive oil mix. It’s not only delicious but also loaded with nutrients, making it perfect for meal prep. Plus, it stores well in the fridge, so you can enjoy it for days!
Here’s how to whip up this delightful salad in no time. You’ll need just a few fresh ingredients and about 25 minutes to prepare. This recipe serves four, making it ideal for sharing or for multiple lunches throughout the week.
Recipe Overview:
Servings: 4
Prep Time: 15 minutes
Cook Time: 10 minutes
Total Time: 25 minutes
Calories: 190 per serving
Nutrition Information:
Calories: 190, Protein: 6g, Carbs: 30g, Fat: 6g
Ingredients:
– 2 cups whole wheat pasta
– 1 cup cherry tomatoes, halved
– 1 cup cucumber, diced
– 2 tbsp olive oil
– Juice of 1 lemon
– Salt and pepper to taste
Step-by-Step Instructions:
1. Cook the whole wheat pasta according to the package instructions. Once cooked, drain and set aside.
2. In a large mixing bowl, combine the pasta, cherry tomatoes, diced cucumber, olive oil, lemon juice, salt, and pepper.
3. Toss everything together until well mixed. You can serve it chilled or at room temperature.
Tips:
– Add olives or crumbled feta cheese for a burst of flavor!
– This salad keeps well in the fridge for up to three days, making it a perfect option for meal prepping.
By turning to this Whole Wheat Pasta Salad, you’re not just filling your stomach; you’re nourishing your body with wholesome ingredients. It’s a satisfying, guilt-free meal you can feel good about. Enjoy every bite!
Whole Wheat Pasta Salad
Editor’s Choice
Bento Box Adult Lunch Box, Containers for Adults Men Women with 4 Compar…

365 by Whole Foods Market, Organic Whole Wheat Penne Rigate, 16 Ounce
TrendPlain 16oz/470ml Glass Olive Oil Sprayer for Cooking – 2 in 1 Olive…
17. Cucumber & Tuna Bites

Looking for a quick and tasty snack that won’t derail your healthy eating goals? Cucumber & Tuna Bites are your answer! These delightful treats combine crisp cucumber slices with a zesty tuna salad that’s packed with protein. Perfect for busy workdays, they offer a refreshing crunch that satisfies your hunger without weighing you down.
Recipe Overview:
– Servings: 4
– Prep Time: 10 minutes
– Cook Time: 0 minutes
– Total Time: 10 minutes
– Calories: 90 per serving
Nutrition Information:
– Calories: 90
– Protein: 12g
– Carbs: 2g
– Fat: 3g
Ingredients:
– 1 can of tuna, drained
– 1/4 cup of Greek yogurt
– 1/2 tsp of mustard
– 1 cucumber, sliced
Step-by-Step Instructions:
1. In a bowl, mix the drained tuna, Greek yogurt, and mustard until everything is well blended.
2. Take a cucumber slice and top it with a generous spoonful of the tuna mixture.
3. Arrange them on a plate, and enjoy these cool bites as a snack or light lunch!
Tips: For an extra zing, add diced pickles to the tuna mix for a tangy crunch!
Frequently Asked Questions:
– Can I substitute mayonnaise for yogurt? Absolutely! Mayonnaise will give it a creamier texture if you prefer.
These Cucumber & Tuna Bites not only taste great, but they also fit well into your meal prep routine. They are budget-friendly, easy to whip up, and keep well in the fridge. Enjoy them at your desk or pack them for a picnic. They make healthy eating both simple and satisfying!
Cucumber & Tuna Bites
Editor’s Choice
50 Pack (100-Piece) 32 oz Meal Prep Containers Reusable with Lids 3-Comp…
18. Eggplant & Tomato Bake

Get ready to savor the comforting flavors of Eggplant & Tomato Bake! This dish brings together layers of tender eggplant and juicy tomatoes, topped with fragrant herbs. It’s not just a meal; it’s a warm hug for your taste buds. Plus, it’s excellent for batch cooking, making it a smart choice for weekday lunches.
Enjoy the ease of preparing this dish. It takes just 15 minutes to prep and only one hour from start to finish. You’ll get four hearty servings, each packed with flavor and nutrition.
Recipe Overview:
Servings: 4
Prep Time: 15 minutes
Cook Time: 45 minutes
Total Time: 1 hour
Calories: 220 per serving
Nutrition Information:
Calories: 220
Protein: 7g
Carbs: 30g
Fat: 10g
Ingredients:
– 2 eggplants, sliced
– 4 tomatoes, sliced
– 1/4 cup olive oil
– 1 tsp Italian herbs
– Salt and pepper to taste
Step-by-Step Instructions:
1. Preheat your oven to 375°F (190°C).
2. In a baking dish, layer the eggplant and tomato slices, alternating them for a beautiful presentation.
3. Drizzle the layers with olive oil, then sprinkle the Italian herbs, salt, and pepper on top.
4. Bake for 45 minutes or until the eggplant is soft and the flavors meld beautifully.
Tips: Pair this bake with crusty bread for a satisfying meal!
Frequently Asked Questions:
Can I add cheese? Absolutely! Sprinkle some mozzarella on top before baking for an extra cheesy delight!
This Eggplant & Tomato Bake is a delightful way to enjoy healthy eating without sacrificing taste. Enjoy it warm or at room temperature, and make your lunch break something to look forward to!
Eggplant & Tomato Bake
Editor’s Choice
HOMBERKING 10 Pack Borosilicate Glass Meal Prep Containers with Locking …

AOZITA 17oz Glass Olive Oil Bottle Dispenser – 500ml Green Oil and Vineg…

Eastanbul Italian Seasoning, 1.76oz, Italian Seasoning Blend, Herbs Mix,…
19. Shrimp Tacos with Cabbage Slaw

Brighten up your lunch routine with delicious Shrimp Tacos topped with refreshing cabbage slaw! These tacos are not only quick to make but also full of flavor and protein. Imagine biting into a warm corn tortilla filled with juicy shrimp, crunchy slaw, and a zesty squeeze of lime. It’s a meal that feels like a mini vacation, perfect for any workday!
Here’s how to make it happen:
Recipe Overview:
Servings: 4
Prep Time: 15 minutes
Cook Time: 10 minutes
Total Time: 25 minutes
Calories: 220 per serving
Nutrition Information:
Calories: 220, Protein: 25g, Carbs: 20g, Fat: 5g
Ingredients:
– 1 lb shrimp, peeled and deveined
– 1 cup cabbage, shredded
– 1/4 cup cilantro, chopped
– Juice of 1 lime
– Corn tortillas
Step-by-Step Instructions:
1. Heat a skillet over medium heat. Cook the shrimp for about 5 minutes, until they turn pink and opaque.
2. While the shrimp cooks, mix the shredded cabbage, chopped cilantro, and lime juice in a bowl to create your slaw.
3. Once the shrimp is ready, fill each corn tortilla with a portion of shrimp. Top generously with the cabbage slaw.
4. Serve with extra lime wedges on the side for that bright citrus kick!
Tips:
– Add sliced avocado for a creamy texture!
– Try mixing in other veggies like bell peppers or carrots for extra crunch.
Frequently Asked Questions:
Can I swap shrimp for chicken? Absolutely! Grilled chicken is a fantastic alternative.
These Shrimp Tacos are not just tasty; they’re also a nutritious choice that keeps you energized throughout the day. Plus, they’re easy to customize, so feel free to get creative! Enjoy your flavorful, satisfying lunch that’s sure to impress.
Turn busy workdays into flavor wins with Shrimp Tacos and cabbage slaw that fit SmartPoints. Quick to make, high in protein, and easy to pack for your ww lunch ideas for work. Each bite feels like a mini vacation, without sacrificing taste or rhythm.
Shrimp Tacos with Cabbage Slaw
Editor’s Choice

20. Spicy Tofu & Broccoli Stir-Fry

Spice up your lunch routine with a delicious Spicy Tofu & Broccoli Stir-Fry! This dish is perfect for anyone looking for a quick, nutritious meal. With crispy tofu and vibrant broccoli coated in a zesty sauce, it’s both satisfying and packed with protein. Plus, it’s easy to make, fitting perfectly into your busy workday.
Recipe Overview:
Servings: 4
Prep Time: 10 minutes
Cook Time: 15 minutes
Total Time: 25 minutes
Calories: 240 per serving
Nutrition Information:
Calories: 240 | Protein: 15g | Carbs: 14g | Fat: 15g
Ingredients:
– 14 oz firm tofu, cubed
– 4 cups broccoli florets
– 2 tbsp soy sauce
– 1 tbsp sriracha (adjust to taste)
– Olive oil for cooking
Step-by-Step Instructions:
1. Heat a drizzle of olive oil in a skillet over medium heat.
2. Add the cubed tofu and fry until golden brown on all sides, which should take about 10 minutes.
3. Toss in the broccoli and continue cooking for another 5 minutes until it’s tender yet crisp.
4. Stir in soy sauce and sriracha, cooking for an additional 2 minutes to blend the flavors.
Tips: Serve this stir-fry over fluffy brown rice for a filling meal! This not only adds texture but also makes your dish more hearty and satisfying.
Frequently Asked Questions:
Can I swap out the broccoli for other veggies? Absolutely! Bell peppers and carrots work wonderfully, too. Get creative and use whatever you have on hand for a customized dish!
Enjoy this spicy delight for lunch. It’s a quick fix that keeps you energized and ready to tackle your day!
Spicy Tofu & Broccoli Stir-Fry
Editor’s Choice

Mori-Nu Silken Tofu Extra Firm, Velvety Smooth and Creamy, Low Fat, Glut…

TABASCO Brand Sriracha Sauce, Medium Hot Sauce, Easy-to-Squeeze Bottle, …
Pompeian Extra Virgin Olive Oil Variety Pack – Smooth, Robust, Naturally…
21. Chia Seed Pudding

Looking for a quick and satisfying treat? Chia Seed Pudding is your answer! This creamy delight is not only a feast for your taste buds but also packed with nutrients. It’s an excellent source of fiber and omega-3 fatty acids, making it a smart choice for any meal prep. Plus, it’s easy to whip up, needing just a few ingredients you probably already have in your pantry.
Imagine waking up to a delicious breakfast that’s ready in minutes. Chia Seed Pudding is perfect for busy mornings or a mid-afternoon snack at work. As seen in many health blogs, this pudding can be topped with fresh fruits like berries or bananas, adding a pop of color and flavor.
Recipe Overview:
– Servings: 2
– Prep Time: 5 minutes
– Cook Time: 0 minutes
– Total Time: 5 minutes + 2 hours chilling
– Calories: 150 per serving
Nutrition Information:
– Calories: 150
– Protein: 5g
– Carbs: 20g
– Fat: 8g
Ingredients:
– 1/4 cup chia seeds
– 1 cup almond milk (or milk of choice)
– 1 tbsp honey or maple syrup
– Fresh fruits for topping (like berries or banana)
Step-by-Step Instructions:
1. In a mixing bowl, combine chia seeds, almond milk, and honey or syrup.
2. Stir well and let the mixture sit for about 10 minutes.
3. Give it another good stir, then cover and refrigerate for at least 2 hours, or overnight for the best results.
4. Serve chilled, topped with your favorite fresh fruit!
Tips:
– Experiment with different toppings like nuts or granola for added crunch.
– Use coconut milk for a tropical twist or to keep it dairy-free.
Frequently Asked Questions:
– Can I make it dairy-free? Yes! Simply swap the almond milk for coconut milk or any other non-dairy option.
Now you have a delicious, healthy recipe that is easy to prepare and perfect for any occasion. Enjoy your Chia Seed Pudding!
Chia Seed Pudding
Editor’s Choice

BetterBody Foods Organic Chia Seeds 2 lbs, 32 Oz, with Omega-3, Non-GMO,…

Silk Shelf-Stable Almond Milk, Unsweetened Vanilla, Dairy-Free, Vegan, N…
HOMBERKING 10 Pack Borosilicate Glass Meal Prep Containers with Locking …
22. Moroccan Chickpea Soup

Dive into the rich and comforting world of Moroccan Chickpea Soup! This delicious dish combines hearty chickpeas, fresh vegetables, and warm spices to create a meal that will transport your taste buds. Perfect for lunch at work, this gluten-free soup is not only satisfying but also easy to make in large batches, making it a great option for meal prepping.
Recipe Overview:
Servings: 6
Prep Time: 10 minutes
Cook Time: 30 minutes
Total Time: 40 minutes
Calories: 210 per serving
Nutritional Information:
Calories: 210
Protein: 10g
Carbs: 30g
Fat: 5g
Ingredients:
– 2 cans (15 oz) chickpeas, drained
– 1 onion, chopped
– 2 carrots, diced
– 2 celery stalks, diced
– 4 cups vegetable broth
– 2 tsp Moroccan spice blend
– Salt and pepper to taste
Step-by-Step Instructions:
1. In a large pot, heat a splash of oil over medium heat. Sauté the chopped onion, diced carrots, and diced celery until they soften, about 5 minutes. The aroma will fill your kitchen!
2. Stir in the drained chickpeas, vegetable broth, Moroccan spice blend, salt, and pepper. Mix well to combine all the flavors.
3. Bring the soup to a rolling boil. Then, reduce the heat and let it simmer gently for 30 minutes. This allows the spices to develop and infuse into the soup.
4. Serve your soup warm! For an extra touch, sprinkle fresh cilantro on top for a burst of color and flavor.
Tips:
– Pair this soup with crusty bread for a complete meal.
– Make it ahead of time; it tastes even better the next day!
– Store leftovers in the fridge for up to 4 days or freeze for later enjoyment.
This Moroccan Chickpea Soup isn’t just a meal; it’s a warm hug in a bowl. Perfect for busy workdays, it will keep you energized and satisfied.
Have fun making this dish and enjoy the flavors of Morocco right at your desk!
Moroccan Chickpea Soup
Editor’s Choice
Bento Box Adult Lunch Box, Containers for Adults Men Women with 4 Compar…

The Spice Way – Ras El Hanout Moroccan Meat Spice Blend of Turmeric, Cin…

365 by Whole Foods Market, Organic Low Sodium Vegetable Broth, 32 Fl Oz
23. Broccoli & Cheddar Quiche

Prepare to indulge in the hearty delight of Broccoli & Cheddar Quiche! This dish is not just a meal; it’s a warm hug on a plate. Loaded with fresh broccoli and gooey cheddar, it’s a satisfying option for your midday break. Enjoy it warm from the oven or cold from the fridge. It’s an excellent choice for meal prepping, ensuring you always have a tasty lunch on hand.
Recipe Overview:
Servings: 8
Prep Time: 15 minutes
Cook Time: 35 minutes
Total Time: 50 minutes
Calories: 230 per serving
Nutrition Information:
Calories: 230, Protein: 12g, Carbs: 16g, Fat: 14g
Ingredients:
– 1 pie crust
– 4 eggs
– 1 cup milk
– 2 cups broccoli, chopped
– 1 cup cheddar cheese, shredded
– Salt and pepper to taste
Step-by-Step Instructions:
1. Preheat your oven to 350°F (175°C). This ensures your quiche cooks evenly.
2. In a mixing bowl, whisk together the eggs and milk. Add salt and pepper to taste for that extra kick.
3. Fold in the chopped broccoli and shredded cheddar cheese. This is where the magic happens!
4. Pour the mixture into your pie crust and spread it out evenly. Bake for 35 minutes, or until it’s firm and golden.
Tips:
Make this quiche ahead of time and store it in the fridge. It’s perfect for quick lunches throughout the week!
Frequently Asked Questions:
Can I use other cheeses? Yes! Try feta or mozzarella for a different flavor twist.
With this easy recipe, you can enjoy a delicious and nutritious lunch that fits into your SmartPoints plan. Give it a try, and savor every bite!
Broccoli & Cheddar Quiche
Editor’s Choice

Amazon Basics Silicone Rectangular Baking Mat, Non-Stick Reusable Oven B…
HOMBERKING 10 Pack Borosilicate Glass Meal Prep Containers with Locking …

Mora Ceramic Deep Fluted Pie Dish for Baking – 9 inch Porcelain Pie Plat…
24. Chicken and Veggie Rice Bowl

Craving a nutritious and satisfying lunch? Try a Chicken and Veggie Rice Bowl! This dish is bursting with flavor and packed with protein, making it a perfect choice for your workday meals. You can customize it easily with your favorite veggies or whatever you have on hand. Plus, it’s a fantastic option for meal prep, letting you save time during busy weeks.
Recipe Overview:
Servings: 4
Prep Time: 10 minutes
Cook Time: 25 minutes
Total Time: 35 minutes
Calories: 350 per serving
Nutrition Information:
Calories: 350, Protein: 30g, Carbs: 45g, Fat: 10g
Ingredients:
– 1 lb chicken breast, cut into cubes
– 2 cups mixed vegetables (think broccoli, bell peppers, and snap peas)
– 2 cups cooked brown rice
– Soy sauce, to taste
– Olive oil for cooking
Step-by-Step Instructions:
1. Heat a splash of olive oil in a large skillet over medium heat. Add the chicken and cook until golden brown, about 5-7 minutes.
2. Toss in the mixed vegetables and sauté until they are tender, roughly 5 minutes.
3. Stir in the cooked brown rice and drizzle with soy sauce. Mix everything well to combine.
4. Serve it hot and enjoy!
Tips:
– Use leftover chicken to save time!
– Mix and match vegetables based on your preferences or what’s in season.
– Add a sprinkle of sesame seeds for extra flavor and crunch.
– If you’re in a hurry, consider using pre-cooked rice.
This Chicken and Veggie Rice Bowl not only tastes great but also fuels your day. It’s a balanced meal that keeps you full and satisfied. Enjoy this vibrant dish for lunch, and you’ll be looking forward to your next break!
Fun fact: A Chicken and Veggie Rice Bowl can clock in under 10 minutes prep and still fit your ww lunch ideas for work. Packable, protein-packed, and endlessly customizable—batch it on Sunday, and save serious time during busy weeks.
Chicken and Veggie Rice Bowl
Editor’s Choice
50 Pack (100-Piece) 32 oz Meal Prep Containers Reusable with Lids 3-Comp…
TrendPlain 16oz/470ml Glass Olive Oil Sprayer for Cooking – 2 in 1 Olive…

Aroma Housewares Aroma 6-cup (cooked) 1.5 Qt. One Touch Rice Cooker, Whi…
25. Stuffed Bell Peppers

Stuffed Bell Peppers are not just delicious; they are a colorful way to enjoy a balanced meal. Imagine biting into a tender pepper filled with a warm mixture of rice, lean ground beef, and zesty spices. This dish isn’t just a feast for your taste buds; it’s also packed with nutrients. Perfect for meal prep, you can enjoy these tasty peppers warm or cold throughout the week.
Ready to make your own? Here’s how you can whip up Stuffed Bell Peppers in no time:
Recipe Overview:
Servings: 4
Prep Time: 15 minutes
Cook Time: 30 minutes
Total Time: 45 minutes
Calories: 250 per serving
Nutrition Information:
Calories: 250, Protein: 18g, Carbs: 35g, Fat: 5g
Ingredients:
– 4 bell peppers (choose any color you like)
– 1 lb lean ground beef
– 1 cup cooked rice
– 1 cup diced tomatoes
– 1 tsp Italian seasoning
– Salt and pepper to taste
Step-by-Step Instructions:
1. Preheat your oven to 375°F (190°C).
2. Cut the tops off the bell peppers and remove the seeds.
3. In a mixing bowl, combine the ground beef, rice, diced tomatoes, Italian seasoning, salt, and pepper.
4. Stuff each pepper with the savory mixture.
5. Place the stuffed peppers upright in a baking dish and bake for 30 minutes.
Tips: Want to elevate the flavor? Add a sprinkle of cheese on top during the last few minutes of baking for a cheesy finish!
Frequently Asked Questions:
Can I substitute turkey for beef? Absolutely! Ground turkey is a lean and tasty alternative.
Enjoy making these Stuffed Bell Peppers! They’re easy to prepare and provide a hearty, satisfying meal. Perfect for busy workdays or family dinners, they will quickly become a favorite in your kitchen!
Stuffed Bell Peppers
Editor’s Choice

Ninja Foodi PossibleCooker PRO- Sous Vide & Proof 6-in-1 Multi-Cooker, w…

Salt and Pepper Wood Mill Tray, Retro Colour Pepper Grinder Rest, Work S…
26. Almond Butter & Banana Toast

Ready for a quick, delicious lunch that fuels your day? Try this Almond Butter & Banana Toast! It’s a simple yet filling option that combines the creamy goodness of almond butter with the sweetness of ripe banana. This tasty toast is packed with healthy fats and fiber, making it not just a treat for your taste buds, but also a boost for your energy levels.
Here’s how to make it:
Recipe Overview:
Servings: 1
Prep Time: 5 minutes
Cook Time: 0 minutes
Total Time: 5 minutes
Calories: 250 per serving
Nutrition Information:
Calories: 250, Protein: 8g, Carbs: 35g, Fat: 10g
Ingredients:
– 1 slice whole grain bread
– 2 tbsp almond butter
– 1 banana, sliced
– Honey for drizzling (optional)
Step-by-Step Instructions:
1. Toast your whole grain bread until it’s golden brown and crispy.
2. Spread almond butter generously over the warm toast.
3. Layer banana slices on top. Drizzle with honey if you like a touch of sweetness.
4. Slice in half and enjoy every bite!
Tips:
Want to add a little extra crunch? Sprinkle some chia seeds on top! They not only taste great, but they pack even more nutrition into your meal.
Frequently Asked Questions:
Can you swap out almond butter? Absolutely! Peanut butter or cashew butter are fantastic alternatives. Experiment and find your favorite combination!
This Almond Butter & Banana Toast is not just quick and easy; it’s also a smart choice for your lunch box. Whether at work or on the go, this meal will keep you satisfied and energized throughout your busy day.
Almond Butter & Banana Toast
Editor’s Choice
Oroweat Whole Grains 100% Whole Wheat Bread, Wheat Bread Free From Artif…

Spread The Love UNSALTED CRUNCH Almond Butter, All Natural, Vegan, Glute…
BetterBody Foods Organic Chia Seeds 2 lbs, 32 Oz, with Omega-3, Non-GMO,…
27. Grilled Vegetable Wrap

Wrap your lunch in flavor with a delicious Grilled Vegetable Wrap! This vibrant meal combines a medley of grilled vegetables, creamy hummus, and crisp greens, all snuggled inside a whole wheat tortilla. It’s not just a tasty option; it’s a fantastic way to sneak more veggies into your day while keeping lunchtime fun and satisfying.
Recipe Overview:
Servings: 2
Prep Time: 10 minutes
Cook Time: 10 minutes
Total Time: 20 minutes
Calories: 200 per serving
Nutrition Information:
Calories: 200, Protein: 6g, Carbs: 30g, Fat: 8g
Ingredients:
– 2 whole wheat tortillas
– 1 cup mixed grilled vegetables (like zucchini, bell peppers, and onions)
– 1/4 cup hummus
– 1 cup mixed greens
Step-by-Step Instructions:
1. Heat your grill and cook the vegetables until they’re tender and have nice grill marks.
2. Spread a generous layer of hummus on each tortilla.
3. Pile on the grilled veggies and a handful of mixed greens.
4. Roll the tortilla tightly, slice it in half, and enjoy!
Tips:
Want to kick up the flavor? Add some crumbled feta cheese or a sprinkle of your favorite herbs!
Frequently Asked Questions:
Can I use raw vegetables? Yes, but grilling them really brings out their sweetness and adds a tasty smoky flavor.
This wrap is perfect for meal prep. Make a batch on Sunday for easy, grab-and-go lunches throughout the week. Enjoy a nutritious, tasty option that keeps you energized and satisfied all day long!
Grilled Vegetable Wrap
Editor’s Choice

365 by Whole Foods Market Flour Tortillas, 10.7 OZ

Helena Hummus (3-pack), Shelf-Stable, No Added Preservatives, 2 Natural …
Conclusion

With these 27 WW lunch ideas, your work week will never feel dull again! From protein-packed salads to comforting wraps, you have a variety of flavors and nutrients at your fingertips. Meal prepping has never been so exciting!
Use these recipes as inspiration to build a lunch routine that fuels your body and satisfies your cravings. Let your lunch hour transform into a delightful experience each day!
Note: We aim to provide accurate product links, but some may occasionally expire or become unavailable. If this happens, please search directly on Amazon for the product or a suitable alternative.
This post contains Amazon affiliate links, meaning I may earn a small commission if you purchase through my links, at no extra cost to you.
Related Topics
ww lunch ideas
healthy meal prep
low SmartPoints meals
easy work lunches
Weight Watchers recipes
quick lunch ideas
meal prep tips
light lunch options
healthy eating
office meals
time-saving recipes
diet-friendly lunches