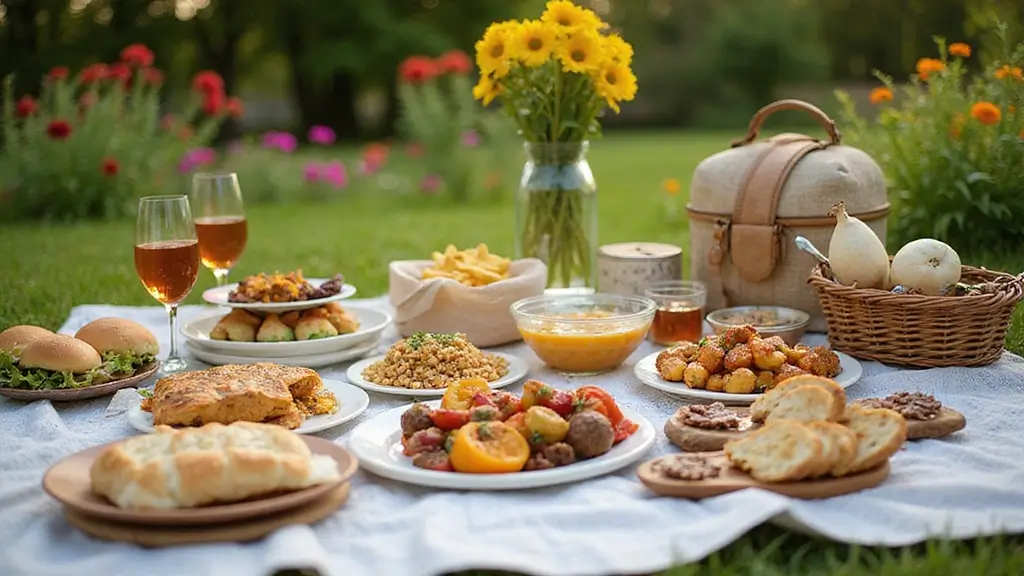
Getting together with friends for lunch can be one of life’s simplest pleasures. But let’s be real: planning a meal can sometimes feel overwhelming. You want it to be special, but you also want to keep it low-key. That’s why I put together this list of 27 lunch ideas for entertaining friends that feel effortless. With these options in your back pocket, you can focus on the fun and connection instead of stressing in the kitchen.
If you’re someone who loves hosting but dreads the pressure of complicated cooking, this post is for you. Whether you’re an experienced home chef or someone who just wants to impress your friends with minimal effort, you’ll find something here. We all want to create memorable moments without spending hours preparing. There’s nothing like sharing delicious food and laughter with good company, and my goal is to help you make that happen.
In this guide, you’ll discover a variety of lunch ideas that are not just simple but also delicious. From light salads to hearty sandwiches, these meals strike the perfect balance between flavor and ease. Each idea is designed to be quick to pull together, so you can spend more time chatting and less time cooking. Plus, these recipes can cater to different dietary preferences, ensuring everyone at your table is happy.
So, let’s dive in! Your next gathering can be filled with good food and great memories. You’ll have plenty of easy options that will leave your friends asking for more. Get ready to make lunch a delightful experience that feels effortless!
1. Mediterranean Picnic Platter

Start your gathering on a high note with a stunning Mediterranean picnic platter that’s sure to impress your friends. Imagine a vibrant array of creamy hummus, flavorful olives, sweet cherry tomatoes, crunchy cucumbers, and soft, warm pita bread. This colorful spread not only pleases the eyes but also offers a delightful mix of tastes and textures that everyone will enjoy.
Recipe Overview:
– Servings: 4-6
– Prep Time: 15 minutes
– Cook Time: 0 minutes
– Total Time: 15 minutes
– Calories: About 320 per serving
Nutrition Information:
– Protein: 12g
– Carbohydrates: 40g
– Fat: 15g
– Fiber: 6g
Ingredients:
– 1 cup hummus
– 1 cup assorted olives
– 1 cup cherry tomatoes, halved
– 1 cucumber, sliced
– 1 pack of pita bread, cut into wedges
– Fresh parsley for garnish
Step-by-Step Instructions:
1. Place the hummus in the center of a large platter.
2. Arrange the olives, cherry tomatoes, and cucumber slices around the hummus.
3. Position the pita wedges along the outer edge.
4. Sprinkle fresh parsley on top for a colorful finish.
Tips to Elevate Your Platter:
– Use a variety of olives: This adds depth to the flavors.
– Add feta cheese or marinated artichokes: These ingredients can bring extra zest to your platter.
Frequently Asked Questions:
– Can I prepare this ahead of time? Yes! You can chop your veggies and assemble the platter just before serving for maximum freshness.
This Mediterranean platter not only looks beautiful but is also simple to make. It’s perfect for casual get-togethers or special occasions, making your entertaining feel effortless yet elegant.
Mediterranean Picnic Platter
Editor’s Choice

4-Pack Plastic 16″ x 11″ Large White Serving Trays Set – Reusable Servin…

TUZAZO 40 PCS Reusable Snack Containers with Lids, 4.5oz Double Compartm…

OXO Good Grips Handheld Mandoline Slicer for Kitchen, Adjustable Vegetab…
2. Caprese Skewers

Imagine serving a colorful platter of Caprese skewers at your next gathering. These delightful bites mix juicy cherry tomatoes, fresh basil, and creamy mozzarella on a skewer, creating a feast for the eyes and the palate. Drizzle them with balsamic glaze for a tangy kick that your friends will love. It’s a simple yet impressive way to elevate your lunch spread.
Here’s how you can whip them up in just 10 minutes. This dish is not only quick but also budget-friendly, making it perfect for casual get-togethers. Plus, these skewers are a hit with everyone, whether you’re hosting a picnic or a backyard barbecue. They bring a touch of freshness and elegance, making your gathering feel special without much effort.
Ingredients:
– 1 pint cherry tomatoes
– 1 pack fresh mozzarella balls
– Fresh basil leaves
– Balsamic glaze
– Salt and pepper to taste
Step-by-Step Instructions:
1. Take a skewer and thread on a cherry tomato, followed by a basil leaf, then a mozzarella ball.
2. Repeat this pattern until the skewer is filled, leaving space at the ends for easy handling.
3. Before serving, drizzle the skewers with balsamic glaze and sprinkle with salt and pepper for extra flavor.
Tips:
– Choose colorful cherry tomatoes for a vibrant look.
– Add slices of prosciutto for a savory twist.
– Prepare them ahead of time and store in the fridge until guests arrive.
– Offer a variety of dips like pesto or hummus for added flavor options.
Frequently Asked Questions:
– Can I make these vegan? Yes! Just skip the mozzarella or swap it for vegan cheese.
With these easy Caprese skewers, you’ll impress your friends with minimal effort. They’re not just tasty; they bring a pop of color and a fresh taste to any lunch gathering. Enjoy!
Caprese Skewers
Editor’s Choice

HOPELF 12″ Natural Bamboo Skewers for BBQ,Appetiser,Fruit,Cocktail,Kabob…

Alessi Balsamic Vinegar Reduction, Autentico from Italy, Ideal on Capres…

3. Quinoa Salad with Roasted Vegetables

Feeling stuck on what to serve at your next gathering? Look no further than a vibrant quinoa salad with roasted vegetables. This dish not only looks appealing but also packs a nutritional punch, ensuring your guests feel satisfied and happy. Roasting bell peppers, zucchinis, and carrots brings out their natural sweetness, complementing the nutty flavor of quinoa perfectly. Plus, it’s an effortless way to impress your friends!
Recipe Overview:
– Servings: 4
– Prep Time: 15 minutes
– Cook Time: 25 minutes
– Total Time: 40 minutes
– Calories: Approximately 280 per serving
Nutrition Information:
– Protein: 10g
– Carbohydrates: 50g
– Fat: 8g
– Fiber: 7g
Ingredients:
– 1 cup quinoa
– 2 cups vegetable broth
– 1 red bell pepper, chopped
– 1 zucchini, chopped
– 1 carrot, sliced
– 2 tablespoons olive oil
– Salt and pepper to taste
– 1 teaspoon dried oregano
– Fresh parsley for garnish
Step-by-Step Instructions:
1. Preheat your oven to 400°F (200°C).
2. Toss the chopped bell pepper, zucchini, and carrot with olive oil, salt, pepper, and oregano. Spread them evenly on a baking sheet.
3. Roast the vegetables for about 25 minutes or until they are tender and slightly caramelized.
4. While the veggies roast, cook the quinoa in vegetable broth according to the package instructions.
5. Once done, mix the roasted vegetables with the quinoa. Garnish with fresh parsley before serving.
Tips:
– Serve this salad warm or cold to suit your gathering’s vibe.
– Add crumbled feta cheese or a handful of nuts for extra crunch and flavor.
Frequently Asked Questions:
– Can I use different vegetables? Yes! Feel free to swap in seasonal favorites or whatever you have on hand.
This quinoa salad isn’t just easy to make; it’s also a fantastic way to explore flavors and textures. Your friends will love it, and you’ll enjoy a stress-free meal prep. Enjoy your time entertaining!
Quinoa Salad with Roasted Vegetables
Editor’s Choice

Viva Naturals Organic Quinoa, 4 lb – Pre-Washed Whole Grain, Plant Prote…

365 by Whole Foods Market, Organic Low Sodium Vegetable Broth, 32 Fl Oz

GoodCook Everyday Nonstick Carbon Steel Baking Sheet Set, 3 Pack – Small…
4. Gourmet Grilled Cheese Sandwiches

Imagine impressing your friends with gourmet grilled cheese sandwiches that taste as good as they look. By swapping out ordinary ingredients for something special, you can turn this classic dish into a mouthwatering experience. Think aged cheddar, creamy Brie, or nutty Gruyère. Add a touch of sweetness with caramelized onions or fresh apple slices. These little changes can make your lunch gathering unforgettable.
Let’s dive into how you can create these delicious sandwiches at home. The best part? They’re quick to make and budget-friendly. You can easily prep your ingredients ahead of time, so when your friends arrive, you’ll be ready to grill. Plus, this recipe allows for creativity. Mix and match different cheeses and toppings according to your taste. It’s all about making it your own!
Recipe Overview:
– Servings: 2
– Prep Time: 5 minutes
– Cook Time: 10 minutes
– Total Time: 15 minutes
– Calories: Approximately 400 per sandwich
Nutrition Information:
– Protein: 20g
– Carbohydrates: 35g
– Fat: 25g
– Fiber: 2g
Ingredients:
– 4 slices of artisan bread
– 1 cup shredded cheese (mix your favorites)
– 1 small onion, thinly sliced
– 2 tablespoons butter
– Optional: sliced apples or figs, fresh herbs
Step-by-Step Instructions:
1. Melt 1 tablespoon of butter in a skillet over medium heat. Add the sliced onions and cook until they are golden and caramelized, about 5 minutes.
2. Layer the cheese and caramelized onions between two slices of bread to make your sandwiches.
3. Spread butter on the outside of each sandwich. Grill them in the skillet until they are golden brown and the cheese is melted, roughly 3-4 minutes on each side.
4. For a delightful twist, add thin slices of apple or figs inside the sandwich before grilling.
Tips:
– Use a panini press for an extra crispy finish.
– Experiment with different breads like sourdough or rye for unique flavors.
Frequently Asked Questions:
– Can I make these ahead of time? While grilled cheese tastes best fresh, you can prep your ingredients in advance to save time during your gathering!
Now you’re ready to wow your friends with these gourmet grilled cheese sandwiches. They’re not just tasty; they’re a fun way to gather and enjoy good company.
Gourmet Grilled Cheese Sandwiches
Editor’s Choice

Cuisinart Griddler Indoor Grill, Panini Press, Sandwich Maker & More, 5-…

WHOLE FOODS MARKET, San Francisco Sourdough Boule, 24 Ounce

Zyliss Classic Rotary Cheese Grater – NSF Restaurant Certified Handheld …
5. Spinach and Feta Stuffed Muffins

Imagine serving warm, savory muffins that your friends will rave about. These Spinach and Feta Stuffed Muffins are a tasty treat that brings a burst of flavor to your lunch gathering. Easy to whip up, they’re perfect for sharing at home or enjoying outdoors. Whether served warm or at room temperature, you can’t go wrong with this crowd-pleaser.
Recipe Overview:
– Servings: 12 muffins
– Prep Time: 15 minutes
– Cook Time: 20 minutes
– Total Time: 35 minutes
– Calories: Approximately 170 per muffin
Nutrition Information:
– Protein: 6g
– Carbohydrates: 22g
– Fat: 7g
– Fiber: 1g
Ingredients:
– 2 cups all-purpose flour
– 1 tablespoon baking powder
– ½ teaspoon salt
– 1 cup milk
– 2 large eggs
– ½ cup olive oil
– 2 cups fresh spinach, chopped
– 1 cup feta cheese, crumbled
Step-by-Step Instructions:
1. Preheat your oven to 375°F (190°C) and grease a muffin tin.
2. In a large bowl, combine flour, baking powder, and salt.
3. In another bowl, whisk together milk, eggs, and olive oil. Pour this mixture into the dry ingredients and stir until just blended.
4. Gently fold in the chopped spinach and crumbled feta cheese until evenly mixed.
5. Spoon the batter into the prepared muffin tins and bake for about 20 minutes, or until they are golden brown.
Tips to Elevate Your Muffins:
– Add sun-dried tomatoes for a vibrant twist.
– Store in an airtight container for up to 3 days to keep them fresh.
Common Questions:
– Can I freeze these muffins? Yes, they freeze well for up to 3 months. Just reheat them in the oven when you’re ready to enjoy!
These muffins are not just delicious; they are versatile too. Perfect for brunch, casual get-togethers, or even as a snack. With their rich flavors and satisfying texture, they make every meal feel special. Get ready to impress your friends with these delightful bites!
Spinach and Feta Stuffed Muffins
Editor’s Choice

Amazon Basics Nonstick Round Muffin Baking Pan, 12 Cups, Set of 2, Gray,…

Silicone Baking Mat, 3 Pack Reusable Baking Mat, Non-Stick, Food Safe Si…

WHYSKO Meal Prep Stainless Steel Mixing Bowl (5-Piece Set) Home, Refrige…
6. Thai Chicken Lettuce Wraps

Create a delightful lunch experience with Thai chicken lettuce wraps. These wraps are fresh, crunchy, and packed with flavor, making them an exciting choice for entertaining friends. The best part? They’re fun to assemble, allowing everyone to join in on the action. Serve these tasty wraps at your next gathering, and watch as your friends enjoy a healthy meal that feels indulgent.
Here’s what you’ll need for your wraps:
Recipe Overview:
– Servings: 4
– Prep Time: 10 minutes
– Cook Time: 10 minutes
– Total Time: 20 minutes
– Calories: About 200 per serving
Nutrition Information:
– Protein: 25g
– Carbohydrates: 10g
– Fat: 8g
– Fiber: 1g
Ingredients:
– 1 lb ground chicken
– 1 tablespoon soy sauce
– 1 tablespoon fish sauce
– 1 tablespoon lime juice
– 1 tablespoon peanut butter
– 1 head of butter lettuce, leaves separated
– Sliced cucumbers and shredded carrots for garnish
Step-by-Step Instructions:
1. Heat a skillet over medium heat. Cook the ground chicken until it turns brown, about 5-7 minutes.
2. Stir in soy sauce, fish sauce, lime juice, and peanut butter. Cook for another 2-3 minutes until well combined.
3. Spoon the chicken mixture into lettuce leaves. Top with cucumbers and carrots for extra crunch.
Tips:
– Swap ground chicken for turkey or tofu for a lighter or vegetarian twist.
– Serve with lime wedges on the side for an extra burst of flavor.
– These wraps are naturally gluten-free if you choose gluten-free soy sauce.
These Thai chicken lettuce wraps are not just a meal—they’re an experience. Perfect for a casual lunch or a fun dinner party, they keep things light yet satisfying. Plus, they’re quick to make, so you can spend more time enjoying your friends’ company and less time in the kitchen!
Thai Chicken Lettuce Wraps
Editor’s Choice

Plasticpro 6 Sectional Round Plastic Serving Tray/Platters Clear Pack of 2

Eden Organic Tamari Soy Sauce, Naturally Fermented from Non GMO USA Soyb…
7. Pasta Salad with Pesto and Fresh Veggies

Imagine a sunny afternoon, friends gathered around, and a bowl of colorful Pasta Salad with Pesto and Fresh Veggies in the center. This dish bursts with flavor and freshness, making it the perfect choice for any casual gathering. You get the delightful chew of al dente pasta, the aromatic touch of basil pesto, and the juicy sweetness of cherry tomatoes. A drizzle of lemon juice brightens it all up, creating a dish that feels like summer on a plate.
Recipe Overview:
– Servings: 6
– Prep Time: 15 minutes
– Cook Time: 10 minutes
– Total Time: 25 minutes
– Calories: Approximately 300 per serving
Nutrition Information:
– Protein: 9g
– Carbohydrates: 45g
– Fat: 12g
– Fiber: 3g
Ingredients:
– 1 lb pasta (fusilli or penne)
– 1 cup basil pesto
– 1 cup cherry tomatoes, halved
– 1 cup mozzarella balls
– 1 tablespoon lemon juice
– Salt and pepper to taste
Step-by-Step Instructions:
1. Cook the pasta according to the package instructions. Drain it and let it cool down.
2. In a large mixing bowl, combine the cooled pasta with the pesto, cherry tomatoes, mozzarella balls, and lemon juice.
3. Season the salad with salt and pepper to taste. Toss everything gently to mix well.
Tips:
– Add grilled chicken or chickpeas for a protein boost.
– Let the salad chill in the fridge for a few hours. It enhances the flavors beautifully.
Frequently Asked Questions:
– Can I use store-bought pesto? Yes! It’s a great time-saver and still tastes amazing.
With this easy pasta salad, you can impress your friends without spending hours in the kitchen. Serve it as a side or main dish, and enjoy the compliments! Perfect for picnics, barbecues, or just a cozy lunch at home, this salad is both practical and delicious.
Pasta Salad with Pesto and Fresh Veggies
Editor’s Choice


Rao’s Homemade Fusili Pasta, 16 Ounce (Pack of 2)

Umite Chef Mixing Bowls with Airtight Lids Set, 8PCS Stainless Steel Kha…
8. Shrimp Tacos with Avocado Cream

Delight your friends with mouthwatering shrimp tacos topped with a creamy avocado sauce. These tacos are not just light and flavorful; they’re a guaranteed crowd-pleaser at any lunch gathering. Imagine sinking your teeth into juicy shrimp, wrapped in warm tortillas and drizzled with a rich avocado cream. Each bite bursts with freshness and zest, making these tacos perfect for any occasion.
Let’s break down the recipe so you can whip them up effortlessly. This dish serves four and takes only 25 minutes from start to finish. With a prep time of just 15 minutes and a cook time of 10 minutes, you can spend less time in the kitchen and more time enjoying your friends’ company.
Ingredient List:
– 1 lb shrimp, peeled and deveined
– 2 tablespoons olive oil
– 1 teaspoon chili powder
– 1 teaspoon cumin
– 1 ripe avocado
– ½ cup sour cream
– 8 small corn tortillas
– Shredded cabbage for crunch
– Lime wedges for a zesty kick
Instructions:
1. In a bowl, mix shrimp with olive oil, chili powder, and cumin until well-coated.
2. Heat a skillet on medium-high and cook the shrimp for about 3-4 minutes, or until they turn pink.
3. In a blender, combine the avocado and sour cream. Blend until smooth and creamy.
4. Assemble the tacos by placing shrimp in the tortillas. Top with avocado cream and a handful of shredded cabbage.
5. Serve with lime wedges on the side for an extra burst of flavor!
Tips for Extra Flavor:
– Add radish slices for a refreshing crunch.
– Try pickled jalapeños for a spicy twist.
– Feel free to grill the shrimp for a smoky flavor.
– If you’re looking for alternatives, chicken or tofu works great too!
Now you have a delicious and simple recipe that will impress your guests without the stress. Enjoy the flavors, and happy cooking!
Shrimp Tacos with Avocado Cream
Editor’s Choice

CAROTE Nonstick Frying Pan Skillet,Non Stick Granite Fry Pan Egg Pan Ome…


Taco Holders Set of 6, Taco Stand, Stainless Steel Taco Holder, with Eas…
9. Roasted Beet and Goat Cheese Salad

Elevate your lunch gatherings with a delightful Roasted Beet and Goat Cheese Salad. This dish is not just a feast for the eyes, but it also balances earthy flavors with creamy textures, making it a sure hit among your friends. The vibrant colors of roasted beets paired with the white goat cheese create a stunning presentation that will impress everyone at your table.
Recipe Overview:
– Servings: 4
– Prep Time: 10 minutes
– Cook Time: 30 minutes
– Total Time: 40 minutes
– Calories: Approximately 250 per serving
Nutrition Information:
– Protein: 8g
– Carbohydrates: 30g
– Fat: 12g
– Fiber: 4g
Ingredients:
– 4 medium beets, trimmed and scrubbed
– 4 cups mixed greens
– ½ cup goat cheese, crumbled
– ¼ cup walnuts, toasted
– 2 tablespoons olive oil
– 1 tablespoon balsamic vinegar
– Salt and pepper to taste
Step-by-Step Instructions:
1. Preheat your oven to 400°F (200°C). Wrap the beets in aluminum foil.
2. Roast the beets for about 30 minutes until they are tender. Let them cool, peel, and slice them.
3. In a large bowl, toss the mixed greens with olive oil, balsamic vinegar, salt, and pepper.
4. Top the salad with the sliced beets, crumbled goat cheese, and toasted walnuts. Serve immediately.
Tips for Success:
– Add sliced pears or apples for a sweet twist that complements the beets.
– Prep ahead of time: Make the salad in advance but add the dressing just before serving to keep it fresh.
Frequently Asked Questions:
– Are beets healthy? Yes, they are rich in vitamins and antioxidants, making them a nutritious choice.
This salad is perfect for a casual lunch or a more formal gathering. It’s easy to prepare, budget-friendly, and offers a burst of flavor that everyone will love. Enjoy creating this beautiful dish that will have your friends raving!
Roasted Beet and Goat Cheese Salad
Editor’s Choice

Pompeian Robust Extra Virgin Olive Oil, Contains Polyphenols, First Cold…

Colavita Balsamic Vinegar of Modena, 17 Ounce Bottle
10. Veggie and Cheese Charcuterie Board

Elevate your next gathering with a delightful Veggie and Cheese Charcuterie Board. This stylish spread not only impresses your friends but also encourages them to mingle and snack at their own pace. Imagine vibrant colors from fresh vegetables paired with an array of cheeses. As seen across trendy food blogs and Pinterest, this is a perfect way to showcase your culinary creativity without the stress.
To create your board, gather seasonal ingredients for the freshest flavors. Opt for budget-friendly cheese options available at local markets. This setup feels welcoming and cozy, making your space ideal for laughter and conversation.
Ingredients:
– 3 types of cheese (like cheddar, brie, gouda)
– 2 cups of assorted fresh veggies (think colorful carrots, crunchy bell peppers, and zesty radishes)
– 1 cup of different dips (hummus, ranch, tzatziki work beautifully)
– Crackers and baguette slices for serving
Instructions:
1. Start by selecting a large wooden board. Arrange your cheese in sections for visual appeal.
2. Next, fill in the gaps with your fresh vegetables and tasty dips.
3. Finally, add crackers and baguette slices around the edges for a complete look.
Tips:
– Choose seasonal veggies for the best taste.
– Add a handful of nuts or dried fruits for extra flair.
Frequently Asked Questions:
– Can I customize the board? Absolutely! Use your favorite cheese and vegetables to make it your own.
With this charcuterie board, you’re all set for effortless entertaining. Enjoy the smiles as your friends delight in the delicious bites!
Veggie and Cheese Charcuterie Board
Editor’s Choice

Acacia Wood Cutting Board and Chopping Board with Handle for Meat, Chees…

R&M Set of 3 Cheese Knives for Every Cheese Lover. Mini Stainless Steel …
11. Sweet Potato and Black Bean Tacos

Get ready to impress your friends with delicious Sweet Potato and Black Bean Tacos! These colorful tacos are not only easy to make but also bursting with flavor and nutrients. The sweet, creamy taste of roasted sweet potatoes pairs beautifully with the earthy richness of black beans, creating a satisfying meal that everyone will love. Perfect for casual lunch gatherings, these tacos are sure to be a hit!
Recipe Overview:
– Servings: 4
– Prep Time: 15 minutes
– Cook Time: 25 minutes
– Total Time: 40 minutes
– Calories: Approximately 300 per serving
Nutrition Information:
– Protein: 10g
– Carbohydrates: 45g
– Fat: 8g
– Fiber: 10g
Ingredients:
– 2 medium sweet potatoes, diced
– 1 can black beans, drained and rinsed
– 2 tablespoons olive oil
– 1 teaspoon cumin
– 1 teaspoon chili powder
– 8 corn tortillas
– Optional toppings: sliced avocado, fresh cilantro, lime wedges
Step-by-Step Instructions:
1. Preheat your oven to 400°F (200°C). Toss the diced sweet potatoes with olive oil, cumin, and chili powder until evenly coated.
2. Spread the potatoes on a baking sheet and roast for about 25 minutes or until they are tender and golden brown.
3. While the potatoes roast, warm your tortillas in a dry skillet or microwave.
4. To assemble, fill each tortilla with a generous scoop of roasted sweet potatoes and black beans.
5. Top with sliced avocado, fresh cilantro, and a squeeze of lime juice for extra flavor. Serve warm and enjoy!
Tips:
– Use sliced jalapeños for a spicy kick.
– Make extra tacos for larger gatherings; they’re easy to prepare in bulk.
– Feel free to swap in your favorite toppings like salsa or cheese.
– These tacos are gluten-free if you choose gluten-free tortillas!
With their vibrant colors and tasty flavors, these Sweet Potato and Black Bean Tacos will make your lunch feel special. Enjoy making them with your friends for a delightful, effortless gathering!
Sweet Potato and Black Bean Tacos
Editor’s Choice

Lodge 12 Inch Cast Iron Skillet with Red Silicone Hot Handle Holder – Pr…

Taco Holders 4 Packs – Stainless Steel Taco Stand Rack Tray Style, Oven …

Spring Chef Premium Swivel Vegetable Peeler, Soft Grip Handle and Ultra …
12. Chicken Caesar Wraps

Wrap your taste buds around these Chicken Caesar Wraps! They’re a delicious twist on the classic Caesar salad, all packed into a convenient, handheld meal. Perfect for lunch with friends, these wraps are not only easy to prepare but also bursting with flavor. Imagine the crunch of fresh lettuce, the creamy Caesar dressing, and tender chicken all rolled up in a soft tortilla. They’re a hit at any gathering!
Here’s everything you need to whip up these tasty wraps for four people in just 20 minutes. It’s an affordable option that doesn’t skimp on taste. Not only will you impress your friends, but you’ll also have more time to enjoy their company. These wraps are a fantastic way to serve a satisfying meal without the fuss.
Recipe Overview:
– Servings: 4
– Prep Time: 10 minutes
– Cook Time: 10 minutes
– Total Time: 20 minutes
– Calories: Approximately 400 per wrap
Nutrition Information:
– Protein: 30g
– Carbohydrates: 35g
– Fat: 18g
– Fiber: 3g
Ingredients:
– 2 cups cooked chicken, shredded
– 4 large tortillas
– 1 cup romaine lettuce, chopped
– ½ cup Caesar dressing
– ½ cup grated Parmesan cheese
Step-by-Step Instructions:
1. In a large bowl, combine the shredded chicken, chopped lettuce, Caesar dressing, and Parmesan cheese. Mix well to coat everything evenly.
2. Lay out each tortilla on a clean surface. Spread a generous amount of the chicken mixture across the center of each tortilla.
3. Carefully roll each tortilla tightly, tucking in the sides as you go. Slice the wraps in half to make them easier to handle.
Tips:
– Add croutons for a delightful crunch in every bite.
– Try using grilled chicken for a smoky flavor that elevates the dish.
– Make these wraps vegetarian by swapping out chicken for chickpeas or grilled veggies.
These Chicken Caesar Wraps can easily adapt to your taste. Whether you’re hosting a casual lunch or just need a quick meal on the go, these wraps deliver on flavor and convenience. Enjoy your time with friends while savoring every bite!
Grab-and-go for crowds: these Chicken Caesar Wraps prove that lunch ideas for entertaining friends can be easy and delicious. Prep the chicken, crisp lettuce, and a quick Caesar swirl, then roll—four servings in minutes, perfect for a crowd.
Chicken Caesar Wraps
Editor’s Choice

Mission Burrito Flour Tortillas, Large Size, 8 Count, Trans Fat Free

BRIANNAS – Home Style Asiago Caesar Dressing – Fine Salad Dressing made …

Chicken Shredder Tool Twist Large – 10” Pro Meat Shredders for Chicken …
13. Fruit and Yogurt Parfaits

Treat your friends to a delightful dessert with fruit and yogurt parfaits. These layered delights are as tasty as they are beautiful. Picture creamy yogurt mingling with fresh berries and crunchy granola. It’s a feast for both the eyes and the palate!
Let’s dive into the details of this easy yet impressive treat.
Recipe Overview:
– Servings: 4
– Prep Time: 10 minutes
– Cook Time: 0 minutes
– Total Time: 10 minutes
– Calories: About 200 per serving
Nutrition Information:
– Protein: 8g
– Carbohydrates: 30g
– Fat: 8g
– Fiber: 4g
Ingredients:
– 2 cups yogurt (plain or flavored)
– 2 cups mixed berries (like strawberries, blueberries, and raspberries)
– 1 cup granola
Step-by-Step Instructions:
1. Grab some clear cups or glasses to show off those layers. Start by adding a layer of yogurt.
2. Next, sprinkle in a handful of mixed berries.
3. Add a layer of granola for that satisfying crunch.
4. Repeat the layers until the cups are nearly full.
5. Finish with a few extra berries and a sprinkle of granola on top for presentation.
Tips:
– Choose seasonal fruits for the best taste. They’ll make your parfaits even more flavorful!
– You can prepare these a few hours ahead of time. Just keep them in the fridge until you’re ready to serve.
Frequently Asked Questions:
– Can I use frozen berries? Yes! Just thaw them first and drain any excess liquid before layering.
These parfaits are not only simple to make but also look stunning on the table. They create a relaxed atmosphere, perfect for catching up with friends over lunch. Enjoy creating this refreshing treat that everyone will love!
Fruit and Yogurt Parfaits
Editor’s Choice

Eupako 25 Pack 5 OZ Plastic Mini Dessert Cups with Spoons – Clear Small …

Nature Valley Protein Granola, Oats and Honey Granola, Resealable Snack …

Euro Cuisine Yogurt Maker – YMX650 Automatic Digital Yogurt Maker Machin…
14. Mini Quiches with Spinach and Cheese

Imagine serving bite-sized delights that steal the show. Mini quiches filled with spinach and cheese are an effortless choice for your next lunch gathering. Guests love them, and you can serve them warm or at room temperature. They’re perfect for brunch or lunch, making them a versatile crowd-pleaser.
Recipe Overview:
– Servings: 12 mini quiches
– Prep Time: 15 minutes
– Cook Time: 20 minutes
– Total Time: 35 minutes
– Calories: About 150 per quiche
Nutrition Information:
– Protein: 7g
– Carbohydrates: 10g
– Fat: 10g
– Fiber: 1g
Ingredients:
– 1 pie crust (store-bought or homemade)
– 4 large eggs
– 1 cup milk
– 1 cup fresh spinach, chopped
– 1 cup shredded cheese (like cheddar or Swiss)
Step-by-Step Instructions:
1. Preheat your oven to 375°F (190°C) and grease a muffin tin.
2. Roll out the pie crust and cut circles to fit the muffin cups.
3. In a bowl, whisk together the eggs, milk, spinach, and cheese until well mixed.
4. Pour the mixture into the crusts and bake for 20 minutes, or until they are set and golden.
Tips:
– Try adding different veggies like mushrooms or bell peppers for variety.
– Make these quiches ahead of time and serve them cold for a fuss-free option.
Frequently Asked Questions:
– Can I freeze these mini quiches? Absolutely! They freeze well and can be reheated easily in the oven.
With these mini quiches, you will impress your friends without breaking a sweat. They are simple to make and packed with flavor, ensuring everyone will be coming back for seconds!
Mini Quiches with Spinach and Cheese
Editor’s Choice
Amazon Basics Nonstick Round Muffin Baking Pan, 12 Cups, Set of 2, Gray,…

Pastry Wheel Cutter – Pasta Cutter Wheel – Ravioli Crimper Cutter Wheel …

Amazon Basics Silicone Rectangular Baking Mat, Non-Stick Reusable Oven B…
15. BBQ Pulled Pork Sliders

BBQ pulled pork sliders are a crowd-pleaser for any gathering. These tender little sandwiches bring a burst of flavor and a taste of summer to your table, making them perfect for backyard barbecues or casual get-togethers. Imagine biting into a soft slider bun filled with juicy, flavorful pulled pork coated in smoky barbecue sauce. Top it off with crunchy coleslaw, and you have a dish that’s both satisfying and delicious!
Ready to make your own? Here’s how to whip up these mouthwatering sliders in no time.
Recipe Overview:
– Servings: 6
– Prep Time: 15 minutes
– Cook Time: 6 hours (slow cooker)
– Total Time: 6 hours 15 minutes
– Calories: Approximately 350 per slider
Nutrition Information:
– Protein: 22g
– Carbohydrates: 35g
– Fat: 15g
– Fiber: 1g
Ingredients:
– 2 lbs pork shoulder
– 1 cup BBQ sauce
– 12 slider buns
– Coleslaw for topping
Step-by-Step Instructions:
1. Place the pork shoulder in your slow cooker and pour the BBQ sauce over it.
2. Set it to low and let it cook for 6 hours, until the pork is fork-tender.
3. Once done, shred the pork with two forks and mix it back into the sauce.
4. Serve the pulled pork on slider buns and top with a generous scoop of coleslaw.
Tips:
– Add pickles for an extra crunch that complements the flavors well.
– Try using chicken or jackfruit for a twist on the classic recipe.
– You can prepare the pork ahead of time and store it in the fridge for up to 4 days, making it easy to serve to guests.
These BBQ pulled pork sliders are sure to impress your friends and family. Whether you’re hosting a game day, a summer picnic, or just hanging out, they fit perfectly into any occasion. Enjoy every bite!
BBQ Pulled Pork Sliders
Editor’s Choice

7 Quart Oval Manual Slow Cooker, Stainless Steel (SCV700-S-BR), Versatil…

Nature’s Own Perfectly Crafted Brioche Style Hamburger Buns, Non-GMO San…

Hickory Brown Sugar Bbq Sauce | Pack Of 1 | 27 Ounce | Kinders Sauce | L…
16. Zucchini Noodles with Pesto

Imagine a dish that’s not only healthy but also bursts with flavor. Zucchini noodles with pesto are your answer. This dish feels light yet satisfying, making it perfect for a lunch date with friends. Plus, it’s incredibly easy to whip up, taking just 15 minutes from start to finish!
Here’s a quick snapshot of what you need:
Recipe Overview:
– Servings: 4
– Prep Time: 10 minutes
– Cook Time: 5 minutes
– Total Time: 15 minutes
– Calories: About 200 per serving
Nutrition Information:
– Protein: 5g
– Carbohydrates: 10g
– Fat: 15g
– Fiber: 3g
Ingredients:
– 4 medium zucchinis, spiralized
– 1 cup fresh basil pesto
– 1 cup cherry tomatoes, halved
– Grated Parmesan cheese for topping
Step-by-Step Instructions:
1. Heat a skillet over medium heat and add the spiralized zucchini. Sauté for 2-3 minutes until they soften slightly.
2. Mix in the pesto and halved cherry tomatoes. Cook for another 2 minutes, stirring gently.
3. Serve in bowls and generously sprinkle with grated Parmesan cheese.
Tips for Success:
– Add grilled chicken or shrimp for extra protein and heartiness.
– Choose store-bought pesto if you’re short on time, but homemade is always a treat!
Frequently Asked Questions:
– Are zucchini noodles low-carb? Yes! They are a fantastic low-carb substitute for traditional pasta.
Zucchini noodles with pesto not only taste amazing but also make your table look colorful and inviting. Your friends will be impressed, and you’ll love how easy they are to make. This dish is a great way to keep things light and fresh, especially during warmer months.
Enjoy a delicious, healthy meal that’s perfect for any gathering!
Zucchini Noodles with Pesto
Editor’s Choice

Brieftons 5-Blade Vegetable Spiralizer: Strongest-Heaviest Spiral Slicer…


17. Tomato Basil Bruschetta

Tomato Basil Bruschetta is a delightful appetizer that combines freshness and flavor with minimal effort. It’s an easy way to impress your friends at lunch gatherings. Imagine crisp, golden bread topped with juicy tomatoes, fragrant basil, and a sweet balsamic drizzle. Each bite bursts with a symphony of tastes that everyone will love. This classic dish stays trendy, as seen in many popular cookbooks and social media food posts.
To make this dish, you don’t need to break the bank. Use affordable ingredients that you can find at your local grocery store. This bruschetta is not only simple but also makes your table look elegant and inviting. It’s perfect for adding a touch of sophistication to your meal without spending hours in the kitchen.
Ingredients:
– 6 slices of crusty bread
– 2 cups diced ripe tomatoes
– ¼ cup fresh basil, chopped
– 2 tablespoons balsamic glaze
– Salt and pepper to taste
Step-by-Step Instructions:
1. Preheat your oven to 400°F (200°C). Lay the bread slices on a baking sheet.
2. Bake the bread for about 5 minutes, until it turns golden and crispy.
3. In a bowl, mix together the diced tomatoes, chopped basil, salt, and pepper.
4. Once the bread is toasted, top each slice with the tomato mixture. Drizzle balsamic glaze over each piece just before serving.
Tips:
– Brush the bread with olive oil before toasting for extra flavor.
– Serve immediately to enjoy the perfect crunch.
This delicious bruschetta is sure to be a hit at your next gathering. Remember, while fresh tomatoes are ideal for this recipe, you can use canned tomatoes in a pinch, though the flavor will differ. Enjoy creating this beautiful dish that’s as pleasing to the eyes as it is to the palate!
Tomato Basil Bruschetta
Editor’s Choice

Giusti Balsamic Set – Includes Aged Balsamic Vinegar of Modena IGP and 3…

YARRAMATE 16oz/470ml Glass Olive Oil Sprayer for Cooking with Stickers, …
GoodCook Everyday Nonstick Carbon Steel Baking Sheet Set, 3 Pack – Small…
18. Baked Falafel with Tzatziki Sauce

Baked falafel with tzatziki sauce is a delightful way to impress your friends while keeping things simple. These golden-brown balls are not just tasty; they’re loaded with protein and fiber, making them a perfect choice for a filling lunch. Imagine the crunch of the falafel paired with the cool, creamy tzatziki—it’s a match made in heaven! This dish is not only healthy but also trendy, as seen in many social media food posts.
Ready to whip up this crowd-pleaser? Let’s break it down step by step. This recipe is budget-friendly, using basic pantry staples. Plus, it’s a great way to showcase your cooking skills without spending hours in the kitchen. Serve these falafel in pita pockets with fresh veggies for an extra burst of flavor. Your friends will love the vibrant presentation and the delicious taste!
Recipe Overview:
– Servings: 4
– Prep Time: 15 minutes
– Cook Time: 20 minutes
– Total Time: 35 minutes
– Calories: Approximately 250 per serving
Nutrition Information:
– Protein: 10g
– Carbohydrates: 30g
– Fat: 10g
– Fiber: 8g
Ingredients:
– 1 can chickpeas, drained
– 1 onion, diced
– 2 cloves garlic
– 1 teaspoon cumin
– 1 teaspoon coriander
– Salt and pepper to taste
– ¼ cup parsley, chopped
– For tzatziki:
– 1 cup Greek yogurt
– ½ cucumber, grated
– Dill, to taste
– 1 clove garlic, minced
– Juice of 1 lemon
Step-by-Step Instructions:
1. Preheat your oven to 375°F (190°C) and line a baking sheet with parchment paper.
2. In a food processor, blend chickpeas, onion, garlic, spices, and parsley until mostly smooth.
3. Shape the mixture into small balls and arrange them on the baking sheet.
4. Bake for 20 minutes until they turn golden and crispy.
5. For the tzatziki, mix Greek yogurt, grated cucumber, dill, garlic, and lemon juice in a bowl until well combined.
Tips:
– Serve falafel in pita pockets with fresh veggies for crunch.
– Make extra tzatziki for dipping to keep things fun!
– Fry them if you prefer a crunchier texture, but baking is healthier.
– Experiment with spices to suit your taste—add some chili for heat!
Now you have a fantastic recipe that’s easy to make and sure to impress. Enjoy your time with friends while savoring these delicious bites!
Baked Falafel with Tzatziki Sauce
Editor’s Choice

Hamilton Beach Food Processor & Vegetable Chopper for Slicing, Shredding…

Pita Bread – Whole Wheat – 12″ loaves -10 Bags – 6 loaves per bag (SHIP …

360 Count 12″x 16″ Heavy Duty Parchment Paper Sheets for Baking, No-Stic…
19. Egg Salad Sandwiches

Egg salad sandwiches are the ultimate comfort food. They remind you of sunny picnics and relaxed gatherings with friends. This classic dish combines creamy, rich egg salad on soft, fluffy bread. It’s simple yet incredibly satisfying, making it a crowd-pleaser at any lunch gathering.
Let’s dive into making these delightful sandwiches. You can whip them up quickly, making them perfect for any occasion. Plus, they don’t require fancy ingredients, so they’re easy on the wallet. You can prepare the egg salad a day in advance for a stress-free entertaining experience.
Recipe Overview:
– Servings: 4
– Prep Time: 10 minutes
– Cook Time: 10 minutes (for boiling eggs)
– Total Time: 20 minutes
– Calories: Approximately 250 per sandwich
Nutrition Information:
– Protein: 12g
– Carbohydrates: 30g
– Fat: 10g
– Fiber: 1g
Ingredients:
– 6 large eggs, boiled and chopped
– ¼ cup mayonnaise
– 1 tablespoon Dijon mustard
– Salt and pepper to taste
– Lettuce leaves
– Bread of choice (white, whole grain, or gluten-free)
Step-by-Step Instructions:
1. Boil the eggs in water for about 9 minutes. Once done, cool them under cold water and chop them up.
2. In a mixing bowl, combine the chopped eggs, mayonnaise, Dijon mustard, salt, and pepper. Mix until creamy and well-blended.
3. Spread a generous amount of egg salad on your choice of bread. Top with crisp lettuce leaves for added freshness.
4. Cut the sandwiches in half for easy serving and enjoy!
Tips:
– Add chopped celery or pickles for an extra crunch.
– Pair these sandwiches with chips or fresh fruit for a complete meal.
– These egg salad sandwiches are also fantastic for picnics and casual get-togethers.
This dish is all about ease and flavor, making it perfect for your next gathering. Your friends will love the nostalgic taste, and you’ll appreciate how effortless they are to make.
Egg Salad Sandwiches
Editor’s Choice
Umite Chef Mixing Bowls with Airtight Lids Set, 8PCS Stainless Steel Kha…

Uncrustable Sandwich Maker, Sandwich Pocket Circle Shape Cutter & Sealer…
20. Grilled Vegetable Skewers

Grilled vegetable skewers are not just colorful; they are a feast for the senses. When you bite into these vibrant veggies, you taste the smoky flavor from the grill, paired with the freshness of seasonal produce. Picture bright bell peppers, juicy cherry tomatoes, and tender zucchini all perfectly charred and ready to complement any lunch spread. Pinterest users rave about these skewers, making them a must-try for your next gathering.
Making these skewers is simple and budget-friendly. You can use whatever vegetables are in season, keeping costs low while maximizing flavor. Plus, they’re a fantastic way to encourage healthy eating among your friends. Serve them warm or at room temperature for a casual yet impressive dish that sparks conversation and brings everyone together.
Ingredients:
– 1 bell pepper, chopped
– 1 zucchini, sliced
– 1 red onion, cut into chunks
– 1 cup cherry tomatoes
– 2 tablespoons olive oil
– Salt and pepper to taste
– Skewers (soak wooden ones for 30 minutes to prevent burning)
Step-by-Step Instructions:
1. Preheat your grill to medium heat.
2. In a bowl, toss the vegetables with olive oil, salt, and pepper to coat evenly.
3. Thread the vegetables onto the skewers, alternating colors for a beautiful presentation.
4. Grill the skewers for 10-15 minutes. Turn them occasionally until they are charred and tender.
5. Serve them warm or let them cool for a delightful room temperature option.
Tips:
– Add mushrooms or eggplant for a different texture and flavor.
– Pair with a dip like tzatziki or a balsamic reduction to enhance the taste.
– Experiment with herbs like rosemary or thyme for an aromatic twist.
– Use leftover skewers for a quick lunch the next day!
Grilled vegetable skewers are the perfect addition to any lunch gathering. They are not just food; they are a way to bring friends together over fresh flavors and shared experiences.
Grilled Vegetable Skewers
Editor’s Choice

8 Inch Stainless Steel BBQ Skewers, Shish Kebab Kabob Skewers 12 pcs

AOZITA 17oz Glass Olive Oil Bottle Dispenser – 500ml Green Oil and Vineg…

21. Chocolate-Dipped Strawberries

Indulge your guests with a delightful treat: chocolate-dipped strawberries. These sweet bites are not only tasty but also eye-catching. They add a touch of elegance to your lunch and make for a perfect ending to any gathering. Picture fresh strawberries, glistening with rich chocolate, ready to impress your friends. With just a few ingredients and simple steps, you can create this stunning dessert that everyone will love.
Ready to whip up some chocolate-dipped strawberries? Here’s how you can do it without breaking the bank. Purchase fresh strawberries from your local market to ensure quality. Semi-sweet or dark chocolate chips work beautifully, giving you that luscious flavor. If you want to jazz them up, consider adding sprinkles or crushed nuts for some extra flair. This dessert not only satisfies your sweet tooth but also feels special, making your lunch memorable.
Recipe Overview:
– Servings: 12
– Prep Time: 10 minutes
– Cook Time: 5 minutes
– Total Time: 15 minutes
– Calories: Approximately 50 per strawberry
Nutrition Information:
– Protein: 1g
– Carbohydrates: 8g
– Fat: 3g
– Fiber: 1g
Ingredients:
– 12 fresh strawberries
– 1 cup chocolate chips (semi-sweet or dark)
– Optional: sprinkles or crushed nuts for decoration
Step-by-Step Instructions:
1. Melt the chocolate chips in a microwave-safe bowl. Heat them in 30-second intervals, stirring until smooth.
2. Dip each strawberry into the melted chocolate. Let any excess chocolate drip off.
3. Place the dipped strawberries on parchment paper to cool and harden.
4. If desired, sprinkle with nuts or colorful sprinkles before the chocolate sets.
Tips:
– Use high-quality chocolate for a richer taste.
– Serve these treats immediately for the best texture, or store them in the fridge for up to 24 hours.
Frequently Asked Questions:
– Can I use white chocolate? Absolutely! It offers a delightful twist.
With this easy recipe, you can impress your friends and end your lunch on a delicious high. Enjoy the compliments as they savor each bite!
Chocolate-Dipped Strawberries
Editor’s Choice

Amazon Fresh, Chocolate Baking Chips, Semi Sweet, 24 Oz, 1.5 Lb (Pack of…

Parchment Paper Sheets, 9×13 In Non-Stick Precut Baking Parchment for Ba…

Rainbow sprinkles by Medley Hills farm in Reusable Container 2.2 Lbs. – …
22. Spinach and Artichoke Dip

When you’re hosting friends for lunch, a warm, cheesy spinach and artichoke dip is a crowd-pleaser that feels effortless. Picture this: creamy, flavorful goodness served with crunchy tortilla chips. The rich textures and savory flavors make this dish a hit at any gathering. Plus, it’s quick to prepare, so you can focus on enjoying your time with friends instead of spending all day in the kitchen.
Ready to whip up this delightful dish? Here’s what you need:
Ingredients:
– 1 cup frozen spinach, thawed and drained
– 1 cup canned artichoke hearts, chopped
– 1 cup cream cheese
– ½ cup sour cream
– 1 cup shredded cheese (mozzarella or cheddar)
– 1 teaspoon garlic powder
– Tortilla chips for serving
Step-by-Step Instructions:
1. Preheat your oven to 350°F (175°C).
2. In a mixing bowl, combine the spinach, artichokes, cream cheese, sour cream, shredded cheese, and garlic powder. Mix well until smooth.
3. Pour the mixture into a baking dish and spread it evenly.
4. Bake for 25 minutes or until the dip is bubbly and golden on top.
5. Serve warm with tortilla chips for dipping.
Want to spice things up? Add red pepper flakes for a little heat. This dip also pairs wonderfully with fresh veggies if you’re looking for a healthier option.
Tips for Success:
– Prepare the dip ahead of time and store it in the fridge until you’re ready to bake.
– Experiment with different cheeses for variety.
– Serve alongside a colorful veggie platter for a beautiful presentation.
Enjoy this simple yet delicious spinach and artichoke dip. Your friends will love it, and it will leave you with more time to relax and enjoy their company!
Spinach and Artichoke Dip
Editor’s Choice

DOWAN Casserole Dish, 9×13 Ceramic Baking Dish, Large Lasagna Pan Deep f…

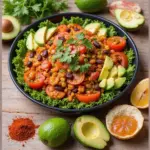
23. Roasted Chickpea Salad

Imagine a salad that’s not just healthy but also packed with flavor and texture. This roasted chickpea salad does just that! Crispy chickpeas turn an ordinary meal into something exciting. Toss them with fresh greens, juicy cherry tomatoes, and a zingy lemon dressing, and you have a dish that feels effortless yet impressive. Perfect for lunch with friends or a light dinner, this salad is sure to be a hit.
Recipe Overview:
– Servings: 4
– Prep Time: 10 minutes
– Cook Time: 30 minutes
– Total Time: 40 minutes
– Calories: Approximately 200 per serving
Nutrition Information:
– Protein: 8g
– Carbohydrates: 30g
– Fat: 5g
– Fiber: 10g
Ingredients:
– 1 can chickpeas, drained and rinsed
– 2 tablespoons olive oil (plus extra for the dressing)
– 1 teaspoon paprika
– Salt and pepper to taste
– 4 cups mixed greens (like spinach and arugula)
– ½ cup cherry tomatoes, halved
– ¼ cup red onion, thinly sliced
– Dressing: 2 tablespoons olive oil, 1 tablespoon lemon juice
Step-by-Step Instructions:
1. Preheat your oven to 400°F (200°C). This will make your chickpeas extra crispy!
2. In a bowl, mix the chickpeas with olive oil, paprika, salt, and pepper.
3. Spread the seasoned chickpeas on a baking sheet in a single layer.
4. Roast for 30 minutes until they are golden brown and crunchy. Keep an eye on them to avoid burning!
5. In a large bowl, combine the mixed greens, halved cherry tomatoes, sliced red onion, and roasted chickpeas.
6. For the dressing, whisk together olive oil and lemon juice. Drizzle it over the salad and toss everything gently to combine.
Tips:
– Add avocado or crumbled feta for a creamier texture.
– Don’t hesitate to mix in your favorite veggies, like bell peppers or cucumbers.
Frequently Asked Questions:
– Can I prepare this in advance? Yes! You can roast the chickpeas ahead of time and toss them with fresh ingredients when you’re ready to serve.
With its delightful crunch and fresh flavors, this roasted chickpea salad is sure to brighten up your lunch table. Enjoy the simplicity and health benefits, making it a go-to recipe for any gathering!
Roasted Chickpea Salad
Editor’s Choice
GoodCook Everyday Nonstick Carbon Steel Baking Sheet Set, 3 Pack – Small…

OXO Good Grips Salad Spinner | Lettuce Spinner | Fruit Washer | Fruit Wa…
AOZITA 17oz Glass Olive Oil Bottle Dispenser – 500ml Green Oil and Vineg…
24. Coconut Chia Pudding

Coconut chia pudding is the perfect blend of healthy and delicious. This light dessert doubles as a snack or a refreshing treat for your next get-together. Imagine digging into a creamy bowl filled with the tropical taste of coconut, topped with vibrant fresh fruit. It’s a delightful choice that feels fancy but takes just minutes to prepare—ideal for impressing friends without the fuss.
Here’s how to whip it up. First, gather your ingredients. You’ll need coconut milk, chia seeds, a sweetener like honey or maple syrup, and your favorite fruits for topping. This recipe is not only simple but also budget-friendly. Plus, you can easily customize it by swapping in different fruits based on the season or what you have on hand.
Recipe Overview:
– Servings: 4
– Prep Time: 10 minutes
– Total Time: 10 minutes (plus chilling)
– Calories: Approximately 150 per serving
Nutrition Information:
– Protein: 4g
– Carbohydrates: 20g
– Fat: 8g
– Fiber: 10g
Ingredients:
– 1 cup coconut milk
– ¼ cup chia seeds
– 2 tablespoons honey or maple syrup
– Fresh fruit for topping (mango, berries, or pineapple)
Step-by-Step Instructions:
1. In a bowl, combine coconut milk, chia seeds, and your choice of sweetener. Mix well.
2. Cover the bowl and refrigerate for at least 2 hours, or overnight for a thicker texture.
3. Before serving, top with fresh fruit and enjoy your tasty pudding!
Tips:
– Choose unsweetened coconut milk for a healthier option.
– Experiment with fruits like kiwi or banana for fun variations.
Curious if chia pudding is healthy? Absolutely! It’s packed with fiber and omega-3 fatty acids, making it a nutritious addition to your meals. So why not try this delightful coconut chia pudding at your next lunch gathering? Your friends will love the tropical twist, and you’ll enjoy the ease of preparation!
A fun fact for lunch ideas for entertaining friends: chia seeds soak up liquid to swell up to 10x their size, turning coconut milk into a creamy dessert in minutes. With just a few ingredients, you can wow guests without the fuss.
Coconut Chia Pudding
Editor’s Choice

BetterBody Foods Organic Chia Seeds 2 lbs, 32 Oz, with Omega-3, Non-GMO,…

Thai Kitchen Gluten Free Unsweetened Coconut Milk, 13.66 fl oz (Pack of 12)

Butternut Mountain Farm Pure Vermont Maple Syrup, Grade A, Dark Color, R…
25. Lemon Garlic Roasted Chicken

This Lemon Garlic Roasted Chicken is the star of any lunch gathering. Imagine juicy chicken thighs infused with zesty lemon and aromatic garlic, all roasted to perfection. This dish not only tastes amazing, but it also looks beautiful on the table, making it perfect for impressing your friends. Pair it with colorful veggies, and you’ll have a meal that’s both hearty and delightful.
Let’s dive into the details of this simple yet flavorful recipe. With just 15 minutes of prep time, you can enjoy a sensational lunch within an hour and a quarter. Plus, each serving packs around 400 calories, giving you a tasty and satisfying option that won’t weigh you down.
Recipe Overview:
– Servings: 4
– Prep Time: 15 minutes
– Cook Time: 1 hour
– Total Time: 1 hour 15 minutes
– Calories: Approximately 400 per serving
Nutrition Information:
– Protein: 40g
– Carbohydrates: 10g
– Fat: 20g
– Fiber: 0g
Ingredients:
– 4 chicken thighs, bone-in and skin-on
– 2 lemons, juiced and zested
– 4 cloves garlic, minced
– 2 tablespoons olive oil
– Fresh thyme and rosemary
– Salt and pepper to taste
Step-by-Step Instructions:
1. Preheat your oven to 425°F (220°C).
2. In a mixing bowl, combine the lemon juice, zest, minced garlic, olive oil, salt, and pepper.
3. Generously rub this flavorful mixture over the chicken thighs before placing them in a baking dish.
4. Roast in the oven for about 1 hour or until the chicken is golden brown and the skin is nice and crispy.
Tips:
– Serve this chicken with a side of roasted vegetables for a complete meal.
– For an extra punch of flavor, consider marinating the chicken overnight. It makes a world of difference!
– Can’t find chicken thighs? You can use boneless chicken; just adjust the cooking time to ensure it stays juicy.
This dish is not just a meal; it’s an experience. Your friends will love the aroma wafting through your kitchen, and you’ll enjoy the compliments that follow. So gather your ingredients and get cooking—your lunch gathering just got a whole lot tastier!
Even with just 15 minutes of prep, lunch ideas for entertaining friends can feel effortless. Lemon garlic roasted chicken brings juicy flavor and bright citrus to the table, inspiring conversation and a stunning spread with colorful veggies.
Lemon Garlic Roasted Chicken
Editor’s Choice
Lodge 12 Inch Cast Iron Skillet with Red Silicone Hot Handle Holder – Pr…

ThermoPro TP19H Digital Meat Thermometer for Cooking with Ambidextrous B…

Cole & Mason Fresh Herb Keeper – Acrylic Storage Container for Refrigera…
26. Pesto Chicken Salad

Imagine a lunch that feels fancy but is surprisingly easy to make. That’s exactly what the pesto chicken salad brings to your table! This dish combines juicy chicken with vibrant pesto and creamy Greek yogurt, creating a meal that’s both refreshing and satisfying. You can serve it in a wrap or over a bed of greens for a light, flavorful option—perfect for impressing your friends without the hassle.
Recipe Overview:
– Servings: 4
– Prep Time: 10 minutes
– Cook Time: 15 minutes
– Total Time: 25 minutes
– Calories: About 300 per serving
Nutrition Information:
– Protein: 25g
– Carbohydrates: 5g
– Fat: 20g
– Fiber: 0g
Ingredients:
– 2 cups cooked chicken, shredded or diced
– ½ cup pesto
– ½ cup Greek yogurt
– ½ cup diced bell pepper
– Salt and pepper to taste
Step-by-Step Instructions:
1. In a mixing bowl, combine the cooked chicken, pesto, Greek yogurt, and diced bell pepper.
2. Add salt and pepper to taste, then mix everything until it’s well combined.
3. Serve this salad as is, or spoon it into wraps or over mixed greens for a delicious twist.
Tips:
– Add crunch: Toss in some nuts or seeds for extra texture.
– Make ahead: Prepare this salad a day in advance. It stores well in the fridge, making your lunch prep a breeze!
Frequently Asked Questions:
– Can I use store-bought chicken? Absolutely! Rotisserie chicken is a great shortcut.
This pesto chicken salad is not only quick to prepare, but it also bursts with flavor. It’s a fantastic choice for a casual lunch with friends or a light dinner. Enjoy the bright taste of fresh ingredients, and let this dish become a staple in your entertaining repertoire!
Pesto Chicken Salad
Editor’s Choice

Bento Box Adult Lunch Box, Containers for Adults Men Women with 4 Compar…

Filippo Berio Pesto, Organic Classic Basil, 6.7 Ounce Glass Jar, Gluten …

Whole Foods Market Organic Classic Rotisserie Chicken (Cold)
27. Avocado Toast with Radishes

Elevate your lunch game with a trendy dish that’s as delicious as it is easy to make: avocado toast topped with crunchy radishes. This vibrant meal not only looks stunning but also brings a fresh burst of flavor to your table. Perfect for casual gatherings, this simple yet elegant choice will impress your friends and have them asking for seconds.
Recipe Overview:
– Servings: 2
– Prep Time: 5 minutes
– Cook Time: 0 minutes
– Total Time: 5 minutes
– Calories: About 250 per serving
Nutrition Information:
– Protein: 4g
– Carbohydrates: 30g
– Fat: 15g
– Fiber: 5g
Ingredients:
– 2 slices of whole-grain bread
– 1 ripe avocado
– 4 radishes, thinly sliced
– Salt and pepper to taste
– Optional: chili flakes for a spicy twist
Step-by-Step Instructions:
1. Toast the bread until it’s golden brown and crispy.
2. In a bowl, mash the ripe avocado. Add a pinch of salt and pepper.
3. Spread the creamy avocado on the warm, toasted bread.
4. Top with the thinly sliced radishes for that crunchy texture.
5. If you like a little heat, sprinkle some chili flakes on top. Serve right away for the best taste!
Tips:
– Experiment with toppings like a poached egg or fresh herbs for added flavor.
– Pair with a side of fresh fruit to create a balanced meal.
– Serve it on a wooden board for a rustic presentation.
– Try different types of bread, like sourdough or rye, for a unique twist.
Frequently Asked Questions:
– Can I make this ahead of time? It’s best to enjoy avocado toast fresh to avoid browning.
This dish is not just a meal; it’s a celebration of flavors and textures that will brighten any lunch gathering. Enjoy the ease of preparing a dish that feels special without the fuss!
Avocado Toast with Radishes
Editor’s Choice
Acacia Wood Cutting Board and Chopping Board with Handle for Meat, Chees…

Spice Classics Crushed Red Pepper, 12 oz – One 12 Ounce Container of Dri…
Conclusion

With these 27 effortless lunch ideas, you can entertain friends while keeping things relaxed and enjoyable. Each recipe offers something unique, ensuring that you can mix and match to create the perfect picnic spread.
Whether you’re firing up the grill, preparing colorful salads, or indulging in sweet treats, these meals will make your gatherings memorable. So gather your loved ones and enjoy the tasty creations you’ve made together!
Note: We aim to provide accurate product links, but some may occasionally expire or become unavailable. If this happens, please search directly on Amazon for the product or a suitable alternative.
This post contains Amazon affiliate links, meaning I may earn a small commission if you purchase through my links, at no extra cost to you.
Frequently Asked Questions
What Are Some Easy Lunch Recipes for Entertaining Friends?
When it comes to entertaining friends, easy lunch recipes can make all the difference! Think along the lines of charcuterie boards, where you can mix various cheeses, cured meats, and fresh fruits for an effortless yet impressive spread. Another idea is gourmet sandwiches made with artisan bread and unique fillings. Don’t forget about salads—a vibrant quinoa or pasta salad can be both satisfying and visually appealing!
How Can I Plan Casual Dining Ideas for a Fun Lunch Party?
Planning a fun lunch party can be a breeze! Start with a themed menu that resonates with your friends’ tastes. Incorporate finger foods like sliders, mini tacos, or stuffed mushrooms for easy serving. Setting up an interactive element, like a , encourages mingling and creativity. Make sure to create a cozy atmosphere with relaxed seating and perhaps some background music to set the mood!
What Are Some Quick Entertaining Meals I Can Prepare?
If time is of the essence, quick entertaining meals are your best friend! Consider stir-fry dishes that can be whipped up in under 30 minutes, using pre-cut veggies and your choice of protein. Another option is a pasta dish with a simple yet flavorful sauce, like garlic and olive oil or a creamy pesto. Pair your meal with a fresh side salad and you’ll have a delightful lunch ready in no time!
What Recipes for Gatherings Are Both Delicious and Simple?
For gatherings, you want recipes that wow without the hassle! Think about stuffed bell peppers or casseroles that can be made ahead of time and simply heated before serving. Another great option is a platter of roasted vegetables with a tangy dip. These dishes are not only delicious but also allow you to spend more time with your friends and less in the kitchen!
How Do I Create Elevated Picnic Lunch Ideas for Entertaining Friends?
Elevating your picnic lunch is all about presentation and quality ingredients! Opt for a beautiful bento box filled with artisanal cheeses, olives, fresh fruits, and homemade dips. You can also pack savory pastries or gourmet wraps for a touch of sophistication. Don’t forget to bring along a cozy blanket and some refreshing drinks to complete the luxurious picnic experience!
Related Topics
lunch ideas
picnic recipes
easy entertaining
casual dining
quick meals
fun lunch parties
gathering recipes
effortless entertaining
outdoor dining
seasonal ingredients
easy lunch recipes
friends gathering