Packing lunch every day can feel like a daunting task, especially when you want to keep it healthy and delicious. If you’ve ever found yourself staring blankly at your fridge, wishing for something exciting to take to work, you’re not alone. This struggle often leads to the same old tired sandwiches or takeout, and that’s no fun for anyone. So, I decided to gather some inspiration to help shake things up.
This post is for busy adults who want more than just a meal in their lunch box. If you’re juggling work, family, and life, you probably care about nutrition but also want something that excites your taste buds. You want lunches that are satisfying and enjoyable, not just filling.
You’re in luck! I pulled together 30+ Indian lunch box ideas that are tasty, nutritious, and easy to prepare. Each option offers a burst of flavor that will brighten your day, keeping you energized through those long hours at the office or while you run errands. Whether you’re looking for vegetarian delights, protein-packed dishes, or something with a bit of spice, you’ll find plenty of options here.
So, let’s dive in and transform your lunch routine! With these ideas, you can enjoy homemade meals that make each lunchtime something to look forward to. Say goodbye to boring lunches and hello to a world of flavors right in your lunch box!
1. Vegetable Biryani with Raita

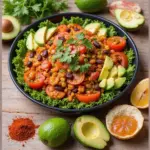
Are you tired of the same old lunch options? Spice up your midday meal with a delicious Vegetable Biryani! This fragrant, one-pot dish combines fluffy basmati rice with colorful vegetables and aromatic spices. It’s not just satisfying; it’s a feast for your senses. Pair it with a cool cucumber raita to balance the spice and make it a complete meal.
To make this delightful dish, start by heating some oil in a pan. Sauté sliced onions until they turn golden brown. Add your favorite veggies, like peas, carrots, and beans, and stir them in. Then, mix in soaked basmati rice along with spices such as cumin, cardamom, and bay leaves. The result? A mouthwatering biryani that’s perfect for your lunch box!
Here’s how to bring this dish to life:
Recipe Overview:
– Servings: 2-3
– Prep Time: 20 mins
– Cook Time: 30 mins
– Total Time: 50 mins
– Calories: Approx. 350 per serving
Nutritional Information:
– Carbohydrates: 55g
– Protein: 9g
– Fat: 9g
Ingredients:
– 1 cup basmati rice
– 2 cups mixed vegetables (carrots, peas, beans)
– 1 onion, sliced
– 2 tbsp oil
– 1 tsp cumin seeds
– 2-3 cardamom pods
– 1 bay leaf
– 1 tsp garam masala
– Salt to taste
– 1 cucumber for raita
– 1 cup yogurt for raita
Instructions:
1. Heat oil in a pan and add cumin seeds. Let them splutter for extra flavor.
2. Add the sliced onions and sauté until they are golden brown.
3. Stir in the mixed vegetables, followed by the soaked rice.
4. Add the spices, cover with water, and cook until the rice is fluffy.
5. For the raita, mix diced cucumber with yogurt and season it with salt.
Use day-old rice for better texture and flavor.
FAQs:
– How can I store biryani? Keep it in an airtight container in the fridge for up to 3 days.
This Vegetable Biryani is not only easy to prepare but also packed with nutrition. Perfect for a tasty lunch or dinner, it’ll keep your taste buds happy and your stomach full!
Vegetable Biryani with Raita
Editor’s Choice

Leak Resistant Stainless Steel Bento Box For Adults|Stainless Steel Lunc…

Amazon Basics Electric Coffee Grinder, Coffee Bean and Spice Grinder, Wi…

WHYSKO Meal Prep Stainless Steel Mixing Bowl (5-Piece Set) Home, Refrige…
2. Chana Masala with Quinoa

Chana Masala with Quinoa is a fantastic choice for your lunch box. This Indian chickpea curry is not only rich in protein but also bursting with flavor. When you pair it with quinoa, you get a meal that’s both filling and nutritious. Imagine the warmth of spices mingling with hearty chickpeas, all atop fluffy quinoa—it’s comfort food at its best!
To whip this up, start by cooking your chickpeas until they’re tender. In a pan, sauté onions until they turn golden, then add diced tomatoes and a blend of spices like coriander and cumin. Let everything simmer, allowing the spices to deepen in flavor. Finally, serve this aromatic mix over a bed of cooked quinoa. Your taste buds will thank you!
Here’s your quick recipe overview:
– Servings: 2-3
– Prep Time: 15 minutes
– Cook Time: 25 minutes
– Total Time: 40 minutes
– Calories: Approximately 400 per serving
Nutritional Information:
– Carbohydrates: 60g
– Protein: 20g
– Fat: 6g
Ingredients:
– 1 can chickpeas, drained
– 1 cup cooked quinoa
– 1 onion, chopped
– 1 tomato, diced
– 2 tsp chana masala spice mix
– 2 tbsp oil
– Salt to taste
Instructions:
1. Heat the oil in a pan and add the onions. Cook until they are translucent.
2. Stir in the diced tomatoes and cook until they soften.
3. Add the chickpeas and chana masala spice mix, cooking for about 10 minutes.
4. Serve warm over the quinoa.
Don’t forget to add a squeeze of lemon for an extra burst of flavor!
FAQs:
– Can I use dried chickpeas? Yes! Just soak them overnight and cook them before using.
This meal is perfect for busy days when you want something quick, healthy, and satisfying.
Chana Masala with Quinoa
Editor’s Choice


BetterBody Foods Organic Quinoa, Vegan, Gluten Free, Low Glycemic Rice R…

Bentgo Prep – 20-Piece 3-Compartment Reusable Meal Prep Containers with …
3. Paneer Tikka Wrap

Elevate your lunch game with a scrumptious Paneer Tikka Wrap! This wrap bursts with flavor while giving you a hearty dose of protein. Imagine tender, marinated paneer cubes grilled to perfection, paired with crisp veggies, all snugly wrapped in a soft roti or tortilla. It’s a lunch that’s as satisfying as it is nutritious.
Start by marinating the paneer in a mix of yogurt, spices, and a squeeze of lemon juice. Let it soak up those flavors for at least 30 minutes. Then, grill the paneer until it’s golden and smoky. Layer it with fresh lettuce, crunchy cucumbers, and a zesty mint chutney in your wrap. This meal is fantastic for meal prep—just roll it up right before you dig in for a fresh taste!
Recipe Overview:
– Servings: 2
– Prep Time: 20 mins
– Cook Time: 15 mins
– Total Time: 35 mins
– Calories: Approx. 500 per serving
Nutritional Information:
– Carbohydrates: 50g
– Protein: 25g
– Fat: 20g
Ingredients:
– 200g paneer, cubed
– 1 cup yogurt
– 1 tsp tikka masala
– 2 roti or tortillas
– Fresh veggies (lettuce, cucumber, bell pepper)
– Mint chutney
Instructions:
1. Marinate the paneer in yogurt and tikka masala for at least 30 minutes.
2. Preheat your grill to high heat and cook the paneer until charred.
3. Lay out your roti or tortillas, and fill them with grilled paneer and fresh vegetables.
4. Drizzle with mint chutney before rolling tightly.
For a healthier twist, use whole wheat tortillas.
FAQs:
Can I make this vegan? Yes! Simply replace the paneer with tofu for a delicious vegan option.
With these wraps, you not only satisfy your hunger but also enjoy a meal that’s colorful and packed with nutrition. Perfect for busy days or a delightful picnic!
Paneer Tikka Wrap
Editor’s Choice

SENSARTE Nonstick Grill Pan for Stove Tops, Versatile Griddle with Pour …

WGCC Meal Prep Containers, 50 Pack Extra-thick Food Storage Containers w…
Amazon Basics Electric Coffee Grinder, Coffee Bean and Spice Grinder, Wi…
4. Spinach and Lentil Soup

Warm up your lunch break with a comforting bowl of Spinach and Lentil Soup. This dish packs a flavorful punch while also providing a healthy boost. Combining protein-rich lentils and fresh spinach, this soup is a nourishing choice for busy adults. Plus, it’s easy to prepare, making it perfect for a quick lunch at work or home.
To whip up this delightful soup, start by cooking lentils in vegetable broth until they’re tender. While that’s happening, sauté chopped onions and minced garlic in a separate pot until they’re golden and fragrant. Then, toss in fresh spinach and let it wilt. For a creamy texture, blend everything together, or keep it chunky for a more rustic feel. Enjoy this hearty soup with a slice of whole-grain bread for a filling meal.
Here’s how to make it:
Ingredients:
– 1 cup lentils (any variety)
– 2 cups fresh spinach
– 1 onion, chopped
– 2 garlic cloves, minced
– 1 tsp cumin
– 4 cups vegetable broth
– Salt and pepper to taste
Instructions:
1. Cook the lentils in vegetable broth until they are soft.
2. In a separate pot, sauté the chopped onions and minced garlic until fragrant.
3. Add cumin and spinach, cooking until the spinach wilts.
4. Blend the soup to your desired consistency. Optionally, add a splash of lemon juice for extra brightness.
This soup freezes well, too! You can store it in airtight containers for up to three months. So, make a big batch and enjoy quick lunches whenever you need them.
Quick Tips:
– Use any lentil variety for different flavors.
– Choose fresh spinach for the best nutrition.
– Add spices like turmeric for added health benefits.
– Pair with whole-grain bread for a balanced meal.
Spinach and Lentil Soup
Editor’s Choice

Rubbermaid Brilliance 16-Cup Airtight Food Storage Container with Lid Cl…

KitchenAid Variable Speed Corded Hand Blender KHBV53, Contour Silver

Oroweat Whole Grains 100% Whole Wheat Bread, Wheat Bread Free From Artif…
5. Masoor Dal with Brown Rice

Imagine a warm bowl of Masoor Dal waiting for you at lunch. This popular Indian dish is not just delicious; it’s also packed with nutrients. When you pair it with wholesome brown rice, you create a meal that fuels your day. It’s perfect for busy adults like you who want something quick yet satisfying.
Making masoor dal is simple. You’ll cook the lentils until they’re tender, adding a splash of turmeric and a mix of spices for that irresistible flavor. A tadka, or tempering, of mustard seeds and curry leaves takes it to the next level. Serve it over steaming brown rice, and you’ll have a lunch that feels both hearty and healthy.
Here’s how to prepare this delightful dish:
Recipe Overview:
– Servings: 2-3
– Prep Time: 10 mins
– Cook Time: 30 mins
– Total Time: 40 mins
– Calories: Approx. 350 per serving
Nutritional Information:
– Carbohydrates: 60g
– Protein: 18g
– Fat: 7g
Ingredients:
– 1 cup masoor dal
– 1 cup brown rice
– 1 onion, chopped
– 2-3 green chilies, slit
– 1 tsp mustard seeds
– 2 tbsp oil
– Salt to taste
Instructions:
1. Rinse the brown rice and cook it in water until fluffy.
2. In a pot, boil the masoor dal with turmeric until soft.
3. In a pan, heat oil and add mustard seeds; let them splutter.
4. Add chopped onions and green chilies to the pan; sauté until golden.
5. Mix the cooked dal with the tadka and serve hot over the brown rice.
For an extra kick, add a side of pickles. This meal not only satisfies your hunger but also delights your taste buds with its rich flavors.
If you like it spicier, simply toss in more green chilies during cooking. This is a simple way to adjust the heat level to your preference!
Now you have a nutritious and delicious lunch option that’s quick to prepare. Enjoy your flavorful Masoor Dal with Brown Rice, and feel good knowing you’re treating your body right.
Masoor Dal with Brown Rice
Editor’s Choice

Duo 7-in-1 Mini Electric Pressure Cooker, Slow Rice Cooker, Steamer, Sau…
Amazon Basics Electric Coffee Grinder, Coffee Bean and Spice Grinder, Wi…

Stainless Steel Lunch Box, 3 Compartments Metal Bento Box for Kids Adult…
6. Vegetable Upma

Vegetable Upma is a delightful dish that brings the flavors of South India right to your lunch table. Often served as breakfast or a light meal, this savory treat is made from semolina and packed with colorful vegetables and spices. You’ll enjoy its fluffy texture and rich taste, making it a satisfying option for adults on the go.
Making Upma is quick and easy. Start by toasting semolina in a pan until it turns golden brown. This step enhances its nutty flavor. Next, add mustard seeds, urad dal, and a mix of your favorite chopped veggies, like carrots and peas. Pour in water, let it boil, and then stir in the semolina. In just a few minutes, you’ll have a hearty dish ready to enjoy.
Here’s how to make it:
Recipe Overview:
– Servings: 2
– Prep Time: 10 mins
– Cook Time: 15 mins
– Total Time: 25 mins
– Calories: Approx. 300 per serving
Nutritional Information:
– Carbohydrates: 45g
– Protein: 10g
– Fat: 7g
Ingredients:
– 1 cup semolina
– 1 cup mixed vegetables (carrots, peas, beans)
– 1 tsp mustard seeds
– 1 tsp urad dal
– 2 cups water
– Salt to taste
Instructions:
1. Heat a pan and toast semolina until it turns golden; then set aside.
2. In the same pan, heat oil and add mustard seeds and urad dal.
3. Mix in the vegetables, add water, and bring it to a boil.
4. Gradually add the toasted semolina while stirring continuously until all the water is absorbed.
For a tropical twist, garnish with fresh coconut. This dish is versatile, so feel free to swap in any vegetables you have on hand.
Got questions? You might wonder if Upma is gluten-free. Unfortunately, it’s not, as it uses semolina made from wheat. But don’t let that stop you! Give this nourishing dish a try—it’s perfect for a busy lunch hour or a light dinner, full of flavor and nutrition.
Vegetable Upma
Editor’s Choice

CAROTE Nonstick Frying Pan Skillet,Non Stick Granite Fry Pan Egg Pan Ome…

Fullstar The Original Pro Chopper – Vegetable Chopper and Spiralizer, Fo…

Bento Box Adult Lunch Box, Containers for Adults Men Women with 4 Compar…
7. Quinoa Pulao

Quinoa Pulao is not just a meal; it’s a delightful experience that transforms your lunch into something special. Imagine a vibrant dish packed with colorful vegetables and fragrant spices. This gluten-free, high-protein option gives a fresh twist to the classic pulao you love. It’s perfect for those days when you want to feel satisfied without compromising on health.
To whip up this tasty dish, start by sautéing onions and garlic in a splash of oil. The aroma will fill your kitchen and whet your appetite. Next, toss in your favorite veggies—think bell peppers, peas, and carrots. Add rinsed quinoa, a sprinkle of spices, and vegetable broth. Soon, you’ll have a fluffy, nutritious bowl that feels indulgent yet wholesome.
Here’s how to make it:
Ingredients:
– 1 cup quinoa
– 2 cups mixed vegetables (like bell peppers, peas, and carrots)
– 1 onion, chopped
– 2 cups vegetable broth
– 1 tsp cumin
– Salt to taste
– 1 tbsp oil (for sautéing)
Instructions:
1. Rinse the quinoa under cold water until it runs clear. This helps remove the bitter coating.
2. Heat oil in a pan. Sauté chopped onions and minced garlic until they are golden and fragrant.
3. Add the mixed vegetables and sauté for a few minutes until they soften.
4. Stir in the rinsed quinoa, cumin, and vegetable broth. Bring the mixture to a boil.
5. Once boiling, reduce the heat, cover, and let it simmer for about 15 minutes or until the quinoa is fluffy.
6. Fluff with a fork before serving for the best texture.
You can easily store leftovers. Just keep them in an airtight container in the fridge for up to four days. Quinoa Pulao is a meal that not only nourishes your body but also delights your taste buds. Enjoy every bite knowing you’re treating yourself well!
Quinoa Pulao
Editor’s Choice

Pride Of India – Natural Three Color Bolivian Royal Quinoa – Protein Ric…
Rubbermaid Brilliance 16-Cup Airtight Food Storage Container with Lid Cl…
8. Vegetable Samosa with Mint Chutney

Craving a tasty snack that’s easy to pack for lunch? Try making your own Vegetable Samosas! These golden, crispy pastries are filled with a delicious mix of spiced potatoes and peas. They make a perfect addition to your lunch box, especially when paired with zesty mint chutney that boosts the flavors.
To get started, you’ll want to create a flavorful filling. Simply mash boiled potatoes and stir in peas along with your choice of spices and fresh herbs. Next, whip up a simple dough using flour and water. Shape the dough into triangles, filling each pocket with your savory mixture. Fry them until they’re beautifully golden or bake for a healthier twist.
Here’s a complete recipe to make your own Vegetable Samosas:
Recipe Overview:
– Servings: 4
– Prep Time: 30 mins
– Cook Time: 15 mins
– Total Time: 45 mins
– Calories: Approx. 250 per samosa
Nutritional Information:
– Carbohydrates: 35g
– Protein: 5g
– Fat: 12g
Ingredients:
– 2 cups flour
– 2 potatoes, boiled and mashed
– 1 cup peas
– 1 tsp cumin
– Salt to taste
– Oil for frying (or baking for a healthier option)
Instructions:
1. Mix flour and water to form a dough and let it rest for 15 minutes.
2. Combine mashed potatoes, peas, cumin, and salt in a bowl for the filling.
3. Roll out the dough, cut into circles, and fill with the potato-pea mixture.
4. Deep-fry in hot oil until golden brown, or bake at 375°F (190°C) for 25 minutes.
Want to make these ahead of time? You can freeze the uncooked samosas for up to a month. Just pull them out and fry or bake when you’re ready to enjoy!
With these Vegetable Samosas, you’ll have a delightful, homemade treat to brighten your lunch. They’re not just tasty; they’re also a great way to get your veggies in. Enjoy your cooking adventure!
Vegetable Samosa with Mint Chutney
Editor’s Choice

Commercial Samosa Maker,Automatic Dumpling Machine,Spring Roll Maker Mac…
CAROTE Nonstick Frying Pan Skillet,Non Stick Granite Fry Pan Egg Pan Ome…

Amazon Basics Silicone Rectangular Baking Mat, Non-Stick Reusable Oven B…
9. Kadai Paneer with Whole Wheat Roti

Indulge in the rich flavors of Kadai Paneer, a beloved Indian dish that blends creamy paneer with colorful bell peppers and aromatic spices. This dish is a feast for your senses. As you cook, the vibrant colors of the bell peppers and the fragrant spices fill your kitchen, making it a delightful experience. Pair it with soft, warm whole wheat roti, and you have a satisfying lunch that nourishes the body and soul.
To whip up this delicious meal, start by sautéing onions and bell peppers until they’re soft and aromatic. Next, add juicy tomatoes and creamy paneer cubes, letting them soak up the spices. The result is a hearty dish that’s not only tasty but also packed with nutrients. Plus, it’s easy to prepare, making it perfect for a busy weekday lunch.
Recipe Overview:
– Servings: 2-3
– Prep Time: 15 mins
– Cook Time: 20 mins
– Total Time: 35 mins
– Calories: Approx. 400 per serving
Nutritional Information:
– Carbohydrates: 50g
– Protein: 18g
– Fat: 20g
Ingredients:
– 200g paneer, cubed
– 1 onion, sliced
– 1 bell pepper, sliced
– 2 tomatoes, chopped
– 1 tsp kadai masala
– 2 tbsp oil
Instructions:
1. Heat oil in a pan over medium heat. Add sliced onions and bell peppers. Sauté until they are soft.
2. Stir in the chopped tomatoes and cook until they are mushy.
3. Add the paneer cubes and kadai masala. Cook for an additional 5 minutes, mixing well.
4. Serve hot with freshly made whole wheat roti for a complete meal.
Feel free to drizzle a bit of cream on top for extra richness!
FAQs:
Is this dish spicy? You can easily adjust the spice level to suit your taste. Just add less kadai masala if you prefer a milder flavor.
Try this recipe for your next lunch. It’s a simple yet flavorful way to enjoy a healthy meal!
Kadai Paneer with Whole Wheat Roti
Editor’s Choice
CAROTE Nonstick Frying Pan Skillet,Non Stick Granite Fry Pan Egg Pan Ome…

365 by Whole Foods Market, Organic 100% Whole Wheat Flour, 80 Ounce

Rani Kashmiri Masala Indian Curry Spice Blend 3oz (85g) PET Jar ~ All Na…
10. Methi Thepla

Methi Thepla is a delightful Indian flatbread that brings together the earthy flavor of fenugreek leaves and a mix of spices. This dish is not just tasty; it’s also packed with nutrients, making it an ideal lunch option. You can enjoy these soft, spicy breads on their own or pair them with yogurt and pickles for a satisfying meal. They’re great for meal prep too, so you can make them in advance and grab them when you’re on the go.
To whip up this delicious bread, you’ll need a few simple ingredients. Start by mixing whole wheat flour with finely chopped methi leaves, spices, and water to create a smooth dough. Roll the dough into thin circles and cook them on a hot griddle until they turn golden brown. The aroma of the spices and fresh methi wafting through your kitchen will be irresistible!
Here’s how to make Methi Thepla step-by-step:
Ingredients:
– 2 cups whole wheat flour
– 1 cup fresh methi leaves, chopped
– 1 tsp turmeric powder
– 1 tsp cumin powder
– Salt to taste
– Water (as needed for the dough)
Instructions:
1. In a large bowl, combine whole wheat flour, chopped methi leaves, turmeric, cumin, and salt.
2. Gradually add water to the flour mixture and knead until you have a soft dough.
3. Divide the dough into small balls and roll each ball into thin circles using a rolling pin.
4. Heat a griddle over medium heat. Place a rolled-out circle on the griddle and cook for about 1-2 minutes on each side, or until golden brown.
5. Repeat with the remaining dough. Serve warm with yogurt or your favorite pickles for a delicious lunch!
You can also freeze leftover Theplas for later use. Just make sure to wrap them well. Remember, fresh methi adds the best flavor, but you can use frozen methi leaves in a pinch.
FAQs:
– Can I use frozen methi? Yes, frozen works too, but fresh is always better for flavor.
– How do I store leftovers? Keep them in an airtight container in the fridge for up to a week, or freeze them for longer storage.
Methi Thepla is a versatile, nutritious option for your lunch box. Enjoy the flavors and benefits they bring!
Methi Thepla
Editor’s Choice
365 by Whole Foods Market, Organic 100% Whole Wheat Flour, 80 Ounce


Chefman XL Electric Griddle with Removable Temperature Control, Immersib…
11. Daal Makhani

Daal Makhani is a beloved dish that brings warmth and comfort to any lunch box. This creamy lentil delight, a hallmark of North Indian cuisine, features the rich flavors of black lentils and kidney beans. When you slow-cook these ingredients with spices and a touch of cream, you create a mouthwatering meal that’s hard to resist. Picture this: a bowl of Daal Makhani, served with fluffy naan or fragrant steamed rice, ready to brighten your lunch break.
To whip up this delicious dish, start by soaking the lentils overnight. This helps them cook evenly. The next day, simmer them slowly with spices and tomatoes, then stir in cream for that velvety finish. It’s simple, satisfying, and perfect for meal prep.
Now, let’s get into the details of making Daal Makhani:
Recipe Overview:
– Servings: 4
– Prep Time: 15 mins
– Cook Time: 1 hour
– Total Time: 1 hour 15 mins
– Calories: Approx. 400 per serving
Nutritional Information:
– Carbohydrates: 62g
– Protein: 20g
– Fat: 15g
Ingredients:
– 1 cup black lentils
– 1/2 cup kidney beans
– 1 onion, chopped
– 2 tomatoes, puréed
– 1/2 cup cream
– 2 tsp ginger-garlic paste
– Salt to taste
Instructions:
1. Soak the black lentils and kidney beans overnight.
2. Cook the soaked lentils and beans in water until they’re tender.
3. In a separate pan, sauté the chopped onion until golden, then add ginger-garlic paste and spices.
4. Mix the cooked lentils with the sautéed onions and puréed tomatoes, then let it simmer.
5. Stir in the cream for that luxurious texture.
Allow the flavors to meld for the best taste.
Curious about storage? You can keep Daal Makhani in the fridge for up to a week, making it a convenient option for busy days. Enjoy this hearty dish and savor the flavors of India in your lunch box!
Daal Makhani
Editor’s Choice
Duo 7-in-1 Mini Electric Pressure Cooker, Slow Rice Cooker, Steamer, Sau…
Amazon Basics Electric Coffee Grinder, Coffee Bean and Spice Grinder, Wi…
WGCC Meal Prep Containers, 50 Pack Extra-thick Food Storage Containers w…
12. Stuffed Bell Peppers

Imagine a lunch that looks as good as it tastes. Stuffed bell peppers bring a splash of color and a burst of flavor to your midday meal. These vibrant veggies are not only eye-catching but also packed with nutritious ingredients. You can fill them with a delightful mix of rice, lentils, and spices, then bake them until they are tender and full of flavor.
To make these stuffed bell peppers, start by selecting fresh, colorful peppers. Hollow them out and fill them with a savory combination of cooked rice, lentils, onions, and your favorite spices. As they bake, the flavors blend together beautifully, creating a dish that is both satisfying and healthy. Plus, they look fantastic in your lunchbox, making your meal feel special.
Here’s a quick overview of what you need to know:
– Servings: 4
– Prep Time: 20 mins
– Cook Time: 30 mins
– Total Time: 50 mins
– Calories: Approx. 300 per serving
Nutritional Breakdown:
– Carbohydrates: 50g
– Protein: 12g
– Fat: 8g
Ingredients:
– 4 bell peppers (any color works!)
– 1 cup cooked rice (white or brown)
– 1/2 cup cooked lentils
– 1 onion, chopped
– 1 tsp cumin
– Salt to taste
Instructions:
1. Preheat your oven to 375°F (190°C).
2. Carefully hollow out the bell peppers and set them aside.
3. In a bowl, combine the cooked rice, lentils, chopped onion, cumin, and salt. Mix well.
4. Stuff the bell pepper halves with the rice mixture until they’re full.
5. Place the stuffed peppers in a baking dish and cover with foil. Bake for 25-30 minutes or until the peppers are tender.
Feel free to add cheese on top for an extra treat!
FAQs:
Can I use quinoa instead of rice? Yes, quinoa is a great substitute!
With these stuffed bell peppers, you get a wholesome meal that’s both delicious and visually appealing. Give them a try for your next lunch, and enjoy a boost of nutrients and flavors!
Stuffed Bell Peppers
Editor’s Choice

8-Piece Deep Glass Baking Dish Set with Plastic lids,Rectangular Glass B…

Christmas Bells Silicone Molds Bells Fondant Mold For Cake Decorating Cu…
You might also like

13. Aloo Paratha

Aloo Paratha is a beloved Indian dish that brings comfort and flavor to your lunch box. This hearty flatbread is filled with spiced mashed potatoes, making it a satisfying choice for any meal. Pair it with cool yogurt or zesty pickle, and you have a complete, tasty meal that keeps hunger at bay.
Making Aloo Paratha is simple and fun. Start by creating a soft dough with whole wheat flour. Then, mix boiled and mashed potatoes with your favorite spices and herbs. Roll out the dough, stuff it with the potato mixture, and cook on a hot griddle until it turns golden brown. These parathas are great for meal prep and can be enjoyed warm or even at room temperature.
Here’s how to make them:
Recipe Overview:
– Servings: 4
– Prep Time: 15 mins
– Cook Time: 20 mins
– Total Time: 35 mins
– Calories: Approx. 250 per paratha
Nutritional Information:
– Carbohydrates: 40g
– Protein: 6g
– Fat: 10g
Ingredients:
– 2 cups whole wheat flour
– 2 potatoes, boiled and mashed
– 1 tsp cumin
– Salt to taste
– Oil for cooking
Instructions:
1. Combine the flour with water to form a smooth dough, then let it rest for 10 minutes.
2. Mix the mashed potatoes with cumin and salt until well combined.
3. Divide the dough into small balls. Roll out each ball into a small circle, add a spoonful of the potato mixture, and fold the dough over the filling.
4. Roll the stuffed dough gently into flatbreads.
5. Cook each paratha on a hot griddle, using a little oil until both sides are golden and crispy.
Serve your Aloo Parathas with a dollop of butter for extra richness.
FAQs:
– Can I freeze Aloo Parathas? Yes, wrap them tightly and freeze for later enjoyment. They maintain their flavor well!
With these easy steps, you can create a delicious Aloo Paratha that brightens any lunch. Enjoy the rich flavors and the warmth of homemade cooking in every bite!
Aloo Paratha
Editor’s Choice

365 by Whole Foods Market, Flour 100 Percent Whole Wheat Pastry Organic,…

Nordic Ware Two Burner Griddle, 10.3 x 17.4 inches, Non-Stick, Black

Airtight Food Storage Containers with Lids, 24 PCS Kitchen and Pantry Or…
14. Tofu Tikka Masala

Tofu Tikka Masala is a delicious vegetarian alternative to the beloved chicken tikka masala. This dish is rich in flavors and offers a comforting experience that’s perfect for lunch. You’ll love the marinated tofu cubes soaked in spices, then cooked in a creamy tomato sauce. It’s satisfying and packed with nutrients, making it a standout in any lunch box.
To prepare this delightful meal, start by marinating tofu in yogurt and a mix of spices. You’ll then grill or bake it until it’s crispy. The next step involves simmering the tofu in a luscious creamy sauce made from tomatoes and spices. Pair it with rice or warm naan for a complete and hearty meal.
Here’s how to make it:
Recipe Overview:
– Servings: 4
– Prep Time: 20 mins
– Cook Time: 30 mins
– Total Time: 50 mins
– Calories: Approximately 450 per serving
Nutritional Information:
– Carbohydrates: 30g
– Protein: 24g
– Fat: 25g
Ingredients:
– 400g firm tofu, cubed
– 1 cup yogurt
– 1 can diced tomatoes
– 1 onion, chopped
– 2 tsp tikka masala spice blend
– 2 tbsp oil
Instructions:
1. Marinate the tofu cubes in yogurt and tikka masala for at least 30 minutes to absorb the flavors.
2. Grill or bake the marinated tofu until crispy, giving it a nice texture.
3. In a pan, sauté the chopped onions until soft. Then, add the diced tomatoes and incorporate the grilled tofu.
4. Let it simmer for about 10 minutes, allowing the flavors to meld together. Serve hot with rice or naan.
Want a vegan version? Simply substitute the yogurt with a non-dairy alternative.
This Tofu Tikka Masala is not just tasty; it’s also a great way to enjoy a fulfilling meal without meat. It’s a fantastic choice for your lunch box, ensuring you have a nutritious meal ready to go.
Tofu Tikka Masala
Editor’s Choice

50 Pack (100-Piece) 32 oz Meal Prep Containers Reusable with Easy Open L…

Pride of India – Tikka Curry Masala Seasoning Spice – Gourmet Curry Mix …
15. Vegetable Pakhora

Imagine enjoying crispy, flavorful bites that brighten up your lunch. Vegetable Pakhora is just that! These delicious snacks are made from a mix of your favorite vegetables, coated in a spiced chickpea flour batter, and deep-fried to a perfect golden brown. They’re not just tasty; they’re also a great way to sneak in some nutrition. Whether you’re at work or on the go, these pakhoras make an ideal lunch box treat.
To whip up these delightful snacks, grab some common veggies like potatoes, spinach, and onions. You’ll mix them with chickpea flour, spices, and water to create a thick, flavorful batter. Then, deep-fry them until they’re crispy and golden. Pair them with tangy tamarind or refreshing mint chutney for a flavor explosion that will have you reaching for more!
Here’s how to make your own Vegetable Pakhora:
Recipe Overview:
– Servings: 4
– Prep Time: 20 mins
– Cook Time: 15 mins
– Total Time: 35 mins
– Calories: Approx. 300 per serving
Nutritional Information:
– Carbohydrates: 30g
– Protein: 7g
– Fat: 15g
Ingredients:
– 1 cup chickpea flour
– 1 cup mixed vegetables (potatoes, spinach, onions)
– 1 tsp ajwain (carom seeds)
– Salt to taste
– Oil for frying
Instructions:
1. In a bowl, mix chickpea flour, ajwain, salt, and enough water to create a thick batter.
2. Cut your vegetables into bite-sized pieces and coat them with the batter.
3. Heat oil in a deep pan. Once hot, carefully drop the coated vegetables into the oil.
4. Fry until they turn golden brown and crispy, then remove them and place on paper towels to drain excess oil.
5. Serve hot with chutney and enjoy every bite!
If you prefer a healthier option, you can bake these instead of frying, but remember, they won’t be as crispy. Enjoy your homemade Vegetable Pakhora as a snack or add them to your lunch box for a flavorful, nutritious boost!
Vegetable Pakhora
Editor’s Choice

Bob’s Red Mill Chickpea Flour, 16oz (Pack of 4) – Non GMO, Vegan, Keto F…

Candy Thermometer with Pot Clip – Deep Fry Oil Thermometer for Frying an…
16. Palak Chole

Enjoy a burst of flavors with Palak Chole, a delightful dish that pairs hearty chickpeas with fresh, vibrant spinach. This nutritious curry is perfect for your lunch box, ensuring you stay energized throughout your day. With its rich taste and health benefits, it’s a meal you’ll look forward to.
Making Palak Chole is simple and rewarding. Start by cooking chickpeas until they’re tender and full of flavor. Then, sauté onions and tomatoes with a mix of spices that create a warm, inviting aroma. Finally, toss in fresh spinach and let it wilt—this step enhances the dish’s color and nutrient profile. Serve it alongside rice or roti for a wholesome meal that satisfies.
Recipe Overview:
– Servings: 4
– Prep Time: 15 mins
– Cook Time: 30 mins
– Total Time: 45 mins
– Calories: Approx. 350 per serving
Nutritional Information:
– Carbohydrates: 55g
– Protein: 15g
– Fat: 7g
Ingredients:
– 1 cup chickpeas, soaked and boiled
– 2 cups fresh spinach
– 1 onion, chopped
– 2 tomatoes, chopped
– 2 tsp garam masala
– Salt to taste
Instructions:
1. Sauté the chopped onion in a pan until it turns golden brown.
2. Add the chopped tomatoes and garam masala; cook until soft.
3. Stir in the boiled chickpeas and spinach. Cook until the spinach wilts.
4. Serve hot with rice or roti for a filling meal.
You can blend the spinach for a creamier texture if you prefer.
FAQs:
How long can I store this dish? Store it in the fridge for up to 4 days.
Palak Chole not only delights your taste buds but also fuels your body with essential nutrients. It’s a smart choice for busy adults looking for quick yet delicious lunch options!
Palak Chole
Editor’s Choice

Stainless Steel Lunch Box, 40oz/1200ml Metal Bento Box, Partitionable St…
17. Baida Roti

Craving something unique for lunch? Try Baida Roti, a delicious stuffed flatbread that brings a burst of flavor to your midday meal. This savory delight is filled with spiced scrambled eggs and fresh vegetables, creating a satisfying combination that will keep you energized. With a crispy exterior and a soft, comforting inside, Baida Roti pairs perfectly with tangy chutneys or creamy yogurt. It’s no wonder this dish is a favorite among adults seeking tasty and nutritious options.
Making Baida Roti is simple and fun! Start by preparing the dough, rolling it out, and filling it with a zesty mix of eggs, veggies, and spices. Cook it on a hot skillet until it turns golden brown, then serve it warm for a delightful lunch experience.
Recipe Overview:
– Servings: 4
– Prep Time: 20 mins
– Cook Time: 20 mins
– Total Time: 40 mins
– Calories: Approx. 300 per serving
Nutritional Information:
– Carbohydrates: 40g
– Protein: 15g
– Fat: 10g
Ingredients:
– 2 cups flour
– 4 eggs, beaten
– 1 onion, chopped
– 1 tsp garam masala
– Salt to taste
– Oil for frying
Instructions:
1. Mix flour and water to form a soft dough. Let it rest.
2. Sauté onions until golden, then add beaten eggs and garam masala. Cook until eggs are scrambled.
3. Roll out the dough into circles, place some filling in the center, and fold it over. Seal the edges.
4. Heat oil in a skillet and cook the filled dough until crispy and golden on both sides.
5. Serve hot with your favorite chutney or yogurt.
Want to boost the nutrition even more? Consider using multi-grain flour instead of regular flour. This small swap adds fiber and enhances the overall flavor.
FAQs:
Is Baida Roti gluten-free?
No, it contains wheat flour, making it unsuitable for a gluten-free diet.
Baida Roti is not just a meal; it’s a culinary experience. Perfect for lunch at work or a picnic in the park, it’s sure to impress your taste buds and impress your friends. Enjoy every bite!
Baida Roti
Editor’s Choice
CAROTE Nonstick Frying Pan Skillet,Non Stick Granite Fry Pan Egg Pan Ome…

Unpretentious 9 Grain Flour, 1 Gallon, Bread & Dough, Storable, Fresh Ho…

Old Martaban’ Ceramic Pickle Jars for Dining Table Container with Lid (N…
18. Chole Puri

Chole Puri is a delightful North Indian dish that combines spicy chickpeas with fluffy puris. This duo not only satisfies your hunger but also brings a burst of flavors to your lunch. The crunchy puris and the rich chole curry create a perfect balance. It’s a go-to meal for anyone craving comfort food with a kick.
To whip up this tasty dish, you’ll need to prepare the chickpeas first. Soak them overnight to make them tender and easy to cook. After boiling, sauté onions and tomatoes with your favorite spices to create a fragrant base. Then, mix in the chickpeas and let them simmer until everything is beautifully blended. Serve hot with crispy puris for a truly satisfying experience.
Here’s how to make Chole Puri:
Recipe Overview:
– Servings: 4
– Prep Time: 15 mins
– Cook Time: 30 mins
– Total Time: 45 mins
– Calories: Approx. 400 per serving
Nutritional Information:
– Carbohydrates: 55g
– Protein: 15g
– Fat: 10g
Ingredients:
– 1 cup chickpeas, soaked overnight
– 8-12 puris (2-3 per person)
– 1 onion, chopped
– 2 tomatoes, chopped
– 2 tsp chole masala
– Oil for frying
Instructions:
1. Soak the chickpeas overnight and boil them until soft.
2. In a pan, heat oil and sauté the chopped onions until golden.
3. Add chopped tomatoes and chole masala, cooking until everything is well combined.
4. Stir in the boiled chickpeas and let it simmer for about 10 minutes to blend the flavors.
5. Heat oil in another pan and fry the puris until they puff up and turn golden.
6. Serve the hot chole alongside crispy puris. Don’t forget to add some onion salad on the side for a refreshing crunch!
FAQs:
– Can I make it ahead? Yes, you can prepare the chole a day in advance to save time. Just reheat before serving!
This meal not only fills you up but also gives you a taste of India right at your lunch table. Enjoy the process and savor every bite!
Chole Puri
Editor’s Choice
CAROTE Nonstick Frying Pan Skillet,Non Stick Granite Fry Pan Egg Pan Ome…
19. Rawa Idli with Coconut Chutney

Rawa Idli is a delightful South Indian treat that you’ll love for lunch! These fluffy steamed cakes, made from semolina and yogurt, are not just light but also filling. When you pair them with fresh coconut chutney, you bring a burst of flavor that makes your meal special. This dish is perfect for busy adults seeking a quick yet satisfying option.
To whip up Rawa Idli, you start by mixing semolina with yogurt and letting it rest. This simple step helps develop the texture. Then, you steam the batter in idli molds, which results in those fluffy cakes everyone raves about. Serve them warm with coconut chutney, and you’re in for a treat!
Recipe Overview:
– Servings: 4
– Prep Time: 15 mins
– Cook Time: 15 mins
– Total Time: 30 mins
– Calories: Approx. 200 per serving
Nutritional Information:
– Carbohydrates: 30g
– Protein: 6g
– Fat: 5g
Ingredients:
– 1 cup semolina
– 1 cup yogurt
– 1 tsp mustard seeds
– 1 tsp urad dal
– Salt to taste
Instructions:
1. Combine semolina, yogurt, and salt in a bowl. Let it rest for 30 minutes.
2. Grease idli molds and fill each with the batter.
3. Steam for 10-15 minutes until they are fluffy.
4. Serve warm with coconut chutney for a delicious experience.
Don’t forget, if you have leftover batter, you can turn it into crispy dosa for breakfast the next day!
FAQs:
– Can I skip fermentation? Yes, you can, but the texture will be different. For the best results, let it ferment a bit.
Enjoy this simple yet flavorful dish that’s perfect for your lunch box or any meal!
Rawa Idli with Coconut Chutney
Editor’s Choice

See Through lid 5 Pcs Stainless Steel Induction Friendly Idli Cooker Mul…


Caputo Antimo Di Grano Duro Rimacinata Semolina Flour – All Natural Doug…
20. Khichdi

Khichdi is more than just a meal; it’s a warm hug in a bowl. This delightful dish combines rice, lentils, and spices, creating a nourishing and satisfying option for lunch. Perfect for days when you crave comfort food that’s easy to prepare, khichdi is not only simple but also packed with nutrition.
To whip up this hearty meal, simmer rice and lentils together with a mix of spices and vegetables until they’re soft and inviting. A touch of ghee on top takes its flavor to the next level. Plus, it’s easy on the stomach, making it a great choice for a quick lunch or dinner.
Here’s how you can make your own khichdi:
Recipe Overview:
– Servings: 4
– Prep Time: 10 mins
– Cook Time: 30 mins
– Total Time: 40 mins
– Calories: Approx. 300 per serving
Nutritional Information:
– Carbohydrates: 45g
– Protein: 10g
– Fat: 8g
Ingredients:
– 1 cup rice
– 1 cup lentils (moong dal)
– 1 tsp turmeric
– 1 onion, chopped
– 2 cups mixed vegetables (like carrots, peas, and beans)
– Salt to taste
Instructions:
1. In a pot, combine rice, lentils, and enough water along with turmeric. Bring it to a boil.
2. Add the chopped onions and mixed vegetables. Cook everything until soft, stirring occasionally.
3. If the khichdi is too thick, add more water to reach your desired consistency.
4. Serve hot, drizzled with ghee for an extra touch of flavor.
5. For a zesty kick, squeeze a bit of lemon juice on top before enjoying.
Can you use leftover rice? Absolutely! It makes for a quicker khichdi, saving you time on busy days. This dish is not just filling; it’s also a canvas for your creativity. You can add different spices or seasonal vegetables to make it your own.
Enjoy this comforting meal that’s sure to satisfy your cravings!
Khichdi
Editor’s Choice
Duo 7-in-1 Mini Electric Pressure Cooker, Slow Rice Cooker, Steamer, Sau…
Amazon Basics Electric Coffee Grinder, Coffee Bean and Spice Grinder, Wi…

4 Pack Bento Lunch Box Set 3 Compartment Food Storage Containers Wheat S…
21. Ragi Dosa with Sambar

Ragi Dosa is a delicious and healthy twist on traditional dosa. Made from finger millet flour, it’s packed with nutrients and is gluten-free. This dish is rich in iron, making it a fantastic choice for a nutritious lunch. Pair it with sambar, a hearty lentil and vegetable stew, and you have a satisfying meal that will keep you energized throughout the day.
To whip up Ragi Dosa, you need just a few simple ingredients. Mix ragi flour with water and a pinch of salt to create a smooth batter. Cook it on a hot skillet until it’s crispy on the outside and soft on the inside. Serve it with steaming sambar for a comforting and wholesome experience.
Here’s how to make your own Ragi Dosa:
Recipe Overview:
– Servings: 4
– Prep Time: 15 mins
– Cook Time: 30 mins
– Total Time: 45 mins
– Calories: Approx. 250 per serving
Nutritional Information:
– Carbohydrates: 30g
– Protein: 8g
– Fat: 6g
Ingredients:
– 1 cup ragi flour
– 2 cups water
– Salt to taste
– Oil for cooking
Instructions:
1. In a bowl, mix the ragi flour with water and salt to create a batter. Allow it to rest for about 10 minutes for fluffier dosas.
2. Heat a non-stick skillet over medium heat and lightly grease it with oil.
3. Pour a ladleful of batter onto the skillet and spread it in a circular motion.
4. Cook until the edges lift and the bottom turns golden brown. Flip and cook for another minute.
5. Serve hot with a bowl of sambar on the side. Enjoy your meal!
Feel free to add grated carrots or spinach to the batter for extra nutrition. This simple dish is not just easy to make but also a perfect way to enjoy a healthy lunch that’s bursting with flavor. So, why wait? Get cooking and enjoy this delightful meal today!
Ragi Dosa with Sambar
Editor’s Choice

Jiva Organic Ragi Flour 2 Pound Bag (32 ounce) – Finger Millet Flour
CAROTE Nonstick Frying Pan Skillet,Non Stick Granite Fry Pan Egg Pan Ome…

MTR Sambar Ready Mix – Authentic Indian Curry Powder Blend of Turmeric, …
22. Pani Puri

Pani Puri, often called Golgappa or Puchka, is a delightful street food that can transform your lunch box into a mini feast. Imagine biting into a crispy puri filled with spicy water and flavorful fillings. It’s a fun and interactive meal that adds excitement to your day!
To make Pani Puri at home, start by frying small discs of dough until they turn golden and crunchy. The magic happens when you fill these puris with a zesty mixture of mashed potatoes, chickpeas, and tangy tamarind water. This dish is not just a meal; it’s a vibrant experience that can brighten up any lunch or snack time.
Here’s how to whip up this delicious treat:
Recipe Overview:
– Servings: 4
– Prep Time: 30 mins
– Cook Time: 20 mins
– Total Time: 50 mins
– Calories: Approx. 150 per serving (for 5 Pani Puris)
Nutritional Information:
– Carbohydrates: 25g
– Protein: 3g
– Fat: 5g
Ingredients:
– 1 cup semolina (for puris)
– 2 large potatoes, boiled and mashed
– 1 cup chickpeas, cooked
– 1 cup tamarind water
– Salt and your favorite spices to taste
Instructions:
1. Combine semolina with water to form a dough. Roll it out and cut into small circles.
2. Fry the circles in hot oil until they puff up and become crispy.
3. In a bowl, mix the mashed potatoes with chickpeas and spices.
4. Carefully fill each puri with the potato mixture and serve with tamarind water for dipping.
Serve them right away for the ultimate crunch!
FAQs:
Can I make Pani Puris in advance? Yes, you can prepare the puris ahead of time. Just fill them just before serving to keep them crispy.
With this recipe, you can enjoy a taste of India in your lunch box. It’s a crowd-pleaser at parties or a fun snack any time of the day!
Pani Puri
Editor’s Choice

indian Puri Press Stainless Steel Puri Maker Press roti chapati Presser …

Tamicon Tamarind Concentrate | Tangy & Sour Imli Chutney | South Indian …
Amazon Basics Electric Coffee Grinder, Coffee Bean and Spice Grinder, Wi…
You Might Also Like
23. Gobi Manchurian

Gobi Manchurian is a delightful Indo-Chinese dish that brings a burst of flavor to your lunch box. Imagine biting into crispy cauliflower florets, each coated in a tangy, sweet, and spicy sauce. This dish is not just a side; it can shine as a main course too, making it a favorite among many.
To whip up this tasty treat, start by coating fresh cauliflower in a simple batter. Fry those florets until they turn a gorgeous golden brown. Then, toss them in a delicious sauce made from soy sauce, garlic, and chili for that perfect kick. Gobi Manchurian pairs beautifully with steamed rice or noodles, making it a complete meal that’s sure to satisfy your cravings.
Recipe Overview:
– Servings: 4
– Prep Time: 15 mins
– Cook Time: 20 mins
– Total Time: 35 mins
– Calories: Approx. 300 per serving
Nutritional Information:
– Carbohydrates: 40g
– Protein: 6g
– Fat: 15g
Ingredients:
– 1 head cauliflower, cut into florets
– 1/2 cup all-purpose flour
– 1 tsp ginger-garlic paste
– Soy sauce, to taste
– Chili sauce, to taste
Instructions:
1. Create a batter using flour and enough water to coat the cauliflower.
2. Dip each floret in the batter and fry them in hot oil until golden brown.
3. Once fried, toss the cauliflower in a mix of soy sauce and chili sauce until well coated.
4. Serve hot, garnished with a sprinkle of sesame seeds.
Want a healthier option? You can bake the cauliflower instead of frying it for a lighter version.
This dish is perfect for meal prep. You can make it ahead of time and enjoy it throughout the week. Just remember to store it in an airtight container to keep it fresh. Give Gobi Manchurian a try, and watch it become a favorite in your lunch rotation!
• Try baking instead of frying for a healthier dish.
• Pair with rice or noodles for a complete meal.
• Make extra sauce for dipping!
• Add vegetables like bell peppers for extra nutrition.
Gobi Manchurian
Editor’s Choice
Amazon Basics Silicone Rectangular Baking Mat, Non-Stick Reusable Oven B…
Bentgo Prep – 20-Piece 3-Compartment Reusable Meal Prep Containers with …

Chef’n Stalk Chop Cauliflower Prep Tool, Green, 7 ½ x 1 ¾-inches –
24. Pesarattu (Green Gram Dosa)

Pesarattu, a delicious green gram dosa, is your go-to for a nutritious lunch. Made from moong dal, this crispy delight is packed with protein and fiber. It’s not just healthy; it’s also a feast for your taste buds. Pair it with a spicy chutney or warm sambar for a meal that satisfies and energizes.
To prepare this tasty dish, start by soaking the green gram overnight. The next day, blend it into a smooth batter. Cook it on a hot skillet until it turns golden and crispy. You’ll love the texture and flavor! Don’t forget to add some chopped onions for an extra crunch.
Here’s the easy recipe for you:
Recipe Overview:
– Servings: 4
– Prep Time: 15 mins
– Cook Time: 30 mins
– Total Time: 45 mins
– Calories: Approx. 250 per serving
Nutritional Information:
– Carbohydrates: 30g
– Protein: 12g
– Fat: 7g
Ingredients:
– 1 cup green gram, soaked
– 1 onion, chopped
– Green chilies to taste
– Salt to taste
– Oil for cooking
Instructions:
1. Blend the soaked green gram with spices and onions into a smooth batter.
2. Heat a non-stick pan and pour in the batter to form a dosa.
3. Cook until the edges lift and the bottom is golden brown.
4. Serve hot with spicy chutney or sambar for dipping.
Want to save time? You can prepare the batter a day ahead and store it in the fridge. This makes Pesarattu a great option for busy mornings or meal prep. Enjoy a tasty, healthy lunch that will keep you full and satisfied!
• Soak green gram overnight for best results.
• Use chopped onions for added texture.
• Serve with a variety of chutneys for flavor.
• Store leftover batter in the fridge for up to a day.
Pesarattu (Green Gram Dosa)
Editor’s Choice
CAROTE Nonstick Frying Pan Skillet,Non Stick Granite Fry Pan Egg Pan Ome…

Ninja BL660 Professional Compact Smoothie & Food Processing Blender, 110…
Bentgo Prep – 20-Piece 3-Compartment Reusable Meal Prep Containers with …
25. Mixed Vegetable Curry

Mixed Vegetable Curry is a hearty and flavorful dish, perfect for a nutritious lunch. It blends colorful, seasonal vegetables with aromatic spices, creating a meal that warms your heart and satisfies your taste buds. You can serve it with rice, roti, or naan, making it versatile and filling.
To whip up this delicious curry, start by sautéing onions and spices in a pot. Then, toss in an array of chopped vegetables and let them simmer until tender. A splash of cream or coconut milk at the end adds a lovely creaminess, making every bite a delight. This dish is not just tasty; it’s also a fantastic way to pack in nutrition!
Here’s how to make your own Mixed Vegetable Curry:
Ingredients:
– 2 cups mixed seasonal vegetables (like carrots, peas, and bell peppers)
– 1 onion, chopped
– 2 tomatoes, chopped
– 2 tsp curry powder
– 1/2 cup coconut milk
– Salt to taste
Instructions:
1. Heat a pot over medium heat and sauté the chopped onions until they’re golden brown.
2. Add the tomatoes, cooking until they soften and blend with the onions.
3. Stir in the mixed vegetables and curry powder, allowing the mixture to simmer for about 15 minutes.
4. Pour in the coconut milk, stir well, and season with salt.
5. Cook for an additional 5 minutes and serve hot.
Using fresh herbs like cilantro as a garnish elevates the flavor even more. This curry is perfect for meal prep, as it keeps well in the fridge, making it a great option for busy days. You can even use frozen vegetables if you’re short on time, ensuring this dish remains quick and easy to prepare!
• Sauté onions until golden for a deeper flavor
• Choose seasonal veggies for freshness and variety
• Add coconut milk for a creamy texture
• Serve with rice or bread to complete the meal
Mixed Vegetable Curry
Editor’s Choice

CAROTE 21Pcs Pots and Pans Set, Nonstick Cookware Sets, White Granite In…
Amazon Basics Electric Coffee Grinder, Coffee Bean and Spice Grinder, Wi…
WGCC Meal Prep Containers, 50 Pack Extra-thick Food Storage Containers w…
26. Lemon Rice

Lemon Rice is not just a dish; it’s a burst of sunshine on your plate! This vibrant meal combines cooked rice with zesty lemon juice and warm turmeric, creating a refreshing experience that’s perfect for lunch or a picnic. By adding crunchy peanuts, you get a delightful contrast in texture. Imagine digging into a plate of Lemon Rice that’s bright, flavorful, and utterly satisfying.
Making Lemon Rice is a breeze! Start by cooking some rice and letting it cool. While it cools, heat oil in a pan and add mustard seeds and curry leaves. Once they sizzle, toss in peanuts, and then stir in turmeric and the cooled rice. A generous squeeze of fresh lemon juice ties everything together, bringing the flavors to life. You can prepare this dish ahead of time, making it a fantastic option for meal prepping!
Here’s what you’ll need:
Ingredients:
– 2 cups cooked rice
– 1/2 cup peanuts
– 1 tsp mustard seeds
– 1 tsp turmeric
– Juice of 1 lemon
– Salt to taste
– Oil for cooking
Instructions:
1. Cook rice and let it cool completely.
2. Heat oil in a pan and add mustard seeds. Wait until they start to splutter.
3. Add peanuts to the pan and cook until they are lightly browned.
4. Mix in turmeric and the cooled rice. Stir well to combine.
5. Squeeze lemon juice over the rice and season with salt. Mix thoroughly.
6. Garnish with fresh coriander if desired for an extra touch of flavor.
This dish is a great way to use leftover rice, so don’t hesitate to make it with what you have on hand! You’ll love how easy it is to prepare and how much flavor it packs. Perfect for busy days, Lemon Rice brings a taste of India right to your lunch box. Enjoy the bright and tangy flavors that make every bite a delight!
Lemon Rice is sunshine in a bowl for lunch box ideas for adults indian. Zesty lemon, warm turmeric, and crunchy peanuts make every bite bright and satisfying. It’s breezy to make, perfect for busy days, and packs flavor without fuss.
Lemon Rice
Editor’s Choice
Bento Box Adult Lunch Box, Containers for Adults Men Women with 4 Compar…

Organic Spice Resource Turmeric Root Powder, 8 oz (226 g)
27. Kitchari

Kitchari is a warm, comforting dish that combines rice and lentils into a nourishing meal. Spiced with turmeric and ginger, it’s not only easy to digest but also rich in flavor. This dish is perfect for your lunch box, especially if you want something wholesome that can boost your energy levels.
Making Kitchari is straightforward and allows for plenty of customization. You can mix in your favorite vegetables, making it a versatile option for any palate. Plus, many people enjoy its detoxifying properties, which can help you feel rejuvenated throughout the day.
Here’s a quick overview of the recipe:
– Servings: 4
– Prep Time: 10 mins
– Cook Time: 30 mins
– Total Time: 40 mins
– Calories: Approx. 250 per serving
Nutritional Information:
– Carbohydrates: 45g
– Protein: 10g
– Fat: 5g
Ingredients:
– 1 cup rice
– 1 cup lentils (moong dal)
– 1 onion, chopped
– 1 tsp turmeric
– 2 cups mixed vegetables (like carrots, peas, or spinach)
– Salt to taste
– Ghee (clarified butter) for serving
Instructions:
1. In a pot, combine rice, lentils, water, and turmeric. Bring to a boil, then reduce to a simmer.
2. After about 15 minutes, add chopped onions and vegetables. Cook until everything is tender.
3. If the mixture looks too thick, add a little more water to reach your desired consistency.
4. Serve hot, topped with a drizzle of ghee for extra flavor.
For a refreshing twist, add a squeeze of lemon before serving. This not only brightens the dish but also enhances its nutritional value.
FAQs:
– Can I use leftover rice?
Yes! Leftover rice works wonderfully for a quick Kitchari. Just adjust your cooking time to ensure everything heats through.
Kitchari is a fantastic option for busy days. It’s easy to make, delicious, and packed with nutrients to keep you satisfied. Enjoy this delightful dish at lunch, and you’ll find yourself energized and ready to tackle the rest of your day!
Fun fact: a 1-cup serving of kitchari delivers about 15g protein and 8g fiber, a powerful boost for lunch box ideas for adults indian. Turmeric and ginger aid digestion and flavor, keeping energy steady through the afternoon.
Kitchari
Editor’s Choice
Stainless Steel Lunch Box, 3 Compartments Metal Bento Box for Kids Adult…

BulkSupplements.com Turmeric Extract Powder – from Turmeric Root, Curcum…

4th & Heart Original Grass-Fed Ghee, Clarified Butter, Keto, Pasture Rai…
28. Aloo Gobi

Aloo Gobi is a beloved dish that brings the warmth of Indian kitchens to your lunch box. This simple yet flavorful dry curry combines tender potatoes and crisp cauliflower, all seasoned with aromatic spices. Perfect for busy adults, it pairs beautifully with roti or rice, ensuring a satisfying meal that fuels your day.
To make Aloo Gobi, you’ll start by sautéing cubed potatoes and cauliflower florets in a pan. The spices—turmeric and cumin—add not just flavor but also a beautiful golden hue. The best part? This dish is vegetarian and can easily be made in under an hour, making it ideal for meal prep or a quick lunch.
Recipe Overview:
– Servings: 4
– Prep Time: 15 minutes
– Cook Time: 25 minutes
– Total Time: 40 minutes
– Calories: Approximately 250 per serving
Nutritional Information:
– Carbohydrates: 42g
– Protein: 7g
– Fat: 8g
Ingredients:
– 2 medium potatoes, peeled and cubed
– 1 head of cauliflower, cut into bite-sized florets
– 1 onion, finely chopped
– 1 teaspoon turmeric powder
– 1 teaspoon cumin seeds
– Salt to taste
– 2 tablespoons cooking oil
– Fresh cilantro for garnish
Instructions:
1. Heat oil in a large pan over medium heat. Add the chopped onion and sauté until it turns golden brown.
2. Stir in the turmeric and cumin, allowing the spices to bloom for about 30 seconds.
3. Add the cubed potatoes and cauliflower florets. Season with salt and mix well.
4. Cover the pan and cook for around 20 minutes, stirring occasionally, until the vegetables are tender and lightly browned.
5. Serve hot with roti or rice and garnish with fresh cilantro for an extra pop of flavor.
FAQs:
– How can I store leftovers? Keep them in an airtight container in the fridge for up to 3 days.
This Aloo Gobi recipe not only satisfies your hunger but also adds a delightful touch of Indian cuisine to your lunch routine. Enjoy the burst of flavors and the comforting textures that make this dish a favorite among many!
Fun fact: Aloo Gobi packs roughly 6 grams of fiber per serving and stays tasty for up to 48 hours in a lunch box. Perfect for lunch box ideas for adults indian—it’s flavorful, easy to pack, and keeps you energized.
Aloo Gobi
Editor’s Choice
Stainless Steel Lunch Box, 3 Compartments Metal Bento Box for Kids Adult…
Amazon Basics Electric Coffee Grinder, Coffee Bean and Spice Grinder, Wi…
CAROTE Nonstick Frying Pan Skillet,Non Stick Granite Fry Pan Egg Pan Ome…
29. Bombay Sandwich

The Bombay Sandwich is a delightful street food treat that can brighten up any lunch. It’s quick to prepare and packed with vibrant flavors. Imagine biting into crisp, buttery bread layered with spiced mashed potatoes, fresh cucumber, and juicy tomatoes. The combination is not only tasty but also filling, making it a perfect choice for a light yet satisfying meal.
You can easily whip up this sandwich at home. Start by mashing boiled potatoes with spices and seasoning them to your taste. Then, pile this flavorful mix between slices of buttered bread, adding slices of cucumber and tomato for extra crunch. Grill the sandwich until it’s golden brown and crispy. This makes for a crunchy bite that’s hard to resist. Plus, it’s great for meal prep; you can prepare it ahead of time and grill it just before serving.
Here’s how to make your own Bombay Sandwich:
Ingredients:
– 4 slices of bread
– 2 medium potatoes, boiled and mashed
– 1 cucumber, thinly sliced
– 1 tomato, thinly sliced
– Chaat masala, to taste
– Butter, for grilling
Instructions:
1. In a bowl, mix the mashed potatoes with chaat masala until well-blended.
2. Spread the potato mixture generously between two slices of bread.
3. Layer cucumber and tomato slices on top of the potato mix.
4. Place another slice of bread on top and butter the outside.
5. Heat a skillet over medium heat. Grill the sandwich until it’s golden and crispy on both sides, about 3–4 minutes per side.
6. Slice and serve with ketchup or your favorite chutney.
Tips for a Healthier Option:
– Use whole grain or multigrain bread for added fiber and nutrients.
– Add more veggies like lettuce or sprouts for extra crunch and nutrition.
FAQs:
– Can I make these ahead of time? Yes! Assemble the sandwiches and store them in the fridge. Grill just before serving for the best taste.
Enjoy this flavorful Bombay Sandwich as part of your lunch routine. It’s easy, satisfying, and sure to please your taste buds!
Bombay Sandwich
Editor’s Choice
CAROTE Nonstick Frying Pan Skillet,Non Stick Granite Fry Pan Egg Pan Ome…

Rani Chat Masala (14 Spice Seasoning Salt) Tangy Indian Seasoning 4.5oz …

Dave’s Killer Bread 21 Whole Grains & Seeds Thin-Sliced, Whole Grain Org…
30. Dhokla

Dhokla: A Flavorful Steamed Delight
Dhokla is a delightful steamed cake that hails from Gujarat, India. Its light and fluffy texture makes it an ideal choice for lunch or a snack. You can enjoy it on its own or paired with tangy green chutney. This dish is not just tasty; it’s also packed with nutrition. Plus, it’s easy to whip up in your kitchen!
To prepare Dhokla, you’ll combine chickpea flour and yogurt, letting it ferment for a bit before steaming. The result? A soft, airy treat that’s perfect for any mealtime. Once it’s cooked, cut it into squares and add a sprinkle of mustard seeds and fresh coriander for a pop of flavor.
Here’s how to make it:
Recipe Overview:
– Servings: 4
– Prep Time: 15 mins
– Cook Time: 25 mins
– Total Time: 40 mins
– Calories: Approx. 150 per serving
Nutritional Information:
– Carbohydrates: 25g
– Protein: 8g
– Fat: 3g
Ingredients:
– 1 cup chickpea flour
– 1 cup yogurt
– 1 tsp turmeric
– Salt to taste
– Mustard seeds for tempering
– Chopped green chilies (optional for heat)
Instructions:
1. In a bowl, mix chickpea flour, yogurt, turmeric, and salt. Let it sit for about 30 minutes.
2. Grease a steaming tray and pour in the mixture. Steam for 20 minutes until fluffy.
3. Once cooked, cut into squares. In a small pan, heat some oil and add mustard seeds until they pop. Pour this over the Dhokla.
4. Serve warm with green chutney for a fresh kick!
You can even toss in some chopped green chilies to spice things up. Dhokla is not just a meal; it’s an experience. Perfect for busy days, it’s both satisfying and healthy, making it a great addition to your lunch box!
FAQs:
Can I make this vegan? Yes, simply use non-dairy yogurt.
Dhokla
Editor’s Choice

QSEC Stainless Steel Multi Kadai Idli Cooker with Copper Bottom – All-in…

Rani Chana Besan (Chickpeas Flour, Gram) 32oz (2lbs) 908g ~ All Natural …

So Delicious Dairy Free Coconut Milk Yogurt Alternative, Raspberry, Vega…
Conclusion

With these 30+ flavorful and nutritious Indian lunch box ideas, your meal prep just became a lot more exciting. From vibrant curries to flavorful wraps and wholesome grains, there’s a world of vegetarian options waiting for you.
These recipes are not only healthy but also bring the rich flavors of Indian cuisine to your everyday lunch. Embrace the joy of cooking and experiment with these dishes to make your lunch both nutritious and delicious!
Note: We aim to provide accurate product links, but some may occasionally expire or become unavailable. If this happens, please search directly on Amazon for the product or a suitable alternative.
This post contains Amazon affiliate links, meaning I may earn a small commission if you purchase through my links, at no extra cost to you.
Frequently Asked Questions
What Are Some Quick Indian Lunches That Are Healthy and Flavorful?
Looking for quick Indian lunches that don’t compromise on health or flavor? You’re in luck! Think of dishes like vegetable pulao or chickpea salad. These meals can be prepared in no time and can be packed with nutrients. Don’t forget to add a side of raita for a refreshing twist!
How Can I Meal Prep for Indian Lunch Box Ideas for Adults?
Meal prepping for Indian lunch box ideas for adults is super simple! Start by picking a few healthy Indian recipes that you love. Cook in bulk, portion them into containers, and store them in the fridge. Dishes like dal and roti or stuffed parathas stay fresh for days. This way, you can enjoy nutritious meals throughout the week without the daily hassle!
What Are Some Balanced Meal Ideas for a Vegetarian Indian Lunch?
Creating balanced meal ideas for a vegetarian Indian lunch is fun and delicious! Combine a serving of whole grains like brown rice or quinoa with a protein-packed dish like paneer tikka or chana masala. Add a side of mixed veggies or a salad to round out your meal. This ensures you get a variety of nutrients in one delightful lunch!
Are There Vegan Options for Indian Lunch Box Ideas?
Absolutely! There are plenty of vegan Indian lunch box ideas that are both tasty and nutritious. Consider dishes like vegetable curry with quinoa or lentil soup paired with whole-grain bread. You can also pack a mixed bean salad with a zesty dressing for a refreshing option. Enjoy experimenting with flavors while keeping it plant-based!
How Can I Make My Indian Lunches More Exciting and Flavorful?
To make your Indian lunches more exciting, try adding a variety of spices and herbs to your dishes. Experiment with coriander, cumin, or garam masala to enhance flavors. You can also include different textures by adding nuts or seeds. Don’t shy away from creative pairings, like mixing yogurt with fruits for a sweet and tangy treat to accompany your meals!