Packing a lunch can feel like a chore, especially when you’re staring at the same old sandwich every day. I created this post because I know how tough it can be to come up with lunch ideas that are both tasty and easy to pack. We all want something satisfying and delicious without spending hours in the kitchen or throwing away food at the end of the week.
If you’re an adult juggling work, family, or just your busy life, this is for you. You care about what you eat but often find yourself stuck in a lunch rut. You might be looking for meals that can travel well, taste great, and help you feel energized throughout the day. We’ve all been there—bored of the same lunch options, wishing for something new and exciting.
That’s why I put together 25 lunch box ideas specifically for adults. These ideas are not only simple but also packed with flavor. You’ll find meals that are diverse and easy to prepare, making them perfect for your busy schedule. Whether you’re at the office, running errands, or enjoying a day out, these ideas will help keep your lunch game strong.
From hearty salads to savory wraps, you’ll discover options that can be made ahead of time and stored in your fridge. Plus, many of these lunches are customizable, so you can switch things up based on what you have on hand or your mood. No more boring lunches!
So, let’s dive into these 25 lunch box ideas that will make your midday meals a breeze. You’ll be ready to impress yourself and your coworkers with your delicious, easy-to-pack lunches.
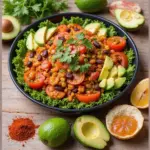
1. Quinoa Salad with Chickpeas and Avocado

Servings: 4
Prep Time: 15 minutes
Cook Time: 20 minutes
Total Time: 35 minutes
Calories: 350 per serving
Looking for a lunch that’s both satisfying and healthy? This Quinoa Salad with Chickpeas and Avocado is your answer! Packed with protein and healthy fats, this meal will keep your energy up throughout the day. The nutty quinoa pairs beautifully with creamy avocado and crunchy chickpeas, creating a delightful mix of textures and flavors. Plus, it’s super easy to prepare in advance, making your weekday lunches a breeze!
Here’s how you can make it:
Ingredients:
– 1 cup quinoa, rinsed
– 1 can chickpeas, drained and rinsed
– 1 ripe avocado, diced
– 1 cucumber, diced
– 1 bell pepper, chopped
– 1/4 cup red onion, finely chopped
– 1/4 cup cilantro, chopped
– Juice of 2 lemons
– Salt and pepper to taste
Instructions:
1. Cook the quinoa according to the package instructions. Once done, let it cool completely.
2. In a large mixing bowl, combine the chickpeas, diced avocado, cucumber, bell pepper, red onion, and cilantro.
3. Add the cooled quinoa to the bowl along with the lemon juice, salt, and pepper.
4. Toss everything together until it’s well mixed.
5. Portion the salad into individual containers for easy grab-and-go lunches.
Want to kick it up a notch? Add feta cheese for a tangy twist!
Frequently Asked Questions:
– Can I make this ahead of time? Yes, it stays fresh in the fridge for 3-4 days.
– How can I boost the protein? Try adding grilled chicken or feta cheese.
This salad is a fantastic way to enjoy a nutritious meal without spending too much time in the kitchen. Perfect for busy adults, it’s not only delicious but also visually appealing. Enjoy your lunch with a burst of flavor and health!
Quinoa Salad with Chickpeas and Avocado
Editor’s Choice

50 Pack (100-Piece) 24 oz Meal Prep Containers Reusable with Lids, Sturd…

Pride Of India – Natural Three Color Bolivian Royal Quinoa – Protein Ric…

2. Turkey and Hummus Wrap

Servings: 2
Prep Time: 10 minutes
Cook Time: 0 minutes
Total Time: 10 minutes
Calories: 250 per serving
Looking for a quick lunch that packs a flavor punch? Try the Turkey and Hummus Wrap! This easy-to-make dish combines lean turkey, creamy hummus, and fresh veggies, giving you a satisfying meal with every bite. Whether you’re heading to work or enjoying a picnic, these wraps are portable and delicious, making them perfect for any busy day.
Eating healthy doesn’t have to be complicated or time-consuming. With just a few ingredients, you can whip up this tasty wrap in no time. Plus, you can customize it to fit your mood. Maybe add some cheese or switch up the veggies. The options are endless!
Here’s how to make it:
Ingredients:
– 2 whole wheat tortillas
– 4 oz deli turkey breast
– 1/2 cup hummus
– 1 cup spinach
– 1/2 cucumber, sliced
– 1/2 red bell pepper, sliced
Instructions:
1. Spread hummus evenly over each tortilla.
2. Layer turkey, spinach, cucumber, and bell pepper on top.
3. Roll the tortilla tightly and slice it in half.
4. Wrap in foil or parchment paper for easy transport.
Want to keep your wraps fresh? Store them in an airtight container in the fridge until you’re ready to eat!
Tips for customization:
– Add sliced cheese for a creamy texture.
– Choose different veggies like carrots or zucchini for variety.
– Use a flavored hummus for an extra kick.
– Swap turkey for chicken or roast beef if you prefer.
Enjoy your delicious Turkey and Hummus Wrap, a simple meal that’s sure to keep you energized all day!
Turkey and Hummus Wrap
Editor’s Choice

Rubbermaid Brilliance Food Storage Containers BPA Free Airtight Lids Ide…

Mission 10 Inch Carb Balance Whole Wheat Tortillas LARGE Burrito 8 ct 20…

MACTANO 9 OZ Reusable Snack Containers with Lids, New Double Compartment…
3. Greek Yogurt Parfait

Servings: 1
Prep Time: 5 minutes
Cook Time: 0 minutes
Total Time: 5 minutes
Calories: 200 per serving
Looking for a quick, tasty lunch? A Greek yogurt parfait is your answer! This delightful dish isn’t just for breakfast; it makes for a refreshing midday treat. Picture creamy Greek yogurt layered with vibrant, juicy berries and crunchy granola. It’s a feast for the eyes and a delight for your taste buds! Plus, it packs a nutritional punch to keep you energized throughout the day.
Crafting your parfait is simple and customizable. Here’s what you need:
Ingredients:
– 1 cup plain Greek yogurt
– 1/2 cup mixed berries (strawberries, blueberries, raspberries)
– 1/4 cup granola
– A drizzle of honey (optional)
Instructions:
1. Grab a bowl or a portable container. Start layering your Greek yogurt at the bottom.
2. Add a layer of mixed berries next. Choose fresh or frozen ones based on what you have!
3. Sprinkle on some granola for that satisfying crunch.
4. Repeat the layering process until your container is full.
5. If you like a touch of sweetness, drizzle honey on top, but keep the granola separate until you’re ready to eat to maintain its crunch.
Feel free to get creative! You can swap out berries for bananas or peaches. Add nuts for an extra crunch or even a sprinkle of cinnamon for a flavor boost.
Frequently Asked Questions:
– Can I prepare this the night before? Yes, but remember to keep the granola apart until you’re ready to dive in for the best texture!
Enjoy this delicious and easy lunch option that’s perfect for busy days!
Greek Yogurt Parfait
Editor’s Choice

50 Pack (100-Piece) 32 oz Meal Prep Containers Reusable with Lids 3-Comp…

Oatsome Granola Variety Pack – Berry Coconut (6g Protein), Vanilla Almon…

4. Veggie and Cheese Bento Box

Servings: 1
Prep Time: 10 minutes
Cook Time: 0 minutes
Total Time: 10 minutes
Calories: 300 per serving
Are you looking for a quick and tasty lunch option? The Veggie and Cheese Bento Box is your answer! This colorful mix of fresh veggies and savory cheese makes lunch fun and satisfying. Each bite delivers a crunchy texture with a creamy twist, perfect for snacking at your desk or on the go. Plus, it’s packed with nutrients to keep your energy up throughout the day!
To make this delightful bento box, gather the following ingredients:
– 1/2 cup baby carrots
– 1/2 cup cherry tomatoes
– 1/2 cup cucumber slices
– 1/2 cup cheese cubes (cheddar or mozzarella)
– 1/4 cup hummus for dipping
Here’s how to put it all together:
1. Arrange the baby carrots, cherry tomatoes, and cucumber slices in a bento box or separate containers.
2. Add the cheese cubes for a tasty protein boost.
3. Include a small container of hummus for dipping.
4. Pack a spoon or fork for easy snacking.
Feel free to switch up the veggies based on what’s in season or add nuts for an extra crunch!
Common Questions:
– How long can I keep this? Aim to enjoy it within 1-2 days for the best flavor.
– Can I add fruit? Yes! Grapes or apple slices make excellent additions.
With this bento box, you’ll have a delicious and healthy lunch ready in no time. Enjoy every bite!
Veggie and Cheese Bento Box
Editor’s Choice

4 Pack Bento Lunch Box Set 3 Compartment Food Storage Containers Wheat S…

50 Pack (100-Piece) 32 oz Meal Prep Containers Reusable with Easy Open L…

HOTOR Insulated Lunch Box for Men & Women – Leak-Proof Cooler Lunch Bag …
5. Lentil Soup in a Jar

Servings: 2
Prep Time: 10 minutes
Cook Time: 30 minutes
Total Time: 40 minutes
Calories: 180 per serving
Imagine opening your lunch box to find a warm jar of lentil soup just waiting to embrace you! This dish is a delightful mix of flavors, packed with protein and fiber to keep you energized all day. Better yet, it’s simple to make in large batches. You can enjoy it fresh or reheat it throughout the week, making lunchtime a breeze.
Here’s how to whip up this comforting meal in no time. Gather these ingredients:
– 1 cup green or brown lentils
– 1 carrot, diced
– 1 celery stalk, diced
– 1 onion, chopped
– 2 cloves garlic, minced
– 4 cups vegetable broth
– Salt and pepper to taste
– Optional: 1 tsp cumin for an extra kick
Now, let’s get cooking! Follow these easy steps:
1. Rinse the lentils under cool water and set them aside.
2. In a pot, heat a splash of olive oil over medium heat. Sauté the onion, carrot, and celery until they soften, about 5 minutes.
3. Add the garlic and cumin, cooking for another minute until fragrant.
4. Pour in the vegetable broth and stir in the lentils. Bring everything to a rolling boil, then reduce the heat. Let it simmer for 25-30 minutes, or until the lentils are tender.
5. Season with salt and pepper. Allow the soup to cool before transferring it into jars.
Finish with a sprinkle of fresh herbs for a pop of flavor!
Now, here are answers to some common questions:
– Can I freeze this? Yes! It freezes beautifully for up to a month.
– How can I make it spicier? Simply add red pepper flakes while cooking.
With this lentil soup, you’ve got a tasty, filling lunch that warms your soul and fits perfectly into your busy lifestyle. Enjoy!
Lentil Soup in a Jar
Editor’s Choice

HOMBERKING 10 Pack Borosilicate Glass Meal Prep Containers with Locking …

Hydro Flask Food Jar – Insulated Stainless Steel, Snack Travel Container…

Pride Of India – Indian Bean & Lentil Superfood – Five Delicious Panchra…
6. Spinach and Feta Stuffed Pita

Servings: 2 Prep Time: 5 minutes
Cook Time: 15 minutes
Total Time: 20 minutes
Calories: 250 per serving
Are you looking for a quick, nutritious lunch option? Spinach and feta stuffed pitas are your answer! These pocket-sized delights pack a punch of flavor while keeping things healthy. With fresh spinach and the zesty taste of feta cheese, you’ll enjoy every bite. Plus, they’re easy to prepare, making them perfect for busy adults on the go.
Imagine biting into a warm, crispy pita filled with creamy yogurt and fresh greens. It’s a delightful mix that satisfies your hunger without weighing you down. You can even eat them cold, so they’re great for packing in your lunch box.
Here’s how to make these tasty pitas:
Ingredients:
– 2 whole wheat pitas
– 2 cups fresh spinach, chopped
– 1/2 cup feta cheese, crumbled
– 1/4 cup Greek yogurt
– Salt and pepper to taste
Instructions:
1. Preheat your oven to 375°F (190°C).
2. In a mixing bowl, combine the chopped spinach, feta cheese, Greek yogurt, salt, and pepper. Stir well until mixed.
3. Carefully cut the pitas in half to create pockets.
4. Stuff each pita pocket with the spinach mixture.
5. Arrange the stuffed pitas on a baking tray. Bake for 10-15 minutes or until they’re warm and the edges are slightly crispy.
6. Let them cool for a minute before packing them away.
These pitas are not just tasty; they are also versatile! You can easily switch up the filling. Want to add a twist? Try sun-dried tomatoes or olives for a burst of flavor.
Frequently Asked Questions:
– Can I use other fillings? Yes! Feel free to experiment with different ingredients.
– How long do they keep? These are best enjoyed within 2-3 days for optimal freshness.
Get ready to impress your taste buds with this simple yet delicious lunch idea!
Spinach and Feta Stuffed Pita
Editor’s Choice

Bento Box for Kids and Adults – Reusable Lunch Box Meal Prep Containers …

DUPASU Electric Lunch Box Food Warmer: 100W Heated Lunch Box for Adults,…
7. Cauliflower Rice Stir-Fry

Looking for a quick, delicious lunch that won’t weigh you down? Try this Cauliflower Rice Stir-Fry! It’s a fantastic low-carb option packed with colorful veggies and flavors. Plus, it’s super easy to customize. Whether you want to toss in shrimp, chicken, or even tofu, this recipe helps you clean out your fridge while keeping your meal exciting.
Prep time is just 10 minutes, and cooking takes only 15. In less than half an hour, you’ll have a tasty meal ready to go. Each serving is around 180 calories, making it light yet filling. Here’s how to whip it up:
Ingredients:
– 1 head of cauliflower, grated into rice-sized pieces
– 2 cups mixed vegetables (like carrots, peas, and bell peppers)
– 2 eggs (optional)
– 2 tablespoons soy sauce
– 1 tablespoon sesame oil
– 2 green onions, chopped
– Salt and pepper to taste
Instructions:
1. Heat the sesame oil in a large skillet over medium heat.
2. Add the mixed vegetables and sauté for about 5 minutes until they soften.
3. Push the veggies to one side of the skillet. Crack the eggs on the other side and scramble them until cooked.
4. Stir in the cauliflower rice, soy sauce, and green onions. Cook for another 5-7 minutes until the cauliflower is tender.
5. Season with salt and pepper to taste, and serve warm.
Feel free to add shrimp or chicken for an extra protein boost!
Frequently Asked Questions:
– Can I make this vegan? Yes! Just skip the eggs and use tofu instead.
– How do I store leftovers? Place them in an airtight container in the fridge for up to 3 days.
This cauliflower rice stir-fry is not just a meal; it’s a canvas for your creativity. Enjoy a tasty lunch that fits perfectly in your lunch box and satisfies your cravings!
Cauliflower Rice Stir-Fry
Editor’s Choice
Bento Box for Kids and Adults – Reusable Lunch Box Meal Prep Containers …

Fullstar The Original Pro Chopper – Vegetable Chopper and Spiralizer, Fo…
8. Caprese Salad Skewers

Servings: 4
Prep Time: 10 minutes
Cook Time: 0 minutes
Total Time: 10 minutes
Calories: 150 per serving
Looking for a quick and tasty lunch that stands out? Try these Caprese salad skewers! They combine the freshness of mozzarella, the sweetness of cherry tomatoes, and aromatic basil. Not only do they taste great, but they also look stunning on a plate. Perfect for your lunchbox, these skewers require zero cooking and just a few minutes to assemble!
You can easily prepare them the night before. Store them in the fridge and grab them when you’re ready to head out. Plus, they’re a hit at picnics or work lunches.
Here’s how to make them:
Ingredients:
– 1 pint cherry tomatoes
– 8 oz fresh mozzarella balls
– Fresh basil leaves
– Balsamic glaze (for drizzling)
– Salt and pepper to taste
– Skewers or toothpicks
Instructions:
1. Thread a cherry tomato onto each skewer, followed by a basil leaf and a mozzarella ball.
2. Repeat these layers until your ingredients are used up.
3. Drizzle with balsamic glaze and season with salt and pepper before serving.
These skewers are best enjoyed fresh but can sit in the fridge for up to a day.
Frequently Asked Questions:
– How long do they last? They taste best fresh but can be kept for a day.
– Can I use pesto instead of balsamic glaze? Yes! Pesto gives them a delightful twist.
These Caprese skewers not only satisfy your taste buds but also make your meal prep effortless!
Caprese Salad Skewers
Editor’s Choice

Bentgo Easyboxes – Original Stackable Lunch Boxes – Reusable 3-Compartme…

HOPELF 12″ Natural Bamboo Skewers for BBQ,Appetiser,Fruit,Cocktail,Kabob…

Filippo Berio Glaze with Balsamic Vinegar of Modena, 8.4 Ounce Plastic B…
9. Sweet Potato and Black Bean Bowl

Servings: 2
Prep Time: 15 minutes
Cook Time: 30 minutes
Total Time: 45 minutes
Calories: 400 per serving
Looking for a nutritious and satisfying lunch that packs a punch? Try this Sweet Potato and Black Bean Bowl! With its delicious blend of roasted sweet potatoes and protein-rich black beans, this bowl is not only filling but also loaded with essential nutrients. Drizzled with a fresh lime dressing, it brings a zesty kick that will keep your taste buds happy. Plus, it’s super easy to make ahead, making your lunch prep a breeze.
Here’s how to whip up this delightful dish:
Ingredients:
– 2 medium sweet potatoes, cubed
– 1 can black beans, drained and rinsed
– 1/4 cup red onion, chopped
– 1/4 cup cilantro, chopped
– Juice of 1 lime
– 2 tbsp olive oil
– Salt and pepper to taste
Instructions:
1. Preheat your oven to 400°F (200°C). Toss the sweet potato cubes with olive oil, salt, and pepper. Spread them out on a baking sheet and roast for about 25-30 minutes until they’re tender and slightly caramelized.
2. While the sweet potatoes are roasting, mix together the black beans, chopped red onion, cilantro, and lime juice in a bowl.
3. Once the sweet potatoes are cool, combine them with the bean mixture and gently toss everything together.
4. Serve your bowl warm or cold, and for an extra treat, top it with creamy avocado slices. This adds a delicious richness that complements the dish perfectly!
Frequently Asked Questions:
– Can I use frozen sweet potatoes? Yes! Just remember to adjust the cooking time.
– How long will leftovers keep? They’re good for about 3-4 days in the fridge.
Now you have a colorful and tasty meal that feels good to eat and is easy to prepare. Enjoy your Sweet Potato and Black Bean Bowl for lunch, and feel great about your healthy choice!
Fun fact: this Sweet Potato and Black Bean Bowl clocks in at about 400 calories per serving—proof that a tasty lunch can power your afternoon. With protein-rich beans and fiber-packed potatoes, it’s one of the top lunch box ideas for adults on a budget.
Sweet Potato and Black Bean Bowl
Editor’s Choice

Bento Box Adult Lunch Box, Containers for Adults Men Women with 4 Compar…

Lemon Squeezer, Stainless Steel Lemon Juicer, Manual Juicer for Lemon Ci…
10. Egg Muffins with Veggies

Servings: 6
Prep Time: 10 minutes
Cook Time: 20 minutes
Total Time: 30 minutes
Calories: 90 per muffin
Looking for a quick, nutritious lunch option? Try these delicious egg muffins! They’re perfect for busy mornings or when you need a grab-and-go meal. Packed with protein and colorful veggies, these muffins are not only healthy but also customizable to fit your taste. You can easily swap in your favorite ingredients or whatever you have on hand. Pinterest is buzzing with variations, so get creative!
Here’s how to make them:
Ingredients:
– 6 large eggs
– 1 cup spinach, chopped
– 1/2 bell pepper, chopped
– 1/4 cup onion, chopped
– Salt and pepper to taste
– Optional: shredded cheese
Instructions:
1. Preheat your oven to 350°F (175°C) and grease a muffin tin.
2. In a mixing bowl, whisk the eggs together. Add salt and pepper for flavor.
3. Stir in the spinach, bell pepper, onion, and cheese if you like.
4. Pour the mixture evenly into each muffin cup.
5. Bake for 15-20 minutes until the muffins are set and golden on top.
6. Let them cool, then store in the fridge for easy access throughout the week.
Want to save some for later? Freeze them! They last for up to a month. Simply reheat in the microwave for 30-60 seconds when you’re ready to eat.
Frequently Asked Questions:
– Add meat: Feel free to toss in cooked sausage or bacon for more flavor.
– Reheat: Microwave until warm, and enjoy a tasty meal that’s ready in seconds!
These egg muffins are a fantastic way to enjoy a healthy meal, no matter how busy your day gets. Enjoy the convenience and deliciousness!
Egg Muffins with Veggies
Editor’s Choice

Amazon Basics Nonstick Round Muffin Baking Pan, 12 Cups, Set of 2, Gray,…
Rubbermaid Brilliance Food Storage Containers BPA Free Airtight Lids Ide…
11. Brown Rice and Veggie Sushi

Servings: 4
Prep Time: 20 minutes
Cook Time: 30 minutes
Total Time: 50 minutes
Calories: 200 per roll
Who says sushi is just for fancy restaurants? You can whip up delicious brown rice and veggie sushi right at home! Not only is this meal healthy, but it’s also a fun, hands-on experience. You’ll impress your friends and family with these vibrant sushi rolls that are as tasty as they are beautiful. Plus, they’re perfect for lunch boxes, making your meal prep a breeze!
Imagine the satisfying crunch of fresh veggies wrapped in soft brown rice, paired with a salty dip of soy sauce. It’s a simple yet delightful dish that you can customize to your liking. Want to spice it up? Try adding cream cheese or smoked salmon for a tasty twist! Now, let’s get to the recipe.
Ingredients:
– 2 cups brown rice, cooked
– 4 sheets nori (seaweed)
– 1 cucumber, julienned
– 1 carrot, julienned
– 1 avocado, sliced
– Soy sauce for dipping
Instructions:
1. Start by laying a bamboo sushi mat on a clean surface.
2. Place a sheet of nori on the mat, shiny side down. Spread a thin layer of cooked brown rice over the nori, leaving about an inch at the top.
3. Lay your julienned cucumber, carrot, and avocado in a line along the bottom edge of the rice.
4. Roll the sushi tightly using the mat, applying gentle pressure. Seal the edge with a little water.
5. Slice the roll into bite-sized pieces and serve with soy sauce.
These sushi rolls are best eaten fresh but can be stored in the fridge for up to two days. They’re a healthy, fun, and easy lunch option that keeps things interesting!
Tips:
– Use white rice if you prefer, but brown rice is a healthier choice.
– Experiment with fillings like bell peppers, spinach, or even your favorite protein.
– Pack them in a lunch box with soy sauce in a small container to keep them fresh.
– Try adding sesame seeds on top for extra crunch!
Now you’re ready to roll! Enjoy making and eating your homemade sushi.
Brown Rice and Veggie Sushi
Editor’s Choice

2 Pack Bamboo Sushi Rolling Mat, Sushi roll maker,Sushi making kit, Bamb…

Raw Organic Nori Sheets 50 qty Pack! – Certified Vegan, Raw, Kosher Sush…
![[8 Pack] Salad Dressing Container To Go, 2.4oz Small Condiment Container...](https://m.media-amazon.com/images/I/61zqhbNRC3L._AC_UL320_.jpg "25 Lunch Box Ideas for Adults That Make Packing Easy 68")
[8 Pack] Salad Dressing Container To Go, 2.4oz Small Condiment Container…
12. Chickpea Salad Sandwich

Servings: 2
Prep Time: 10 minutes
Cook Time: 0 minutes
Total Time: 10 minutes
Calories: 300 per serving
If you’re tired of the same old lunch options, this Chickpea Salad Sandwich is your answer. Packed with flavor and a creamy texture, it’s a delicious twist on the classic tuna or chicken salad. What makes it special? Chickpeas are not only high in protein but also incredibly filling, making this sandwich perfect for your mid-day meal on busy days! Plus, it takes just 10 minutes to whip up. Let’s dive into the details.
Here’s what you’ll need:
– 1 can chickpeas, drained and rinsed
– 1/4 cup Greek yogurt or mayonnaise
– 1 tablespoon Dijon mustard
– 1/4 cup celery, chopped
– 1/4 cup onion, chopped
– Salt and pepper to taste
– 2 slices whole grain bread
Now, let’s make it:
1. Grab a bowl and mash the chickpeas with a fork, leaving some chunks for texture.
2. Mix in the Greek yogurt, Dijon mustard, chopped celery, onion, salt, and pepper until everything is well combined.
3. Spread the chickpea mixture generously onto a slice of whole grain bread.
4. Top with the second slice of bread, slice in half, and enjoy!
Want a little extra heat? Add some hot sauce for that spicy kick!
Common Questions:
– Can I use canned beans? Yes! Any beans will work wonderfully.
– How long does it last? This sandwich stays fresh in the fridge for up to 3 days, making it great for meal prep!
This Chickpea Salad Sandwich is not just easy to make; it’s also a hearty option that will keep you satisfied until dinner. Give it a try for your next lunch box!
Chickpea Salad Sandwich
Editor’s Choice
Bento Box Adult Lunch Box, Containers for Adults Men Women with 4 Compar…

Bentgo Prep – 20-Piece 3-Compartment Reusable Meal Prep Containers with …
13. Zucchini Noodles with Pesto

Servings: 2
Prep Time: 10 minutes
Cook Time: 5 minutes
Total Time: 15 minutes
Calories: 150 per serving
Are you looking for a quick and light lunch that won’t weigh you down? Zucchini noodles, or “zoodles,” are a fantastic option! They’re a fresh twist on traditional pasta and pair beautifully with vibrant pesto. This dish is not only low in carbs but also bursting with flavor, making it perfect for meal prep or a last-minute lunch. Picture a colorful bowl filled with green noodles mingling with bright cherry tomatoes, all brought together by a rich, herbaceous sauce.
Here’s how to whip up this delicious dish in just 15 minutes! You’ll need:
Ingredients:
– 2 medium zucchinis, spiralized
– 1/4 cup pesto
– A handful of cherry tomatoes, halved
– Salt and pepper to taste
Instructions:
1. Start by heating a splash of olive oil in a skillet over medium heat.
2. Toss in the zucchini noodles and sauté for about 2-3 minutes until they soften slightly.
3. Remove the skillet from heat and gently stir in the pesto and cherry tomatoes.
4. Season with salt and pepper to taste. Serve warm, adding extra parmesan if you like!
Want to boost the protein? Toss in some grilled chicken or chickpeas for a heartier meal!
Frequently Asked Questions:
– Can I use store-bought pesto? Absolutely! It’s a great time-saver.
– How do I store leftovers? Keep them in the fridge for up to 2 days, but they’re best enjoyed fresh!
This recipe not only satisfies your hunger but also leaves you feeling light and energized, making it a perfect choice for a busy day. Enjoy your zoodles!
Zucchini Noodles with Pesto
Editor’s Choice

Brieftons 5-Blade Vegetable Spiralizer: Strongest-Heaviest Spiral Slicer…

Filippo Berio Pesto, Organic Classic Basil, 6.7 Ounce Glass Jar, Gluten …
50 Pack (100-Piece) 24 oz Meal Prep Containers Reusable with Lids, Sturd…
14. Oatmeal Energy Bites

Oatmeal energy bites are a fantastic choice for busy adults. When you’re rushing out the door, these little snacks fit perfectly in your lunch box. They’re not only easy to make, but they also provide a nourishing boost. Packed with fiber and healthy fats, they keep you satisfied and energized throughout the day. Imagine biting into a chewy, slightly sweet treat that also fuels your productivity!
Making these bites is a breeze. In just 15 minutes, you can whip up a batch that lasts all week. Plus, you can customize them with your favorite mix-ins. Pinterest is buzzing with ideas, so feel free to experiment with flavors. You might want to try adding a dash of cinnamon or a handful of nuts for an extra kick!
Here’s how to make your own oatmeal energy bites:
Ingredients:
– 1 cup rolled oats
– 1/2 cup nut butter (like peanut, almond, or sunflower)
– 1/3 cup honey or maple syrup
– 1/4 cup chocolate chips or dried fruit
– 1/4 cup chia seeds or flaxseeds
Instructions:
1. In a mixing bowl, combine all the ingredients until everything is well mixed.
2. Roll the mixture into bite-sized balls, about 1 inch in diameter.
3. Place the balls on a baking sheet and chill in the refrigerator for 30 minutes to firm up.
4. Store the bites in an airtight container in the fridge.
These energy bites are perfect for any time you need a quick snack. They can last up to one week in the fridge, or you can freeze them for up to three months. Just grab a few before heading out, and you’re good to go!
Tips:
– Use natural sweeteners like honey or maple syrup.
– Choose your favorite nut butter for flavor.
– Add spices like cinnamon or nutmeg for a twist.
– Mix in seeds or nuts for extra crunch.
With these oatmeal energy bites, you’ll have a delicious, healthy snack ready whenever hunger strikes!
Oatmeal Energy Bites
Editor’s Choice
50 Pack (100-Piece) 24 oz Meal Prep Containers Reusable with Lids, Sturd…

MaraNatha No Stir No Sugar or Salt Added Crunchy Almond Butter, 12oz (Pa…
15. Baked Falafel with Tzatziki

Servings: 4 Prep Time: 15 minutes
Cook Time: 25 minutes
Total Time: 40 minutes
Calories: 160 per serving
Looking for a tasty yet healthy lunch option? Try these baked falafel balls! They’re not only packed with protein but also bursting with flavor. Pair them with a cool tzatziki sauce for a refreshing twist. These bites are perfect for meal prep and easy to pack in your lunch box!
Here’s what you need:
Ingredients:
– 1 can chickpeas, drained and rinsed
– 1/4 cup fresh parsley, finely chopped
– 1/4 cup onion, finely chopped
– 2 cloves garlic, minced
– 1 tsp cumin
– Salt and pepper to taste
– 1/4 cup flour
For the Tzatziki:
– 1 cup Greek yogurt
– 1/2 cucumber, grated
– 1 clove garlic, minced
– Juice of 1 lemon
– Salt to taste
Instructions:
1. Preheat your oven to 375°F (190°C).
2. In a food processor, combine the chickpeas, parsley, onion, garlic, cumin, salt, and pepper. Blend until smooth.
3. Shape the mixture into small balls and place them on a baking sheet.
4. Bake for 25 minutes, or until they turn golden brown.
5. While the falafel bakes, mix the yogurt, grated cucumber, garlic, lemon juice, and salt in a bowl for the tzatziki.
6. Serve your baked falafel with the tzatziki on the side or in a warm pita for a delightful wrap!
Frequently Asked Questions:
– Can I use dried chickpeas? Yes, just be sure to soak them overnight before using.
– How long do leftovers last? Store them in the fridge for up to 3 days.
These baked falafels are not only a healthy choice but also a fun, flavorful option for your lunch routine. Enjoy them as a snack, main dish, or even a tasty wrap!
Baked Falafel with Tzatziki
Editor’s Choice

Hamilton Beach Food Processor & Vegetable Chopper for Slicing, Shredding…
50 Pack (100-Piece) 32 oz Meal Prep Containers Reusable with Lids 3-Comp…

GoodCook Everyday Nonstick Carbon Steel Baking Sheet Set, 3 Pack – Small…
16. Whole Wheat Pasta Salad

Prep Time: 15 minutes
Cook Time: 10 minutes
Total Time: 25 minutes
Calories: 300 per serving
Looking for a lunch that’s both tasty and nutritious? Whole wheat pasta salad is your answer! This dish combines colorful veggies and a light dressing, making it a delightful pick-me-up for your midday meal. It’s filling enough to keep you satisfied without weighing you down.
Imagine digging into a bowl of perfectly cooked whole wheat pasta, tossed with crispy bell peppers, juicy cherry tomatoes, and tangy olives. Each bite brings a burst of flavor, and with just a drizzle of Italian dressing, you have a refreshing meal ready to go. Plus, it’s a breeze to make!
Here’s how to whip it up:
Ingredients:
– 2 cups whole wheat pasta, cooked
– 1 cup cherry tomatoes, halved
– 1/2 bell pepper, diced
– 1/4 cup red onion, chopped
– 1/4 cup olives, sliced
– 1/4 cup Italian dressing
Instructions:
1. In a large bowl, mix the cooked pasta, cherry tomatoes, bell pepper, red onion, and olives.
2. Drizzle the Italian dressing over the salad. Toss everything together until evenly coated.
3. For the best flavor, refrigerate for at least 30 minutes. This allows the ingredients to mingle and enhance each other’s tastes.
Want to boost the protein? Add grilled chicken or chickpeas for a heartier meal!
Frequently Asked Questions:
– Can I use other dressings? Absolutely! Feel free to experiment with your favorites.
– How long will it last? Store it in the fridge for up to 3 days for the freshest taste.
This whole wheat pasta salad not only meets your nutritional needs, but it also fits perfectly into a busy lifestyle. It’s a meal you can prep quickly and enjoy throughout the week, making lunchtime a joy, not a chore.
Whole Wheat Pasta Salad
Editor’s Choice
50 Pack (100-Piece) 24 oz Meal Prep Containers Reusable with Lids, Sturd…

365 by Whole Foods Market, Organic Whole Wheat Penne Rigate, 16 Ounce

17. Roasted Vegetable Quinoa Bowl

If you’re looking for a quick, nutritious lunch, try this Roasted Vegetable Quinoa Bowl. It’s a colorful dish packed with flavor and nutrition. You’ll love the combination of roasted veggies and fluffy quinoa. Plus, it’s a feast for the eyes! This bowl not only satisfies your hunger but also brightens your day with its vibrant hues. Perfect for meal prep, you can easily whip it up on a Sunday and enjoy it throughout the week.
Let’s get started on creating this delicious meal. Here’s what you’ll need:
Ingredients:
– 1 cup quinoa, rinsed
– 2 cups assorted vegetables (zucchini, bell peppers, carrots are great choices)
– 2 tablespoons olive oil
– Salt and pepper to taste
– Optional: tahini or your favorite dressing
Instructions:
1. Preheat your oven to 400°F (200°C).
2. Toss the assorted vegetables with olive oil, salt, and pepper, then spread them on a baking sheet. Roast for about 25 minutes until they’re tender and slightly caramelized.
3. While the veggies are roasting, prepare the quinoa according to package instructions.
4. Once everything is cooked, combine the quinoa and roasted vegetables in a bowl. Drizzle with tahini or your dressing of choice for extra flavor.
Feel free to switch up the vegetables according to the season for the best taste!
You might wonder if frozen veggies work. They do! Just adjust the roasting time a bit. This bowl keeps well in the fridge for up to four days, making it perfect for your busy week.
Here are some tips to make it even better:
– Use seasonal vegetables for fresher flavors.
– Choose organic quinoa for added nutrition.
– Add nuts or seeds for a crunchy texture.
– Top with avocado for a creamy finish.
This Roasted Vegetable Quinoa Bowl isn’t just a meal; it’s a canvas for your creativity. Enjoy making it your own!
Roasted Vegetable Quinoa Bowl
Editor’s Choice
50 Pack (100-Piece) 32 oz Meal Prep Containers Reusable with Lids 3-Comp…

Viva Naturals Organic Quinoa, 4 lb – Pre-Washed Whole Grain, Plant Prote…
18. Fruit and Nut Snack Box

Craving a quick and healthy snack? This Fruit and Nut Snack Box is your go-to solution. It’s packed with sweetness and crunch, making it a delightful treat for those afternoon slumps. Imagine biting into crisp apple slices, juicy grapes, and crunchy nuts. It’s a simple way to satisfy your hunger without guilt.
You can whip this up in just five minutes! Perfect for busy days, this snack box is both nutritious and delicious. Plus, you can easily customize it with whatever fruits are in season. As seen on popular meal prep blogs, this option is trending among health enthusiasts.
Here’s how to make your own Fruit and Nut Snack Box:
Ingredients:
– 1 apple, sliced
– 1/2 cup grapes
– 1/4 cup almonds or walnuts
– 1/4 cup dried cranberries or apricots
Instructions:
1. Start by slicing the apple and gathering your grapes.
2. In a portable container, layer the sliced apple, grapes, nuts, and dried fruits.
3. Seal the container and grab it whenever you need a snack!
Feel free to mix and match fruits based on what you love or what’s available.
Tips for Your Snack Box:
– Add cheese cubes for a savory twist.
– Choose seasonal fruits for the best taste and price.
– Mix different nuts for a variety of flavors and textures.
– Pack extra dried fruits for a sweeter treat.
Keep your snack box in the fridge for up to one day. It’s best enjoyed fresh, but you can still have it later. This portable snack is not just nutritious; it’s also a mood booster, making your break feel special. Enjoy every bite!
Fruit and Nut Snack Box
Editor’s Choice

Reusable Snack Containers with Lids 20Pcs,New Snack Containers,Snackle B…

PLANTERS Deluxe Mixed Nuts, Cashews, Almonds, Pecans, Pistachios, Hazeln…

Mavuno Harvest Organic Dried Fruit Variety Pack | Dried Mango, Papaya, P…
19. Savory Oatmeal Bowl

Servings: 1
Prep Time: 5 minutes
Cook Time: 5 minutes
Total Time: 10 minutes
Calories: 250 per serving
Are you tired of the same old lunch routine? Consider trying a savory oatmeal bowl. This dish is warm, filling, and often overlooked for lunch. With a delightful mix of sautéed veggies, creamy avocado, or even a poached egg, you can easily turn breakfast oats into a satisfying midday meal. It’s a comfort food you can customize to your taste! Plus, it’s a great way to sneak more nutrients into your day. Let’s dive into how to make this delicious bowl.
Ingredients:
– 1 cup rolled oats
– 2 cups vegetable broth
– 1/2 cup fresh spinach
– 1/2 avocado, sliced
– Salt and pepper to taste
Instructions:
1. Start by bringing the vegetable broth to a boil in a pot.
2. Add the rolled oats and cook them according to package instructions.
3. Once the oats are nearly done, stir in the spinach until it wilts.
4. Serve your oatmeal hot, topped with sliced avocado. Season with salt and pepper to your liking.
Need a little extra flavor? Add a splash of hot sauce or a sprinkle of your favorite seasoning for a kick!
Frequently Asked Questions:
– Can I make it sweeter? Yes! If you prefer a sweet twist, drizzle some maple syrup over the top.
– How do I store leftovers? You can keep leftovers in the fridge for 1-2 days. However, it tastes best fresh!
This savory oatmeal bowl is not just easy to prepare; it’s also a nourishing choice that can keep you energized throughout the day. Enjoy experimenting with different toppings and flavors!
Savory Oatmeal Bowl
Editor’s Choice
Bentgo Easyboxes – Original Stackable Lunch Boxes – Reusable 3-Compartme…

Pacific Foods Organic Vegetable Broth, Plant Based, 32 oz Carton

Amazon Grocery, Quick Cook Oats, 18 Oz (Previously Happy Belly, Packagin…
20. Grilled Chicken Salad

Servings: 2
Prep Time: 10 minutes
Cook Time: 15 minutes
Total Time: 25 minutes
Calories: 300 per serving
Looking for a delicious and healthy lunch that you can whip up in no time? Grilled chicken salad might just be your answer! This dish combines succulent grilled chicken with a crisp mix of greens and colorful veggies. Each bite offers a satisfying crunch and a burst of freshness that’s hard to resist. Plus, it’s so easy to make that you’ll want to pack it every week!
Let’s break down how to create this fantastic salad. First, gather your ingredients. You’ll need:
– 2 chicken breasts
– 4 cups mixed greens
– 1/2 cup cucumber, sliced
– 1/2 cup cherry tomatoes, halved
– 1/4 cup red onion, thinly sliced
– Olive oil and vinegar for dressing
Now, let’s get cooking!
1. Start by grilling the chicken breasts over medium heat. Cook them for about 6-7 minutes on each side until they are fully cooked. They should be juicy and tender!
2. Once done, slice the chicken and set it aside to cool slightly.
3. In a large bowl, combine the mixed greens, cucumber, cherry tomatoes, and red onion. Toss them together for a colorful base.
4. Finally, add the grilled chicken on top and drizzle with olive oil and vinegar to taste.
Feel free to get creative! You can add nuts for crunch or sprinkle some cheese for extra flavor. This salad is not just tasty; it’s also packed with protein and nutrients, making it perfect for a midday energy boost.
Frequently Asked Questions:
– Can I use leftover chicken? Yes, shredded rotisserie chicken works just as well!
– How long will it last in the fridge? This salad keeps fresh for up to 2 days, so you can prep it ahead of time.
Grilled Chicken Salad
Editor’s Choice
Bento Box Adult Lunch Box, Containers for Adults Men Women with 4 Compar…

OXO Good Grips Little Salad Dressing Shaker – Black, Small
21. Spicy Tuna Rice Bowl

Looking for a lunch that packs a punch? Try the Spicy Tuna Rice Bowl! This dish is quick, flavorful, and satisfying. With sushi-grade tuna, zesty mayo, and crunchy veggies, you’ll hit all the right notes for your midday meal. It’s perfect for those days when you crave something exciting yet easy to prepare.
Imagine sitting down to a bowl filled with fluffy sushi rice topped with spicy tuna, creamy avocado, and crisp cucumber. Your taste buds will dance with joy! This bowl not only offers delicious flavors but also provides a balanced meal option. Plus, it takes just 20 minutes from start to finish, giving you more time to enjoy your lunch.
Ready to whip it up? Here’s what you’ll need:
Ingredients:
– 1 cup sushi rice, cooked
– 1 can tuna, drained
– 1 tbsp mayo
– 1 tbsp sriracha
– 1/2 avocado, sliced
– 1/2 cucumber, sliced
Instructions:
1. In a bowl, mix the drained tuna with mayo and sriracha until well combined.
2. Place the sushi rice in a bowl as your base.
3. Spoon the spicy tuna mixture over the rice.
4. Garnish with the sliced avocado and cucumber for a fresh crunch.
For an extra burst of flavor, consider adding seaweed salad on the side. It complements the dish beautifully!
Frequently Asked Questions:
– Can I use a different type of tuna? Yes, but sushi-grade is best for raw dishes.
– How long can I store this? It’s best enjoyed fresh but can last in the fridge for one day.
This Spicy Tuna Rice Bowl not only satisfies your hunger but also keeps things interesting at lunchtime. Enjoy!
Spicy Tuna Rice Bowl proves lunch box ideas for adults can be fast, bold, and budget-friendly. Toss sushi-grade tuna with zesty mayo over fluffy rice, add crunchy veggies, and you’ve got a satisfying midday meal in minutes. Pack it up and savor a vibrant, easy-to-make lunch that actually sticks.
Spicy Tuna Rice Bowl
Editor’s Choice


TABASCO Brand Sriracha Sauce, Medium Hot Sauce, Easy-to-Squeeze Bottle, …
50 Pack (100-Piece) 32 oz Meal Prep Containers Reusable with Lids 3-Comp…
22. Vegetable Frittata

Servings: 4
Prep Time: 10 minutes
Cook Time: 20 minutes
Total Time: 30 minutes
Calories: 150 per serving
Imagine biting into a warm, fluffy vegetable frittata, packed with your favorite veggies. This dish is not just for breakfast; it’s a fantastic, protein-rich option for lunch too. You can enjoy it hot, right out of the oven, or cold, straight from your lunch box. It’s easy to make and super versatile, allowing you to customize it with whatever vegetables you have on hand. Let’s dive into the details!
Ingredients:
– 6 large eggs
– 1 cup spinach, chopped
– 1/2 bell pepper, diced
– 1/2 onion, chopped
– Salt and pepper to taste
Instructions:
1. Preheat your oven to 350°F (175°C). This step ensures your frittata cooks evenly.
2. In a large bowl, whisk together the eggs. Add salt and pepper to taste. This is your base.
3. Stir in the chopped spinach, diced bell pepper, and onion. Mix until everything is well combined.
4. Pour the mixture into a greased oven-safe skillet. Bake for 15-20 minutes, or until the center is set and the edges are slightly golden.
5. Once done, let it cool for a few minutes. Slice into wedges, and it’s ready to serve!
Pair it with your favorite salsa for an extra kick! This frittata is a great make-ahead meal. Store any leftovers in the fridge, and they’ll stay fresh for up to four days. Enjoy this delightful dish that makes packing your lunch a breeze!
Frequently Asked Questions:
– Can I add cheese? Yes, adding feta or cheddar can elevate the flavor!
– How do I store leftovers? Keep them in an airtight container in the fridge for up to 4 days for the best taste.
Vegetable Frittata
Editor’s Choice
50 Pack (100-Piece) 32 oz Meal Prep Containers Reusable with Lids 3-Comp…

Amazon Basics Silicone Rectangular Baking Mat, Non-Stick Reusable Oven B…
Fullstar The Original Pro Chopper – Vegetable Chopper and Spiralizer, Fo…
23. Peanut Butter Banana Roll-Ups

Servings: 2
Prep Time: 5 minutes
Cook Time: 0 minutes
Total Time: 5 minutes
Calories: 200 per serving
Craving a quick and tasty snack for your lunch box? Look no further than peanut butter banana roll-ups! These delicious bites are not only easy to make but also packed with nutrition. The sweetness of ripe bananas combines perfectly with creamy peanut butter, making this treat both satisfying and energizing. You can whip them up in just five minutes, making them perfect for busy mornings or a last-minute lunch. Plus, they’re portable, so you can take them anywhere!
Ingredients:
– 2 whole wheat tortillas
– 2 tbsp peanut butter
– 1 banana, sliced
– Honey for drizzling (optional)
Instructions:
1. Start by spreading peanut butter evenly over each tortilla. Make sure to cover every corner!
2. Next, lay the banana slices on top of the peanut butter. If you like a little extra sweetness, drizzle some honey over the bananas.
3. Now, roll each tortilla tightly from one end to the other. This keeps everything snug and prevents any spills.
4. Finally, slice your roll-ups into pinwheels for a fun presentation. Place them in an airtight container, and they’re ready to go!
Feel free to switch things up! Try almond butter for a nutty twist or add a sprinkle of cinnamon for extra flavor. These roll-ups are best enjoyed fresh but can be stored in the fridge for a day if you need to prepare them ahead of time.
Common Questions:
– Can I use any nut butter? Absolutely! Almond butter or cashew butter works well too.
– How long do they last? They are best eaten fresh but can last a day in the fridge.
With these peanut butter banana roll-ups, you’ll have a simple and nutritious option that keeps your lunch exciting and flavorful. Enjoy your snack time!
These peanut butter banana roll-ups prove that smart lunch box ideas for adults can be simple, tasty, and budget-friendly. Prep takes 5 minutes, travels well, and keeps your afternoon cravings at bay.
Peanut Butter Banana Roll-Ups
Editor’s Choice
Mission 10 Inch Carb Balance Whole Wheat Tortillas LARGE Burrito 8 ct 20…

SKIPPY Natural Creamy Peanut Butter Spread Twin Pack 2-Pack, 5 LB
50 Pack (100-Piece) 32 oz Meal Prep Containers Reusable with Lids 3-Comp…
24. Pesto Chicken and Veggies

Imagine opening your lunch box to a delicious aroma of pesto chicken and colorful veggies. This meal is not just tasty; it’s a complete package of nutrition and flavor. It’s a perfect solution for busy days when you want something healthy yet satisfying. Plus, it’s a breeze to make in advance, making your meal prep a hassle-free experience.
Let’s dive into this simple recipe that serves four and takes only 45 minutes from start to finish. It’s loaded with protein and vitamins, keeping you energized throughout the day.
Ingredients:
– 2 chicken breasts
– 1 cup broccoli florets
– 1 cup bell peppers, cut into strips
– 1/2 cup pesto
– Salt and pepper to taste
Instructions:
1. Preheat your oven to 400°F (200°C).
2. Place the chicken breasts on a baking sheet. Spread the pesto generously over the top.
3. Arrange the broccoli and bell peppers around the chicken.
4. Season everything with salt and pepper. Roast in the oven for 25-30 minutes, or until the chicken is cooked through.
5. Allow it to cool before portioning into meal containers.
You can serve this dish over brown rice for a complete meal, adding more fiber and making it even more filling.
Frequently Asked Questions:
– Can I use other proteins? Absolutely! Turkey or salmon would work beautifully.
– How long will it last? This meal stays fresh in the fridge for up to 4 days.
Try this pesto chicken and veggies to break the monotony of your lunch routine. It’s a meal that keeps giving—flavor, nutrition, and the joy of easy preparation!
Pesto Chicken and Veggies
Editor’s Choice

Airtight Food Storage Containers with Lids, 24 PCS Kitchen and Pantry Or…
Filippo Berio Pesto, Organic Classic Basil, 6.7 Ounce Glass Jar, Gluten …
25. Apple Almond Butter Sandwich

Servings: 1
Prep Time: 5 minutes
Cook Time: 0 minutes
Total Time: 5 minutes
Calories: 300 per serving
Looking for a quick yet delicious lunch? The Apple Almond Butter Sandwich is a perfect choice. It combines crisp apple slices with creamy almond butter, delivering a satisfying crunch and a burst of flavor. This sandwich is not just easy to make; it’s also a fantastic way to enjoy a healthy, protein-packed meal on the go. Plus, it’s visually appealing, making your lunch box stand out!
Here’s how to whip one up:
Ingredients:
– 1 apple (your favorite variety)
– 2 tablespoons almond butter
– 2 slices whole grain bread
Instructions:
1. Start by spreading almond butter evenly on one side of each slice of bread.
2. Next, layer your apple slices on one slice of bread, making sure to cover it well.
3. Place the second slice on top, almond butter side down.
4. Cut the sandwich in half for easier eating on your lunch break.
Want to jazz it up? Drizzle honey over the apple slices for sweetness or sprinkle some cinnamon for a warm flavor twist!
Frequently Asked Questions:
– Can I use peanut butter instead? Absolutely! Peanut butter adds a different flavor but works beautifully.
– How long does it last? For the best taste, enjoy it fresh. However, if you need to prep ahead, it can stay in the fridge for one day.
This sandwich is not just a meal; it’s a delightful treat that makes lunchtime a little brighter. So, pack it for work or enjoy it at home. You’ll love its simplicity and taste!
Apple Almond Butter Sandwich
Editor’s Choice
Bentgo Easyboxes – Original Stackable Lunch Boxes – Reusable 3-Compartme…

365 by Whole Foods Market, Organic Creamy Almond Butter, 16 Ounce (Pack …

Dave’s Killer Bread 21 Whole Grains & Seeds Thin-Sliced, Whole Grain Org…
Conclusion

With these 25 lunch box ideas for adults, you’ll never have to settle for boring lunches again! Whether you’re meal prepping for the week or looking for quick, healthy options, there’s something for everyone on this list.
Embrace the variety and flavors that these recipes bring, and feel free to mix and match them as you please. Healthy lunch options can be delicious, fun, and budget-friendly, so get ready to spice up your midday meals!
Note: We aim to provide accurate product links, but some may occasionally expire or become unavailable. If this happens, please search directly on Amazon for the product or a suitable alternative.
This post contains Amazon affiliate links, meaning I may earn a small commission if you purchase through my links, at no extra cost to you.
Frequently Asked Questions
What Are Some Healthy Lunch Box Ideas for Adults on a Budget?
Eating healthy doesn’t have to break the bank! Some great lunch box ideas for adults on a budget include homemade wraps with veggies and lean protein, quinoa salads, or even DIY grain bowls.
Utilizing seasonal produce and bulk grains can help keep costs low while ensuring you have nutritious options. Don’t forget to mix in some portable snacks like nuts or yogurt to keep your energy up throughout the day!
How Can I Make Meal Prep Easier for Lunch Boxes?
Making meal prep easier is all about planning and organization! Start by choosing a day of the week to batch cook your meals. Prepare large quantities of staples like grains or proteins and store them in portioned containers.
Invest in good quality containers that are easy to stack and transport. This way, you can quickly assemble your easy lunch recipes in just a few minutes on busy mornings!
What Are Some Easy Lunch Recipes for the Office?
For the office, you want easy lunch recipes that are both tasty and mess-free! Think about salads in a jar, where you layer your ingredients to keep them fresh until lunchtime. Another idea is grain bowls topped with roasted veggies and a protein like chicken or chickpeas.
These meals can be made in advance and are perfect for a quick grab-and-go option, keeping your workday efficient and healthy!
Can You Suggest Some Healthy Portable Snacks for Lunch Boxes?
Absolutely! Healthy portable snacks can make your lunch box more exciting. Great options include homemade energy balls, sliced fruits like apples or pears with nut butter, or even veggie sticks with hummus.
These snacks are not only easy to pack but also help keep your energy levels up, making it easier to stay focused during your day!
How Do I Keep My Lunch Box Meals Fresh Throughout the Day?
Keeping your lunch box meals fresh is key to enjoying them! Use insulated containers for items that need to stay warm or cold. Adding ice packs can also help keep things chilled, especially for salads or yogurt.
Make sure to pack items that won’t spoil quickly, and consider dressing salads separately until you’re ready to eat to avoid sogginess. This way, your healthy lunch options will be as delicious at lunchtime as they were when you packed them!
Related Topics
lunch box ideas
healthy lunch options
meal prep
easy lunch recipes
portable snacks
office lunch
budget meals
quick prep
adult lunches
nutritious meals
on-the-go food
meal planning